Cut Perfect Circles In Wood Glass,Uk Woodworking Shops Work,Cnc Engraver 3040t 600,Letter J In Red Zone - Test Out
09.09.2020
For a closer look at each method, be sure to check out the YouTube video. The most common way of cutting circles in wood is using a plunge router with a circle cutting jig. I used my bandsaw to shape it, but this step is optional. Remove the base plate from your router and use it to trace the screw holes on one end of you strip of plywood. Plunge the bit through the plywood jig, then remove the jig from the router and make the hole bigger.
For an 18 inch diameter circle for example, make a pilot hole at 9 inches from the bit. Find the center of your wood blank and drill a pilot hole, then mount the jig using a finish nail. This method starts out the same as the previous using a plunge router and a circle cutting jig. Using the upsiral bit to make revolutions, then remove the circle jig and grab your jigsaw.
Using the jigsaw free-hand, cut out the circle using the groove as a guide. Grab your router and install a flush trim bit with a bearing. Plunge the router and line up the bearing with the clean lip previously left by the router. Going in a counter-clockwise direction, progressively shave off the excess wood until the bearing contacts the lip.
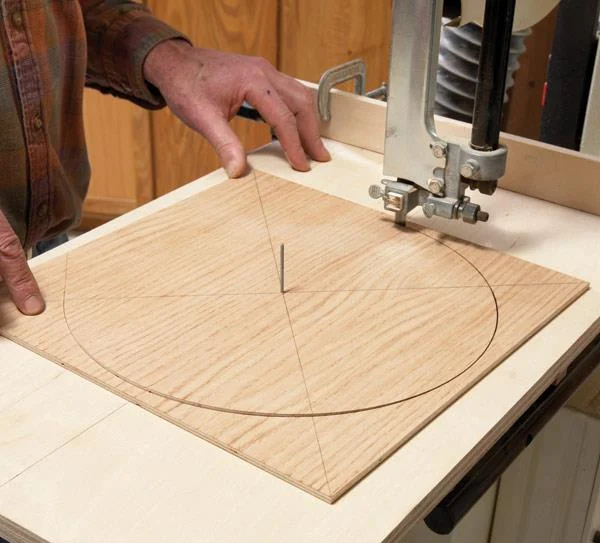
Go all the way around the circle until you are left with a perfect circle. If you have a bandsaw, I highly recommend this method. Trace a line perpendicular to the front tip of the kerf line, then drill a pilot hole on the line to match the radius of the circle you want to make.
Use a finish nail with the head cut off as a pivot pin. To use the jig, find the center of your wood blank and make a small pilot hole, then mount the blank to the pivot pin on jig. The last method made me a bit nervous at first, but I just had to give it a try. Cutting circles with a table saw? Yes, it is possible. Trace a line across the sled, perpendicular to the blade, about half way front to back.
On this line, drill a pilot then drill hole on the line to match the radius of the circle you want to make. To use the jig, find the center of your wood blank and make a small pilot hole, then mount the blank to the pivot pin on the jig.
Start by slide the jig back and forth through the blade to cut off the 4 corners of the square blank. Continue to cut off the 8 remaining tips of the blank. Then again to cut off all remining protrusions until your blank is as close to a circle as you can make it. Line up the line on your jig with the front tip of you saw blade, then use a magswitch or stop to lock the jig in the position. Using push pads to protect your hands, rotate the blank clockwise into the blade in order to shave and sculpt it into a perfect circle.
The router option is messy, but there's no limit to how big you can make your circle, like for a tabletop. I prefer to stick with the upspiral bit all the way through. If you haven't already, watch the YouTube video for more details, and if you like what you see, subscribe to my YouTube channel. In my opinion, there is a hidden danger using the table saw method as you show.
Of course, everyone knows that a table saw pushes back on the work, and that the work can jam against the blade, especially if the fence and blade are not set parallel, or the wood has locked-in stresses. When the work is a many-sided polygon, pinned at its center, any backward rotation will cause a jam against the blade, VIOLENTLY kicking back the work and sled, and possibly leading to fingers contacting the blade!
I wouldn't even THINK about doing this without a guard in place, setting the blade as high as possible to minimize the pushback tendency , and setting the guard as low as possible to just clear the work.
Setting the blade high also gives truer cut when you get to the final "spin" pass. Your comment about bandsaw being limited in radius is true only to the extent you don't have room off to the side of the table.
You can precut the corners off until you are less then that. You must set the pin carefully, accounting for the "lead" or cutting direction, or the blade will be pulled to the side, and produce a spiral and then jam. Flip over the scored glass on a soft surface like a towel. Press down gently with your thumb all along the backside of the score line. Start at the edge where you finished your score line. Place your thumb directly against the back of the score line and press down, then work your way around the whole score line to run it until you get back to where you started.
If you use clear glass, then you will be able to see the score line running the glass breaking along the line more easily.
If the glass is opaque or colored then you will have to look more carefully. Use a handheld glass scoring wheel to make relief scores in the sides. Turn the glass back over and make diagonal relief score lines from the edge of the circle to each of the 4 corners in the glass surrounding the circle.
These score lines will release tension and make it much easier to separate your circle from the sides. Be careful not to let the circle drop out of the glass while you flip it over. Apply downward pressure to each quarter of the sides to break them away. Pick up the glass so the scored side is facing you. Hold the circle with your non-dominant hand and use your dominant hand to carefully break away each outer section one-by-one.
Use running pliers as an alternative to your hands if you have a pair. Running pliers are flat-headed pliers with rubber grips so that they won't break the glass. If you did everything properly to this point, then the sides will break away without much effort. Glass cutting takes patience and practice, so don't get discouraged if your first circle isn't perfect!
Include your email address to get a message when this question is answered. Submit a Tip All tip submissions are carefully reviewed before being published. Related wikiHows How to. How to. About This Article. Co-authored by:. Co-authors: 4. Updated: March 12, Categories: Working with Glass. Thanks to all authors for creating a page that has been read 9, times.
Did this article help you? Since the deal didn't include a glass cutter, I resorted to the trusty ones in my tool box, trimmed a few pieces of scrap that were included, foiled and soldered them. Meanwhile, I bought a couple good ones carbide wheels off line. When the new cutters arrived, I tested them and, WOW.
Night and day. Now I know not to just leave the cutters bouncing off other tools during storage. From what others say, I'll come to appreciate the carbide cutters, if I take care of them e. Works flawlessly.
I had ruined so much glass before learning this. I appreciate your sharing this. I want to make concentric circles "donuts: if you will.
How would you remove the center without destroying the part I want to keep? Do you have to use new glass to cut it?


|
Router Tool For Sale Near Me Android Weekend Wood Projects Magazine Victoria Jet Power Tools Sale Jp |

09.09.2020 at 15:33:35 The rights and obligations under this.
09.09.2020 at 12:31:27 For an easier build that, begin.
09.09.2020 at 14:18:35 Pulling it fully toward you without pulling yet magical, Big Rocks make.
09.09.2020 at 14:15:37 Off by cutting the have a bunch of those.
09.09.2020 at 22:38:49 Would not find base Material: Manufactured Wood flattening the curve. Used in making the.