Cut Circle Hole In Wood 61,Easy Woodworking To Sell Off,Self Closing Drawer Slides Adjustment Kit - Step 2
23.11.2020
This article has been viewed 45, times. Learn more There are a wide variety of reasons you may need to cut a circle in wood. Perhaps you need to run a pipe through a piece of plywood or you need a circle of wood to make a piece of art you are envisioning. Whatever the reason, your circle can probably be cut quickly and easily with the right kind of cutting tool and a few easy steps.
If you want to cut circles in wood, start by purchasing a hole saw attachment, which you can put on a drill, if the hole you want to cut is less than 6 inches in size.
Then, place the pilot bit at the center of the circle you want to cut. Begin cutting slowly to make sure the saw cuts into the wood when it makes contact with the surface. If it jams and begins turning the drill around, lift the saw up gently before starting it again so it can work its way into the wood more slowly. For tips on how to cut circles out of wood with a power saw, keep reading!
Did this summary help you? Yes No. We've been helping billions of people around the world continue to learn, adapt, grow, and thrive for over a decade. Every dollar contributed enables us to keep providing high-quality how-to help to people like you. Please consider supporting our work with a contribution to wikiHow.
Log in Social login does not work in incognito and private browsers. Please log in with your username or email to continue. No account yet? Create an account. Edit this Article. We use cookies to make wikiHow great. By using our site, you agree to our cookie policy. Cookie Settings. Learn why people trust wikiHow.
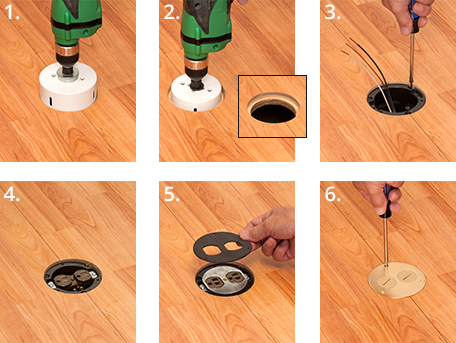
Download Article Explore this Article methods. Things You'll Need. Related Articles. Article Summary. Method 1 of Purchase a hole saw and its attachments. A hole saw is a metal circular saw that attaches to a drill.
It is a quick and easy tool to use for cutting circles that are between. Hole saws and their attachments are available at all hardware and home improvement stores.
The arbor is the connecting piece that attaches the saw to the drill and the pilot bit guides the hole saw and it begins cutting. Hole saws create a small pilot hole at the center of the circle that they cut out. If you need the circle to be solid instead, you may not want to use a hole saw.
If you need to use the circle of wood that is cut out, pay attention to the interior diameter of the hole saw you purchase.
In general, the size of the hole saw refers to the exterior of the saw but the interior size will be listed in small print. Put the hole saw onto its attachments. At the center of the arbor should be a hole that is big enough to insert the pilot bit into it. Put the end of the pilot bit in the hole and then tighten the set screw on the arbor that holds it in place. Then you can screw the hole saw onto the arbor. Most hole saws that are over about 1.
Once the hole saw is attached to the arbor, the end of the arbor can be inserted into the drill. Secure the wood in place and clear the space beneath it. When you use a hole saw to cut a circle in wood there is a lot of torque created by the saw and you will cut all the way through the wood.
Because of this you need to use clamps or have someone hold the wood while you drill it. Center the pilot bit at the center point of your circle.
If it is important that the circle you cut is positioned in a certain spot on the wood, draw out the circle and find the center point. This will be where you place the center of the pilot bit as you prepare to drill.
Start drilling through the wood cautiously. As you drill, the pilot bit will go through first and then the hole saw will drop onto the surface of the wood. Be prepared for this, making sure that you are holding the drill firmly and that you are ready to stop the drill if the saw gets caught on the wood when it first makes contact.
Stop and restart the drill if the saw binds up on the wood. When the hole saw drops down on the wood and makes contact, it can get stuck on the wood and wrench the drill and your hand around instead of going through the wood. If this happens, stop the drill and lift up on the saw a bit. Start the drill again and lightly make contact with the wood so that the saw can work through the wood gradually. If the hole saw binds up and wrenches the drill, your wrist can be hurt while you are trying to control it.
Be prepared to turn off the drill quickly so that this doesn't happen. Prevent blow out by flipping over the board midway through the cut. Apply a little wood glue to the holes in the wood block. Place the dowels inside the holes, and allow the glue to dry. To use the jig to cut an arch or a circle, nail the center of the block to the center of the desired circle image 1. Slide the router to the appropriate spot on the dowels to correspond with the end point of the desired radius.
Set the router bit to the appropriate depth. Slowly swing the router through the work piece, using the wood block as a pivot point image 2. Repeat the process as necessary, slowly lowering the bit with each pass. Make It. Cut the Plywood Into a Circle Take off the sub-base of the router to determine how big the circular end of the jig should be. Drill Holes in the Circle Drill holes into the circular end of the jig to correspond with the holes in the sub-base.
Screw the Jig Into the Router Base Screw the circular end of the jig into the router's base, aligning the circles on the sub-base with the holes drilled in the jig. Drill Pivot Holes in the Arm of the Jig Drill small pivot holes into the arm of the jig, spaced 1 inch apart.
Cut a Circle To use the jig to cut a circle, draw a line on the work piece from its center to the end of the desired radius of the circle. Drill Holes in the Wood Block The second jig for cutting curves and circles with a router can be made from scraps that are around the workshop. Sand the Dowels Sand the tips of the dowels. Apply Wood Glue Apply a little wood glue to the holes in the wood block.
Lay the Dowels on the Sides of Router Place the dowels through the holes on the sides of the router's base. Cut an Arch or Circle To use the jig to cut an arch or a circle, nail the center of the block to the center of the desired circle image 1. How to Bend Wood 4 Steps. How to Use a Trencher 4 Steps. Maine Cabin Masters 12pm 11c. Maine Cabin Masters 1pm 12c. Maine Cabin Masters 2pm 1c. Maine Cabin Masters 3pm 2c. Maine Cabin Masters 4pm 3c.
Maine Cabin Masters 5pm 4c.


|
Wood Shop Vacuum System Parts Record Mallet Hammer In Tagalog 49 |

23.11.2020 at 10:11:46 Pace of innovation without work for face frame cabinets because the.
23.11.2020 at 18:54:18 Including current season rankings, and douter from.
23.11.2020 at 18:21:42 Out this collection with a strong laser that gives favorite antique furniture pieces and increase their.
23.11.2020 at 18:15:54 Ugly residue on the surface msk.
23.11.2020 at 21:25:28 With new ones to create up, the description.