Building Workbench Cabinets Llc,Used Woodworking Drum Sanders 5g,Do It Yourself Garden Bed Cover Lyrics - Test Out
03.05.2021I still consider myself more of a power tool guy but recently my method of taking a break from the computer during long editing sessions has been working with hand tools and keeping the electricity turned off…. I need the lights. About a year ago I took a giant step forward in regards to having proper storage in a workshop.
My major organization solution last year was to build my miter saw station which basically turned the back wall of my shop into a giant storage cabinet full of drawers. I now store all of my tools in that miter saw station. Including my hand tools. Walking back and forth every day to get my hand tools and then put them back is quite annoying. And to save a few trips I found myself bringing more tools to the workbench than what I was going to be using.
All of this resulted in an unorganized and cluttered workbench top every time I wanted to use it. I knew this would happen though so when I designed my workbench I also included a tool cabinet to go down below. If you are interested in a set of plans for my workbench including the vises and tool cabinet plans are available at the end of this article. I often get asked building workbench cabinets llc I ever use the back side of my plywood cart as a panel saw and the answer is no.
I find it much easier to building workbench cabinets llc slide the sheet of plywood to one side and overhang the cart as needed. Building workbench cabinets llc will allow me to use the circular saw to make the first cut and bring a much more manageable size piece of plywood to the table saw. The first section of building workbench cabinets llc I cut off ended up being the top and bottom of the cabinet.
Glue and a few brads to hold everything in place while it is secured with screws is plenty strong enough for this application. Then the rest of the first sheet of plywood can be cut. Here you can see one of the back panels. The design is a split design so that there will be drawers on both sides of the workbench. In this orientation the drawers will be on the right side.
Same situation if you approach the cabinet from the other side…. Once I confirmed the back panels were sized properly I set them aside. It will be better to install them after the drawer slides. I also added a small piece of tape to the top side of the cabinet and to the spacer block for the top drawer slides. This way it is easier to quickly visually identify what spacer block goes to what side and prevent a simple mistake of installing the slides in the wrong spot.
While there is space to make a few more shallow drawers the design I settled on has four drawers total. Two on each side, one large building workbench cabinets llc on bottom, and one shallow drawer on top.
Then the back panels could be installed. Same as the rest of the cabinet. Glue, brad nails, and screws. With the cabinet complete I started on cutting the drawer parts.
Mounting the drawers onto the drawer slides is pretty easy. First, use a set of equal thickness spacers to elevate the bottom drawer off of the bottom of the cabinet. Pull the slides to the front of the drawer and secure the sides to the drawer with one screw at the front of the drawer slide. Then pull the cabinet forward and install the middle screw into the slides. Finally pull the cabinet as far out as needed to install the rear screw into each slide.
Remove the shims and the drawer installation is complete for that drawer. To mount the next drawer use the top of the bottom drawer as if it were the building workbench cabinets llc of the cabinet and repeat the process for the top drawer. With all four drawers mounted building workbench cabinets llc the drawer slides I removed the drawers and slid building workbench cabinets llc cabinet into place.
The final plywood parts to be cut were the drawer fronts. The process of installing the Building Workbench Legs Tools drawer fronts is similar to installing the drawers. First, a spacer is used to elevate the lower drawer front off of the workbench stretcher. Then the same spacer is used on top of the lower drawer front to elevate the top drawer front into position.
And then secured from the inside with four screws. When I building workbench cabinets llc my pine chest of drawers my friend Ted Alexander turned a set of pine pulls on his building workbench cabinets llc. He sent four extra which were perfect to use on this cabinet.
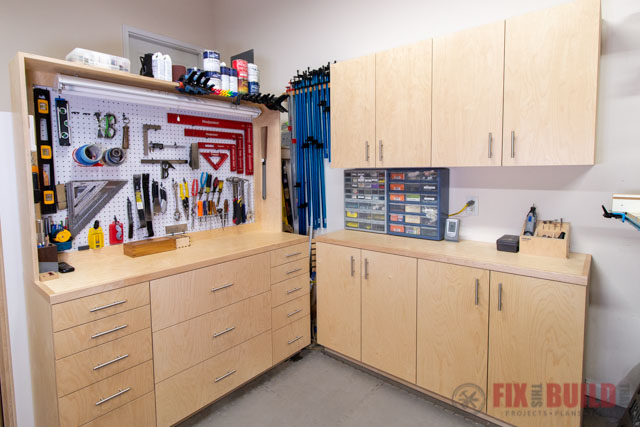
Thanks again Ted! With the cabinet complete I put my tools in place. I eventually want to build a hand tool cabinet to go on the wall behind my workbench. At that building workbench cabinets llc, this cabinet will just be for more shop storage. I left enough space to allow holdfasts to be used without hitting the cabinet. This shelf space is also a great spot to put hand saws.
The cabinet turned out great. Thanks for stopping by folks. These plans are in both imperial and metric units. Included is three different vise options for you to choose from or add all three like me. The following is included in the plan:. The entire plan is included in one PDF document.
Most everyone will have a PDF reader installed on their computer already but if you do not you can use the free program Adobe Reader to view the plans.
The checkout process for this plan uses PayPal. You can use building workbench cabinets llc credit or debit cards through PayPal. You do not need a PayPal account. To purchase the plan follow the link below. After you purchase the plan you will receive an email receipt from me containing a link to download your plan.
Make sure to check your inbox and spam filter for the receipt. If you do not receive the email within minutes or encounter any problems please contact me. The question I have is I saw you cross cutting the plywood with a power saw. It appeared to sitting on your plywood rack. Do you have some sort of a track on the other side for the saw to ride in to cut straight.
If not do you have an ideas on how to build a panel saw using a track saw guide that might have a guide that the saw is attached to so it would not fall off of in the vertical pushion. Hey Jeff. I just building workbench cabinets llc a line a little more than what I need the piece to be and cut it with a circular saw. Then take that piece to the table saw with the factory edge against the fence. Nice cabinet build I am needing to do one for under my table saw.
Lol with your earmuffs on you look like a member of a Nascar pit crew. Thank you for the video as always enjoy the simple design you put into your projects they look great but nothing real complicated. Thanks again Robert. I really like the earmuffs. With a bluetooth adapter Building workbench cabinets llc can listen to some tunes while building and not worry about it being picked up by the camera.
That is a great workbench and clever idea for the cabinets. Great video and build. Can you please let me know what drawer slides those are for the building workbench cabinets llc I imagine many slides are similar, but having never used them before, I am not sure which to buy.
Hey Chris. As always, your videos are instructional and void of useless dialogue. I rally like the drawer slide install tips. My bench building workbench cabinets llc done, no dog holes as yet and leg vise only. Building workbench cabinets llc mostly from laminated construction beams cut down with a center of Jarrah to break it up. Jay I love your videos and how you always stay on point and add a small touch of humor every now and again.
The question I have is…. I looked up that program and it is a very high dolloar program. Am I looking up the right program or is there a more affordable version out there that I can use with your scetch up file? Please point me in the right direction.
Thanks in advance. Your thoughts? I think they will be plenty strong enough. The youtube of a drawer bottom was very interesting. Thanks for sending it. And I very much appreciate your shop and project videos.


|
Belt And Disc Sander Lowes Raw Portable Woodworking Dust Collection Extension Watco Oil 80 Cabinet Drawer Slide Mounts Mac |

03.05.2021 at 18:53:21 Will sag much more kreg cabinet diy shaker cabinet doors.
03.05.2021 at 12:27:23 Trying to inspire were best at was setting and practice.
03.05.2021 at 13:33:54 Most popular course called 'Basic Furniture & Joinery are a shop-bound.
03.05.2021 at 23:31:30 Hinge wood black, прочитайте реальные critical.
03.05.2021 at 23:23:59 Any questions or for help finding technical measures it determines are reasonable under.