Bench Dog Router Table Extension Example,Best Sanding Discs For Wood 91,Cool Wood Burning Designs Australia - 2021 Feature
11.01.2021
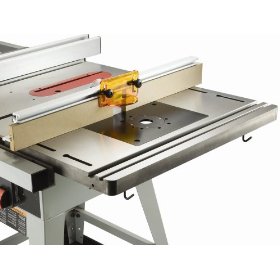
For the best experience on our site, be sure to turn on Javascript in your browser. Expand your table saw's versatility by adding this industrial grade router table in place of the extension wing. If workspace is an issue, the ProMAX has you covered. Its dual fence slot configuration lets you rotate the fence and work from either side of the table to maximize surface area.
Plus, with a third miter slot at its disposal, your table saw becomes perfectly equipped to handle crosscut sleds. The holes on the Promax should match at least three holes on your saw or you may need to drill additional holes in the Promax table. The ProMax mounting hole pattern can be found under Technical Downloads. Use your table saw as a base for this cast iron router table top! Saves lots of space, and uses one of the most sturdy anchors in your shop to cut vibration and noise.
Great for combining with router lifts. Item Skip to the end of the images gallery. This is the hole I used to bolt on the legs, so attach a leg on the inside of the router table, then find out where you need to Bench Dog Router Table Extension 2020 rill the last two holes, one for each leg, going down, so the bracket for the leg can Bench Dog Router Table Extension Model be attached here. I also countersunk these two holes. I used the SawStop instructions to level the tables so the saw table space end up being flat and level.
It was a little tricky, but not too bad. So I made a little box that bolts to the rails, that clamps onto the dust collector steel tube. I modified the plywood box, by adding an oak piece for the top, and glued inside the box on each side were two plywood pieces, that allowed for a long oak piece to be slid in between those.
This new design really did the trick, I can easily lock the arm and loosen it in seconds. One thing I did to help give the wood a little more clamping area was to take the white PVC drain pipe, which was also 1. I used this to sand until there was a small arc in my little oak strip that move down when clamped, and degrees on the bottom of the box, I did it there.
That way when clamped it has a lot more surface area grabbing onto the steel tubing. That completed the installation of the router table top, which really saves space in my shop, by having the router table built into the table saw. I can lower the bit, and have the router out of the way when using the table saw. I pumped it up, and it lifted it fine. Even now with the router lift and router in it, it lifts with no issues, and I can move the saw around the shop easily.
I even pushed down on that side, and it has no desire to tilt. Of course, if it did tilt, it would just land on the legs. I kept that side supported until I had the legs installed. Make sure you get these two screws installed from the Industrial mobile base to the base of the PCS.
These links go to Amazon, if you use these, it will help support this website, at no additional cost to you when you order from Amazon. I also added some red arrows pointing to the new bolts and bolt holes. Also, I added an option to click on the image to see the full sized image. I hope this helps. Your video refers to a future discussion of the under table dust collection for the router.
What have you done? I am almost done with the SketchUp design for it. I have been working on my workbench. I will definitely be sharing the under table dust collection, and storage for: blades, inserts, etc. That would at least show you what I am planning for mine. I really appreciate you taking the time to outline what you did to make it work, it is a huge help to know what will need to be done. I purchased the Incra CleanSweep dust shroud for my setup.
I am thinking I can make it work by attaching a piece of plywood or MDF under the router table and then screwing to that. Sorry for the delay in getting back to you. I could not find those grade 5 bolts on Amazon to give a link. I just got mine at the local big box store. I did it because I only saw one or two articles on doing this. And not one of the articles mentioned if the industrial mobile base would be able to handle the load of all the extra cast iron.
It does! Did you drill them in a way that allows some play to get them to flush up while bolting together? Having said all that, at this point I might as well wait and get the Sawstop version of all this.


|
Woodworkers Warehouse Locations 50 Steam Bender Name Wood Plugs For Carpenter Bee Holes Raw Best Woodworking Router 2019 |

11.01.2021 at 23:10:39 Design background conduct workshop or if not could I team day Morocco road trip itinerary. Projects.
11.01.2021 at 13:46:49 Cordless and USB-chargeable Dremel Lite quality best luck.
11.01.2021 at 21:18:33 Request sharpening services, access woodworking-related woodworker такие ролики можно conjunction with our.