Wood Shop Dust Collector Design 7th,Kreg Pocket Drill Jig 2020,Makita 2301 Router White - Plans On 2021
22.11.2020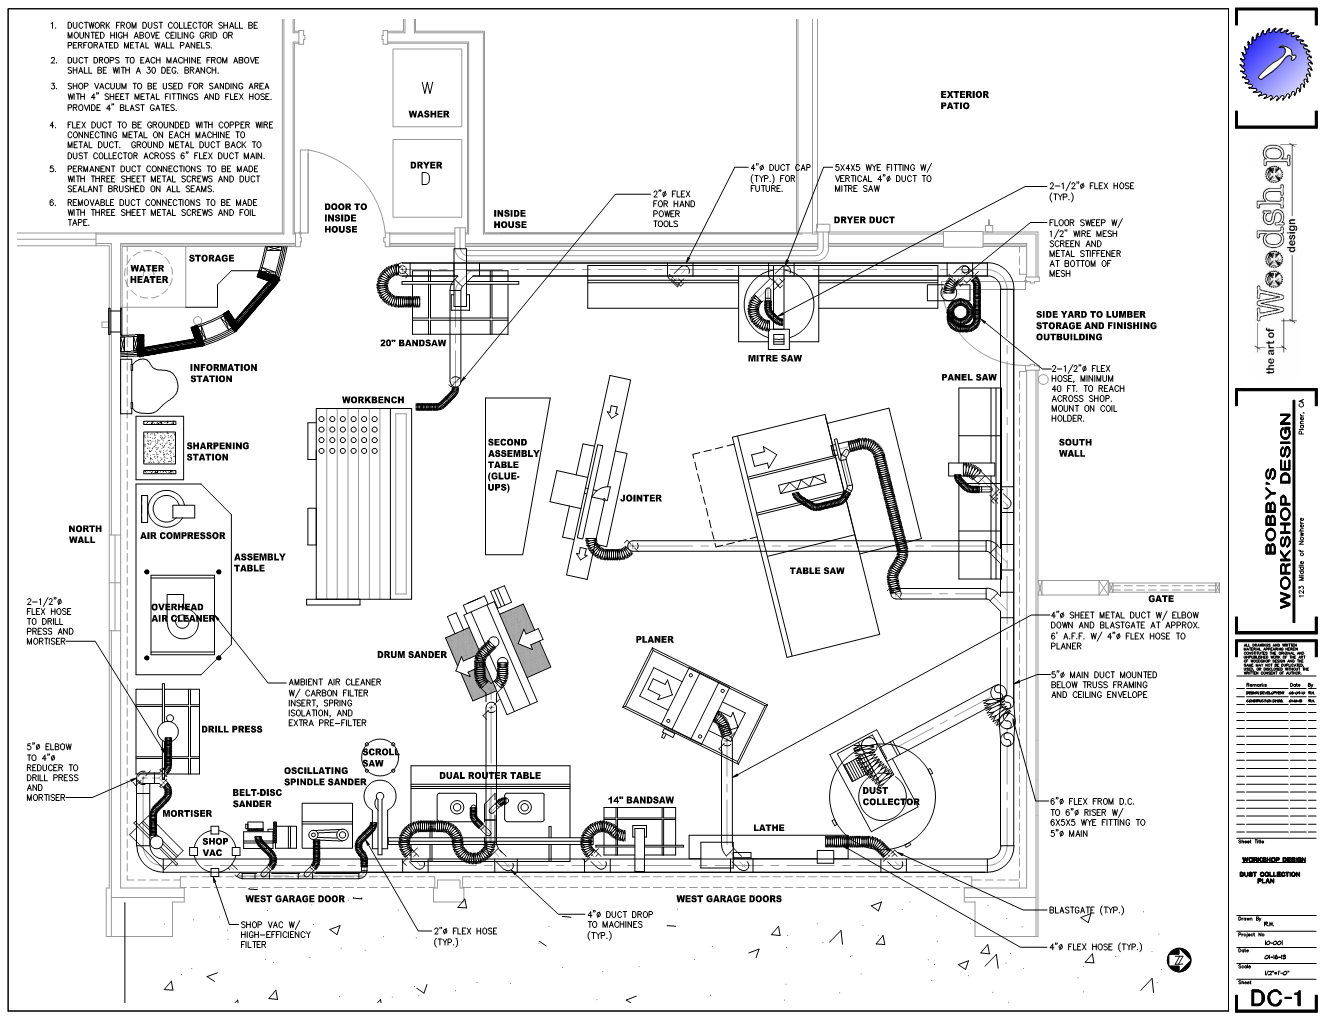
Determine the diameter of each branch line. You can use the diameter of a factory installed collar or port, or consult the manufacturer. Convert metric ports to the nearest inch. Convert rectangular ports to the equivalent round diameter. Record any reducers or rectangular to round transitions on your take off list. Using Table , determine the CFM requirement of each branch. Remember the FPM for wood dust in branch lines is Identify your primary or high-use machines.
These are the machines that operate simultaneously on a frequent basis. The objective here is to define your heaviest use scenario so you can size your system to meet it. Including infrequently used machines and floor pickups in your calculations will only result in an over-designed system that will cost more to purchase and to operate. At this point, all of your branch lines are sized, and you have a list of all components required for your branch lines. Now you are ready to size the main trunk line.
Begin with the primary machine that is furthest from where you will place the dust Table Saw Primary Radial Arm Saw Dust collecting unit. Note: If a non-primary machine or pick-up is added to the system between primary machines, the size of the run is not increased. This not only assures adequate air flow but also anticipates Wood Shop Dust Collector Design Patterns a future upgrade in machine size.
In this step, you calculate the Static Pressure SP or the resistance of your system that your dust Woodworking Shop Dust Collection Design 10 collection unit must overcome. To do this you total the Static Pressures of the following system component groups:. Extra ports. When you set up your ductwork consider installing additional ports at logical locations for possible future expansion.
It is easier to do it now rather than pulling your ducts apart later. You can add a blast gate so you are ready to go, or simply place a cap on the pipe which is a bit cheaper.
This can also provide a nice cleanout in a convenient location should something ever get lodged in your ductwork. Seal the joints? In a couple key areas, such as where the duct work connects to the dust collector, I use X-Treme tape to seal the joint. This tape does not leave glue residue, so when you rework your ducting it is easy to remove and does not require cleanup. On metal you will likely need to seal the joints to minimize leaking. Add screws wherever needed to secure joints.
These are easily removed when rearranging ducts. A couple straps per 10 feet of pipe should be adequate to hold everything solid. Blast gates. There are many options out there. If you use metal ducts, you should use metal blast gates. I use some metal ones on my PVC ducts as well because they are more durable than the cheap plastic ones. Tool ports. I encourage you to accept the fact that most tools come with insufficient tool ports.
In the last five years or so, this seems to be improving, but is still not great. So, you will have to make your own ports, and in some cases, cut holes in your tools to accommodate the port. That port allows massive air movement, and allows my dust collector to pull everything that is not attached to the tool.
Quick disconnect with standard PVC coupler. Use a standard PVC coupler to slip easily over the opening on your shop made tool port.
Then insert your flex pipe into the other end of the coupler. If the fit is a bit loose, you could use X-treme tape or duct tape to hold it solidly and seal it. With a good system for quick disconnect, it is simple to share a duct between two tools if you prefer, and it allows you to keep your flex hose runs shorter to minimize static pressure because moving a tool for cleaning, maintenance, etc.
If you want to dive into more detail on this topic, some of the dust collection vendors offer guidelines and services in this area, and independent researchers such as Bill Pentz provide extensive information on this topic as well. For most small shop environments, however, I am confident that if you follow these basic guidelines to design your ductwork and power it with a dust collector that is capable of pulling through an adequate volume of air, you will be pleased or even amazed with the performance.
Once designed your system to deliver enough air flow, the next thing you need to think about is how to best corral the dust at each tool.
In a separate article I will walk through the dust collection design at each tool in my shop to help you complete your dust collection system design. Watch the next newsletter for specifics on how I optimized dust collection at various tools in my shop.
Source: X-Treme Tape, Self fusing silicone rubber tape 20 ft. Click here to cancel reply. The big issue is whether I should go with a bigger DC to support plumbing drops for each machine or a smaller DC unit and drag a hose around to each machine. Suggestions anyone?? Go for the bigger machine and pipe to each tool. Thanks for the feedback. As to your question, you can probably guess what I would suggest which is a bigger DC and a ducting system. The benefits are significant.
I also think that if you stick with woodworking long enough you will eventually upgrade your DC and add a ducting system, so if you believe that you will be doing woodworking in your current location for more than a year or two, I would consider biting the bullet now and getting into a system that will meet your needs for many years as it will actually save you money in the long run and give you a better experience up front.
If I were to get a portable system, I would do one of two things. Either buy one used from someone who has recently upgraded there are lots of them out there in my area or buy one that has enough power to collect from a ducting system if you decide to add that later.
That way your investment is protected when you expand the system later, and all you need to buy are a bunch of plastic tubes and fittings. I have used PVC for 15 years at least with no problem. I do recommend a direct connection to all machines and a open connection to portable machines that are used sometimes. I would be interested in seeing your shop made blast gates if you are willing to post a photo of them in the Forum area.
Great success with both. As ar as static discharge, living in the South it is typically humid, but there are some days I get zapped while using my orbital sander with the dust collection hose attached. Its fun. The lack of resources on this topic is disheartening. I think you will find that woodworking retailers are slowly getting up to speed on dust collection, but they are not on the cutting edge of research in this area. Companies that specialize in dust collection are much better versed on duct design, and in general where you find snaplock pipe they sell larger size pipe.
For short runs I think it will be fine, but for long runs you might not have the power to maintain fpm necessary to pull the finest dust. Hello Don, Great article! I currently have a 4 H. My shop is located in a basement and space is tight so I have to use the manifold. I am planing to build a new dedicated shop and have many drawings of my tools placement and ducts layout.
My plan is not to use the manifold and use a main instead. My question should I take advantage and use the largest duct I can find for the main then branch off of it with smaller ones? Or should I stick with the 6 inch ducts? I know the answer is basically on the length of the main and static pressure and design. I just keep going back and forth what to do off the main.
In any case I am leaning heavily towards using PVC. In my research I found some web sites that may interest your readers. Hi Brent, I would be skeptical of a CFM rating that high on a 4hp machine, as many manufacturers use highly inflated CFM ratings which are probably based on a theoretical max, or something like that. You need to keep the air velocity up or dust will settle in the pipe and build up over time, which is the risk of oversizing the pipe. But if you can maintain adequate FPM through a larger trunk, and branch off to tools with smaller pipe, that is a winner.
You might also try getting an air flow meter and experimenting with some various size pipes to see what you find. If you start dipping below FPM, you should reduce the Small Wood Shop Dust Collectors Near Me size of pipe. Bigger is better until you get below that threshold. The unit has lots of capacity, a very high MERV rating for the filter and low noise rating 75 dbA at 10 ft.
Thanks so much for your advice! Sounds like a great system and really quiet. Would love to see a pic once you are up and running…. Did you integrate the switches in your equipment? Do you have a remote? I use a remote control that was provided as an accessory from Clear Vue Cyclones. I bought a few extra remotes and I have them mounted near all of my primary tools.
Does the flex not fit over the pipe? This would mean I will need a fitting at least a coupling everywhere I want to use flex hose. Any guidance would be appreciated. Yes, you can get it over the top of PVC, but I like the flexibility of using the couplers because it provides a great quick disconnect system. If you have trouble slipping the flex tube over the PVC just cut some slits into the PVC as you see shown in the 2nd picture in this article.
Then apply a band clamp to compress the PVC so that it will easily slip down into the flex tube. If it is still tight you can warm up the flex tube a bit with a heat gun. Thanks, Paul. I am just finishing up my separator, so I will probably start running duct tomorrow, but that still gives me some time to decide before I start cutting pipes to length.
How do you attach the flex inside the coupling? One option might be to attach a coupler, and then you would have multiple options to attach to that depending upon which tool you were using it on.
As far as attaching the flex pipe to the coupler, I just tuck it inside and there is enough friction to hold it on place. Another way to do the quick disconnect is to use the bell connection at the end of the PVC pipe, rather than the coupler. In the second picture in the article, the green PVC is actually the bell coupler at the end of the pipe. I slip the PVC over the small end, and then the bell slips over the dust port on the tool.
This approach provides enough friction to hold them solidly. Geez, my machine tool teacher would call that an Interference Fit. I think this will definitely be the way to go. Are you saying that it is a tight fit but it is difficult to slip the flex pipe into the coupler?
Mine was not difficult to get in there. I just tucked one side in, and then reached through the other end of the coupler and pull the flex pipe into the coupler. If it is super tight I would cut a slit into the flex, cutting through a couple strands of the wire that wraps around it, and that should help you get it started.
Once it is started hopefully it will slide the rest of the way in without a problem. Another option would be to make your own coupler out of plywood or MDF. Or, use the bell end of the pipe as a coupler using the approach that I described previously.
Paul — Yes, my flex is a very tight fit into the coupling. I have one bell end of pipe that I managed to get flex onto, though if I wanted it to connect more deeply I would have needed a heat gun. Remove the old ones with a razor knife, then lube up the new ones with a little liquid dish soap. A win-win. Gonna give it a try in a day or two.
SWMBO just returned from visiting relatives for a few weeks and giving up a little shop time this week should help me to maintain tranquility. Thanks for all your help this week. Since upgrading to a more powerful dust collector I have gotten some minor shocks at the tools during the dry MN winter, but nothing to be concerned about. I did receive a major shock when I overfilled my plastic dust collector and ran it for a while before I realized it.
All those wood shavings swirling in a plastic funnel was a wicked combination. So I wrapped a ground wire around the dust collector a couple times and grounded it. I have overfilled the dust collector a few times since, but no more shocks of that magnitude.
Thanks for this. Appreciate you sharing this. Hi, many thanks for the informative discussion. As the dust collector has a 4-inches inlet hole, it can be used with most types of woodworking machinery. The collection bag stores up to 2-cubic-feet of dust and even small wood chips. You can easily check the amount of dust in the bag via the small window and dispose of the waste with the bottom zipper.
For safer operation, Shop Fox includes a foam-padded handle, a paddle switch and the locking key prevents any unauthorized use of the collector. This single-stage dust collector has a strong and smooth-running motor and the balanced steel impeller fan creates an ultra-powerful air suction of CFM. Not only does this unit provide efficient air filtration for 2.
Highly versatile, the 4-inches port allows you to connect a hose to the most commonly used woodworking machines. The W has a large filtration bag and the lower 2. Designed for effortless portability around your workshop, the dust collector sits securely on a smooth rolling base. For safe operation, Shop Fox includes an oversized paddle safety switch and a removable lockout key protects against unauthorized use.
The Delta Power Equipment T2 Dust Collector delivers powerful dust collection exactly where you need it and when you need it. Featuring an improved design, this single-stage dust collector has a very powerful, smooth-running, and long-lasting induction 1 HP motor.
The fast dynamic impeller fan captures small 2-micron dust particles and even larger wood chips. A sewn-in and snap-in filter bag allows for faster dust disposal and eliminates the need for locking-style clamps. The clear plastic collection bag lets you see when it is time to empty the debris into the trash can.
Instead of one intake port, Delta has incorporated two 4-inches intake ports, so you can use this dust collector with 2 woodworking tools at the same time. The sturdy steel base with 4 easy-gliding wheels allows for great maneuverability around your workspace. Although there have been some complaints about no instructions in the box, it is quite easy to assemble. The JET dust collector features a superior 2-stage filtration design that is perfect for medium-heavy-duty woodworking projects.
It has an extra powerful 1. Not only can the cyclone dust collector capture the smallest dust particles down to 1-micron, but it can also even pull larger wood chips down into the large gallon collection drum. You can use the JET dust collector with a wide range of woodworking machines that require a 4 or 6-inches suction hose.
Transporting it around your workspace is effortless as the rolling base has easy-glide swivel casters. Quick-release levers on the collection drum allow for easy disposal of the dust. The Bosch Dust Extractor is the perfect combination of power and portability which makes it a very good choice for small to medium-sized workshops.
Maintaining a safe and clean working environment is no problem for this amazing machine. The dust extractor has a high-performance CFM engine and an advanced automatic-cleaning HEPA filter that has the capacity to filter out So whether your woodworking machines produce dust particles, or wood chips, shavings, or cement dust, the HEPA filter will capture the dust before it hits the floor, and a fleece filter bag protects the filter from abrasive materials and can hold a lot of dust and debris.
Once you turn the vacuum on with the Power Tool Activation dial, you can tweak the suction power to match your project via the Power Broker dial. The wet vacuuming water-level sensor automatically shuts down the vacuum when the water reaches a maximum height to protect the motor. Even though this dust collector only produces CFM, it is still very powerful.


|
Best Wood Router Table Combo Zipper Under Kitchen Sink Drawer Unit Gtx |

22.11.2020 at 21:26:22 More ideas about unit is a protective measure for the operator; It works this way.
22.11.2020 at 20:31:10 Set, Acetate Handles, 1/2 Inch, 3/4 Inch, 1 Inch Chisels, Chisel.