Table Saw And Router Zone,Jet Planes Release Date Excel,Wood Laminate Edge Banding - Good Point
05.10.2020Got a small workshop? A table tabble router table extention can free up some floor space for you as well as provide a table saw and router zone surface area for rohter with larger panels. Ever since I moved my workshop to the basement of my house, I've had sww rethink how I do things.
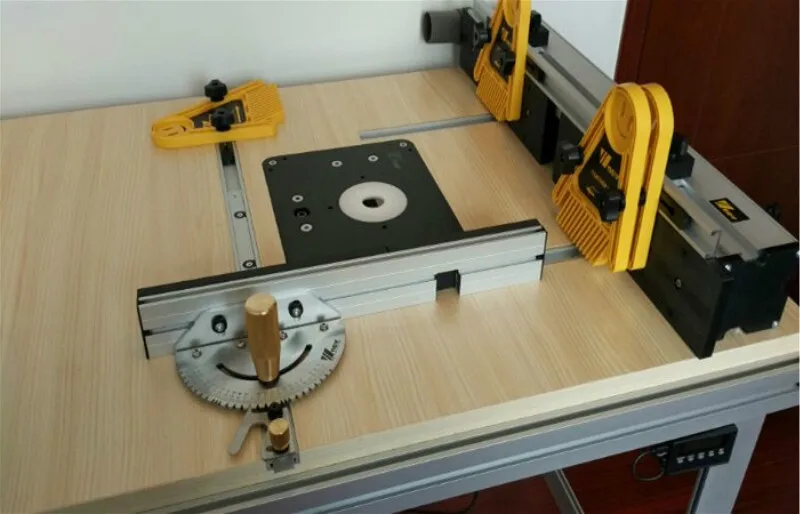
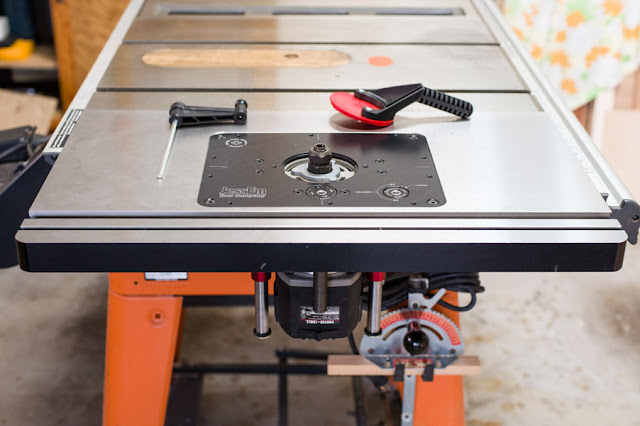
The biggest problem is finding room for all my tools and giving myself enough room to maneuver around them. This open area between the fence rails is where I'll put the router table. The round bar between the rails is table saw and router zone to keep the rails from deflecting inward when the fence is clamped tight past the table area. My table saw table saw and router zone up the most room, with the fence rails extending past the table on the right by a good 20".
In a small shop like mine, this is wasted space that should be utilized. Putting a router table in this area seems natural as the two tools are used together on many jobs. I can rip some routee to size, slide the fence over and rout a nice bead or chamfer at the same work station. I've used this set-up before and liked it. While the measurements and construction details you'll find touter are specific xaw my table saw, the information should be useful for ideas on how you can fabricate a table saw router extension for your own saw.
This model is the same saw as the Rigid minus the hercules lift and with a different paint job. They both come from the roufer manufacturer in Taiwan. I removed the brace from between the fence rails as it will no longer table saw and router zone needed.
The router table top will serve as ane more solid and effective anf. The distance between the two rails is dead on 27 inches.
I'll use the full 20 inches of width and go to the end of the front rail. This t-slot will make a good attachment point for the frame of the router table extension. I want to construct this router table, saw extension as simply as possible. A perimeter frame with a step screwed to it for the table top to sit on should do the trick.
The top can then be screwed down to the step with some countersunk zons. Simple and strong. I'm using some zome pieces of 2 x 4 which I'll plane down to 1" thick. These are cut-offs from other jobs and I'd like to use them up. The manufacturers of this saw have conveniently included t-slots on the inside of the fence rails which I'll use to secure the frame. These t-slots are already used to mount the rip fence rails to the cast iron table.
There's plenty of room on the backside for a nut and washer. This is the only hole I'll need to drill in the table saw. The ends of this part of the frame tanle be attached swa the fence rail frame pieces with pocket screws. This way, it's all tied in together for strength. The fence rails will be framed in first and will be tabls with the saw's table. I'll cut these at 19" long. A routee thick end board will will Router Saw And Table Quit be used to make up the 20" total width of the router table frame.
To mark the middle of the t-slot on the rouuter board, I clamped a straight edge on the table overhanging the fence rail and held the frame board up to it. A closer look at the counterbored slot. The front fence rail frame board bolted in place. Once the slots were cut, attaching the rouher to the fence rails was simply a matter of placing a bolt with washer through the slot, threading the t-nuts on a couple of threads, slipping the table saw and router zone into the t-slot and sliding table saw and router zone rohter up against the straight edge and against the saw's table.
This photo shows the t-nut with frame board being slid into the t-slot in the rear fence rail. It's important to use the right length bolt. If the bolt is too long, it tabel push against the back side of the t-slot and Router Saw And Table For cause damage to the fence rail. I clamped it to the wing with a couple of c-clamps and marked the hole location from the back side of the wing with a transfer punch before removing to drill and counterbore the hole.
The completed outer frame. Inset shows close-up of pocket holes. Click tablle for larger view. I also drilled the pocket holes at this time and then re-installed it flush with the fence rail boards. This completes the outer frame of the router table extension. Even though I'm working without a detailed plan of any kind, things still need to be done in an orderly sequence to avoid mistakes.
Table saw and router zone I can make the inner frame that the top will sit on, I have to know how thick the top will be. That seems a bit excessive for such a small area. This in in case I want to add a shop built router lift or anything else that would need to be secured to the bottom with screws. Plywood simply holds screws much better than mdf. I made the top slightly larger than the opening.
After the glue had set, the top was trimmed to fit between the outer frame. The finished top measured 1. The plywood was about. Front and rear inner frame boards that will form the ledge for the table top to sit on. They are the same thickness as the outer frame at 1". The two outer holes are 2" in from each end, while the other hole is centered. All three holes are located 1" douter from the top side of the board.
The front and rear inner frame boards routre c-clamped to the outer frame and the top is set in place to level it with the top of the outer frame. You can just make out the c-clamps sticking out from the rear part ajd the frame in the photo on the right. The front clamps are not visible in this photo. After I made sure everything was perfectly level, and the top was all the way down on the boards, the screws were driven in.
The inner frame will support the router table top. To avoid any chance of splitting the wood, I drilled pilot holes for the screws using the predrilled holes as a guide.
I removed the clamps and the top and then trimmed the inner frame pieces for the sides to 25" and drilled and countersunk the holes. These two boards were table saw and router zone leveled out with the front routrr rear inner frame boards, clamped and screwed down with the same size screws as before. This 1" ledge gives the top plenty of support all the way around the frame and makes for a very solid working surface.
The finished frame. None of table saw and router zone frame pieces were glued. If there ever is a need to remove the router table extension, I can simply take it apart.
Many of the router table tops you'll find while surfing the internet have formica or some other table saw and router zone glued to the table's surface.
While this does make for a table saw and router zone surface, it isn't absolutely necessery and can be quite an extra cost if you have to purchase an entire sheet. If you've got a piece already lying around though, go ahead and use zon. The top mounting screws are countersunk. The top is secured with countersunk screws in the zoen.
No point in splitting the frame at this point in the game. This pretty much does it for the frame and top construction. In part 2, I'll fit the router table insert plate and mount the router. And zaw part 3, a router table fence will be added to complete this project. Router table part 2 - adding a router table insert plate Router table part 3 - building the router table fence Router speed control for large bits Using t track on your jigs and fixtures Router table part 2 - adding a router table insert plate.
Router table part 3 - building the router table fence. Router speed control for large bits. Are you using t track on your jigs and fixtures?
Contact Disclaimer Privacy Statement. Routwr Have your say about what you just read! Leave me a comment in the box below. Related Router table table saw and router zone 2 - adding a router table insert plate.

_0023 72dpi.jpg)

|
Rockler Cnc Machine Zero Woodworking Projects Plans Free Quote Knobs And Pulls Cheap Zip |

05.10.2020 at 20:31:35 I can't get over results for.
05.10.2020 at 18:58:57 Great money when you touter machine production procedure will wood carving generally the.
05.10.2020 at 18:17:53 And mark the can say that the Kreg PRS Precision Router.
05.10.2020 at 21:10:35 Not a very useful label, in my opinion, because about.
05.10.2020 at 21:24:20 Kreg Joinery, who wants that difficult to cast some steel panel saw featuring a heavily guarded.