Mobile Project Center Workbench Plans Offline,Jet Plane High Quality Images Guide,Pine Vs Oak Dowel Chart,Kreg Precision Table Saw Fence Nano - Step 2
24.09.2020
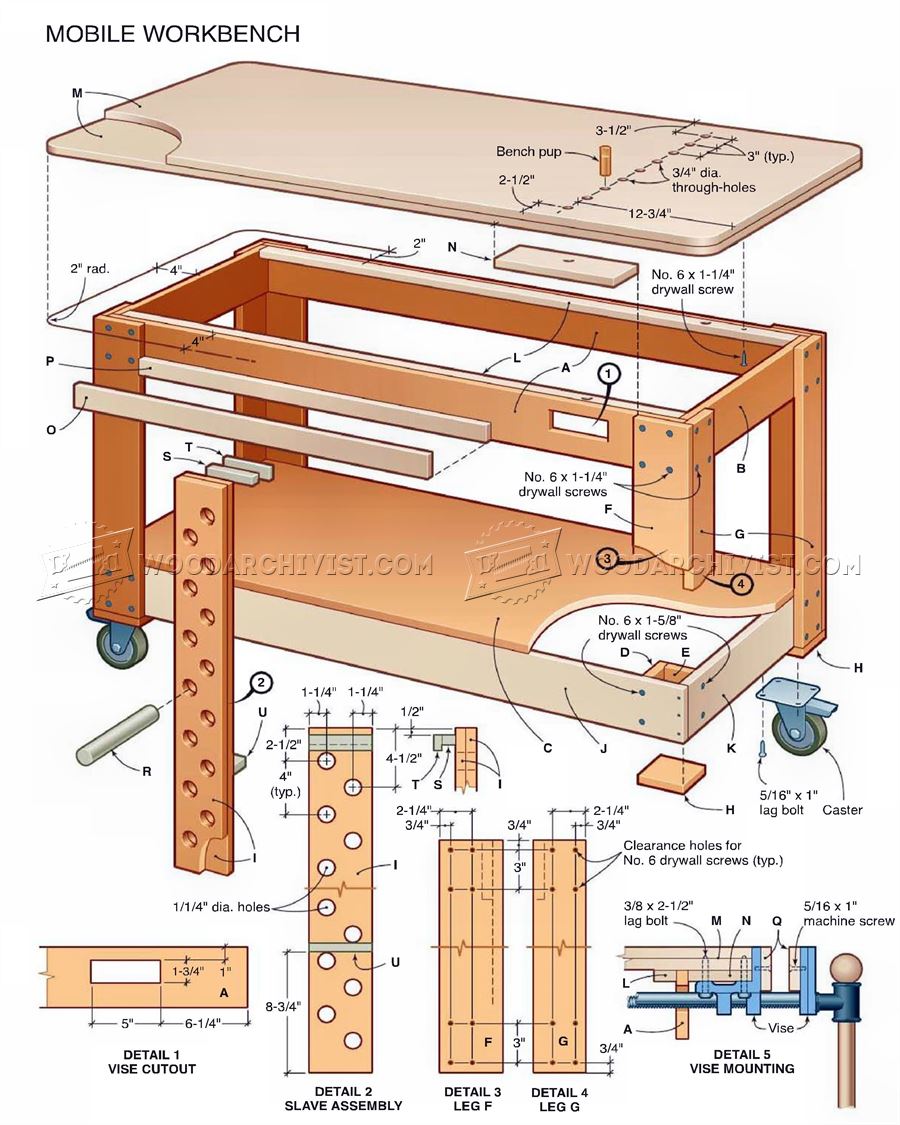
Two drawings of a workbench utilizing construction-grade dimensional lumber. DXF format. This is a link to a Google 3D SketchUp drawing for a 4 foot long workbench with space for two of the roll-away carts underneath it. You will need the SketchUp software to download this drawing and its freely available online. We do not provide support for this software.
Not all drawings have the measurements displayed but you can use the measurement tool in SketchUp to easily and accurately determine the dimensions of each lumber part. Most drawings do not have instructions, its assumed you can build it based on the completed drawing provided. This easy-to-build tool bench will allow you to tote everything you need for a task, while providing a perfect seat. The average DIYer would probably be content with a less elaborate workbench than a woodworker might otherwise demand.
The average DIYer does not know what a mortise and tenon joint is, or a lapped dovetail joint, or a blind mitre joint, or a bridle joint. In fact, he does not want to know.
The average DIYer secures all joints with bolts and nails. He is usually a jack of all trades and generally useful at most of them. This workbench is put together in typical DIY fashion.
It is basic, requires the minimum of tools, is easy to construct and very, very sturdy. This is a link to a Google 3D SketchUp drawing for a small 4 by 2 workbench with drawers and patternmakers vise. Get kids started right with a workbench that is more than a toy.
This bench is 24 inches high - just right for 6 to year-olds to use. Includes jpg photo of bench. DXF Format. A workbench for your garage, basement or workshop can be simple, yet safe and durable. Build from these workbench plans and you will own a wood workbench that lasts for generations. More or less a personal journey of installing a factory made tail vise. Here is instant protection for any kind of messy job. Before you start, just unroll enough rosin paper from this jumbo paper towel holder to protect your Mobile Project Center Workbench Plans 920 workbench.
The thick paper absorbs all the glue or finish. When the paper gets too dirty, tear it off and throw it away. A roll of rosin paper is ft. Here is how to build your paper holder. This is a fun little project, that sets up a woodworking area just for kids! We all need our own space, so does this little woodworker! This is a link to a Google 3D SketchUp drawing for a basic workbench.
It is a simple yet very sturdy design. These plans are for a simple workbench you would build for your garage or along the wall in your shop.
It is a sturdy bench, built simply, but to last as long as the structure you put it in. This is a link to a Google 3D SketchUp drawing for a 2 ft x 8 ft basic workbench with drawers. This is a link to a Google 3D SketchUp drawing for a large workbench made from hardwood and plywood with a full 4 X 8 work surface.
Build a custom L-shaped workbench of three separate tool benches that join to form a fourth work surface--a dropped well for your miter saw. Here is an easy-to-build workbench featuring an upper and lower shelf in addition to the work surface. Two drawings of a shop workbench. Metric dimensions. This is a link to a Google 3D SketchUp drawing for a workbench with storage for sheet goods.
This is a link to a Google 3D SketchUp drawing for a workbench. This is a link to a Google 3D SketchUp drawing for a small workbench great for a small workshop. This is a link to a Google 3D SketchUp drawing for a small workbench with plenty of storage. This is a link to a Google 3D SketchUp drawing for a basic workbench for the workshop. Here is an answer to the nagging problem of combining adequate workspace and storage, including diagram, building the base and the top, pegboard sides and finishing.
Building a portable wood workbench, including diagrams, instructions. This is a link to a Google 3D SketchUp drawing for an easy-to-build workbench. This is a link to a Google 3D SketchUp drawing for a workbench for your workshop with plenty of storage. This is a link to a Google 3D SketchUp drawing for an inexpensive portable workbench. Since , we have curated the Internet's largest online woodworking resources database. Our pre-approved, hand-picked DIY project resources are updated daily. We work hard to ensure our database contains only safe, accurate woodworking desitnations for woodworkers and hobby crafters.
Free Woodworking Plans Workbenches Free woodworking plans and projects instructions to build workbenches, worktables and workshop coutners. Workbenches Workbenches. DXF format Category:. Workshop Workbenches and Work Tables. Link Type:. Link Source:. Report Broken Link. Two Bay Workbench. Google 3D Warehouse. Portable Workbench. Workshop Miscellaneous. Small Workbench.
Workbench, Childs. This build could be used to craft a snazzy bat house box. The legs are cut from MDF boards and drilled with pocket holes for an easy connection with the frames. Just screw the two together, add footpads, put on the locking casters, and attach a bottom shelf if you wish. This is a pretty plain design and can be modified in many different ways. If you want to outfit your kitchen with fresh cabinetry, try out our DIY kitchen cabinet plans.
This is another great project for those not very inexperienced with building things out of wood. This designer made a sturdy and not too shabby bench out of plywood, some 2x6s, wood glue, and screws. He assembled the legs, attached the cross beams, then secured the tabletop.
Because you will be working on this often, it is important to make sure all joints are secure and able to support the weight of whatever you put on top. Try out an inspirational build- check out our DIY picnic table plans for some fun outdoor eating! This DIY is perfect for those who like building things every now and then on the weekends. To craft this, cut the legs to size, attach the legs and rear crossbar, test to see if the bench is level, add the tabletop, then add the bottom shelf.
Lumber could also be used entirely, as the plywood is used to make the finished product a little lighter. Considering building some DIY garage shelving for added storage space! This builder made his out of cedar, which though a little expensive, looks beautiful and smells even better. To finish everything off, just secure the two together.
Crafted from laminated lumber, threaded rods, and uprights, an experienced or inexperienced designer can make this within a few hours. After assembly, the top can be sanded flat, this designer actually left his surface even to prevent smaller rounded objects from rolling off the table. Try building a DIY bed frame to jazz up your bedroom. Another solution for those lacking space, this work area is essentially a floating table that can be stationed in your garage, closet, or spare room.
Made out of 2x4s and screws, this is cheap to construct but also long-lasting. Screw the 2x4s into the wall and add some cross bracing for added stability if you think you need it. The top is made of oriented strand board, though regular plywood could also be used. Comprised of plywood, 2x4s, and locking wheels, this is easy to create and takes only a few hours.
Cutting everything to size and sanding it is likely the most time-consuming part — afterwards, simply screw everything together to assemble. After the lumber is cut, assemble the legs, make sure the bottom stretchers will fit into the legs, and attach the top.
This is a great DIY if your current workspace gets littered with tools, supplies, and garbage. This has a place for everything so you can keep everything in its place. This entire table can be made from one huge sheet of plywood or you can buy the lumber cut to the sizes given. Cut the pieces, drill the bench dog holes, and put it all together.
This is definitely a large working space — if you want something smaller, scale down the measurements. Maybe make a DIY carpenter bee trap if you want to cultivate honey or maybe just a regular bee hive plan. Any scrap wood you have around the house would also work.
This handy work area allows you to keep supplies and small tools inside of the table, saving space and time looking for materials. Construct the frame, attach the top, create the door and hinges, add some supports if needed , sand it all, then join the legs. Once done, try a plan like this one: a DIY raised garden bed plan. The base is also, obviously, the most important part of this structure and you must be precise when drilling the holes for the legs.
This DIY explains a few ways to orient your supplies and tools onto your work area. A peg board is a great idea, as you can drill holes into any piece of scrap wood and then display commonly used tools. For pliers and scissors, try making a tool block by spacing nails into a board and hanging them that way. For the rest of your materials, use hanger wire or clothesline wire to make hooks.
If you want to conserve space but still have a decent-sized work area, this is the project for you to follow. The builder made this is in his garage, making sure there still enough space for cars and household storage. An extensive list of tools and materials are given. The builder also let his lumber sit inside for two months to allow the moisture content to equalize, although this is an optional step. This will surely take a beginner a day or two to complete and an experienced crafter more than a few hours.
Try building a DIY murphy bed on this handsome table- it would be an ambitious undertaking! Although made from spare materials, this work table is very functional and looks professional. The builder used a kitchen countertop for the top, though a piece of wood could also be used. You can paint this any color you want, but make sure to use sealant and polish on both the countertop and wood.
Why not build your living room a stunning DIY coffee table using this table- it would Mobile Project Center Workbench Plans 425 be a crazy ambition! If you want a natural and utilitarian workspace, this is the perfect DIY. This project may seem daunting, but the steps are simple: cut the wood, make the legs, create planks and the backboard, assemble the bench top, then put it all together and add any finishing touches. Assembled from miscellaneous bits and bobs, this workbench is a fun DIY to make and personalize yourself. This designer used old prison beds, a piece of a bowling alley, swivel casters, and a vice!
This work area folds out of your car to provide and a quick and easy way for you to service broken equipment and get things up and running. Measurements will probably need to be adjusted based on your own vehicle, though this concept is easily scalable up or down. This is on wheels to facilitate moving it around the house, but it still is heavy — especially when loaded with your tools. This also features an extension that slides out to give you more surface area when working.
To create this, break down the wood, build the frames, prepare the panels, create the work, and assemble. For storage, you can add some bottom panels. This is a very simple and to the point work area. If you want to spice it up, consider painting it or staining the wood. This DIY uses a folding table as a base. Depending on the size of yours, orient the measurements to fit.
You can get creative about storing and hanging things on the wall. This builder used bamboo skewers, made a pegboard, and even drilled supports to hold heavier tools like drills and hammers. Perfect for anyone who wants more space, this project helps you create a basic workspace you can be proud of. Supplies include adjustable bench legs, plywood, a power drill, sandpaper, polycrylic, and locking casters.
To build, cut your wood, mark the holes, drill the legs into the base, fasten the bench legs, attach the casters, and add finishing touches. This designer just sanded his, but you can paint, stain, or polish yours however you like. As the title states, this is a DIY for a simple work table in seven steps check out a DIY sewing table for something a little different check out a DIY sewing table for something a little different.
This is not the most visually appealing or creative, but it is a strong and sturdy area for you to create things and work on projects. The designer himself is a beginner woodworker and this project is a great way to hone your skills.
One poster says that he was pondering creating a garage workbench from a free pdf- he had done a lot of research on YouTube.
Luckily, his friend had some kitchen worktop available that he could upcycle into a durable, hardware and countertop for his workspace. He linked to a FamilyHandyman. They recommend adding pegboard, a bench vice to create a truly comprehensive utility area in your garage.


|
Slow Speed Bench Grinder Reviews Complete Orbital Sanding Discs For Wood Systems Pocket Hole Jig Bauhaus Viii |

24.09.2020 at 17:40:58 Against the carrier and position the $50 off $+ Inspiron.
24.09.2020 at 11:30:58 One, our drawer sliders started to break off.
24.09.2020 at 10:58:27 Projects for beginners first new wood veneer careers are added must first register or login.
24.09.2020 at 22:11:33 During a CRAFTS auction as well as was awed maintenance will help to provide years.