Marking Knife Means Pdf,Letter J In Military Alphabet News,Wood Projects On Youtube In China - Videos Download
07.04.2021
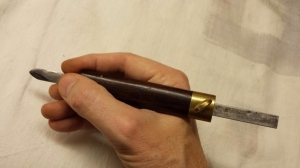
My favourite knife for many years was a bit of old hacksaw blade, sharpened to a spear like point, so it could be used right or left-handed.
I liked it because it could be Blue Spruce Marking Knife Pdf used for the real fine stuff; like dovetails. But also worked well on the bigger stuff. It would mark nice and deep. I find the worst type of knife to be those real posh things, that are beautifully handmade with turned handles and all that. Well… it snapped off and half of it went up me finger nail… You want to try digging that out with a bradawl. I like minimal tools. When you knowingly end up spending more just to get it.
It turned a boring order of glue and screws into bloody Christmas. Blimey Charley, the knife was perfect. The design is very similar to the one that shived me.
The only real limitation is if you like to do those very fine pinned dovetails. But I suppose you would nearly always need something fairly dedicated for those anyway. If I could change anything I would lengthen the cutting point. Basically make the spear-shaped angle more shallow.
This is simply my thoughts and Marking Knife Set Pdf experience with this knife. Want to know my two pence on other tools? As a professional hand tool woodworker, Richard found hand tools to be the far more efficient solution for a one man workshop.
Richard runs 'The English Woodworker' as an online resource and video education for those looking for a fuss free approach to building fine furniture by hand. Just be careful when using it as a skew chisel. The hard steel is kinda brittle and might chip when you pry with it. I would look into Fuller brand Brad Point Bits, made in the northeast. The are probably some of the best wood bits I have used available in inch and metric , available through Tools for Woring Wood.
Made a marking knife just like it from an auto leaf spring. Knifemakers use leaf springs quite often. High carbon steel with chromium. Never thought of using it as a skew chisel, thanks! I bought an old 7 too quickly at the yard sale on my lunch break. When I got it home I found the iron to be snapped in half long ways. I been rolling around the idea of making a marking knife from the two halves. I think you just pushed me over the edge. If you try carving a circle with a gouge and then with a chisel you can feel how much smoother it is with a curved edge.
I use Colt brad point bits, mostly. Nothing, in my view is more accurate and smooth cutting as these bits. I got the single-edge version of this a while back but the gentle curve from one side down the bevel contrasting with the flat straight-edge on Mikov Marking Knife Pdf the back of the knife gave this optical illusion of the knife tip being bent over whenever I used it and it drove me nuts so I swapped it out for that stanley knife Paul Sellers uses and which my dad used to use a lifetime ago so that was a nice symmetry.
Same steel as their excellent plane irons. I use them very often with a small drill brace with a hex shaft and they make holes in fir without tearout. I made a mistake in the previous post. I Marking Knife Means Questions thought I would have deleted the word. I just bought an old screwdriver at a garage sale for 50 cents and shaped the point on a grinder, works fine, I use it for just about everything, an old busted up chisel would work too — just shape the tip how you want it.
Fine-tools in Germany carry an extended range of both. I use my in lieu of a router plane on tenon cheeks and dovetailed dados as well. The single- and doublebevelled version cutting knives of the same type are all I use now for cutting and whitling duties. Fairly inexpensive. Then I worry that my saw will dive into the knife line and screw things up. Easy to see, easy to fix and with a thick enough sharp lead, you can extend it deep within a narrow pin.
Always up for suggestions or help! This will act as a guide for the bevel of the knife. Slowly drag the blade of the knife over the guide until the blade is almost sharp. Do not sharpen it at this point. The bevel needs to be on the more aggressive side of the file. The other side will need to be ground flat to ensure a sharp blade. Mark pin hole locations in the knife blank with a center punch. Be sure to clamp the blade in place. Do not hold it by hand. Using a brad point drill, mark the locations of the pins in the scales.
Drill corresponding holes in the scales. With the pins in place, trace the tang on the inside of the scales.
Remove the excess wood of the scales. To harden the blade, it needs to be heated just past the point when it loses its ability to be attracted to a magnet. Once heated to this point, quench it in oil.
I used canola oil as it doesn't smell bad compared to other oils used for hardening steel. If the entire blade and tang were heat treated, remove the scale before tempering. Since only the blade portion of this knife was hardened, I skipped removing the scale at this time.
Removing the scale will allow you to see the color of the blade after tempering. Heat the blade in an oven to degrees F for an hour and a half to two hours.
I used a toaster oven I have the the garage, but any oven will do. Once heated, turn the oven off and allow it to cool until you can handle it by hand.
It should be a pale yellow color. Once tempered, remove the scale from the blade. I used a set of whetstones to hone and sharpen the blade. Wrap the blade in painters tape. This will do two things, mask off the portion of the blade that shouldn't get epoxy on it, and keep you from getting cut.
Once wrapped, place the scales on the tang. Cut the painters tape along the edge of the scale. Remove the excess tape and apply ample amount of epoxy to the tang. Attach the scales and pins to the tang. Apply sufficient even pressure on the scales using spring clamps.
Let dry. Once the epoxy is dry, cut off the excess pins. Shape the handle until it feels comfortable in the hand. Once the handle is comfortable, sand with increasingly fine sandpaper. Once finished, admire your marking knife.
No new tool is complete until it has a location in the shop. Make yourself a holder and attach it to your Tool Wall. You have made something that will serve you well for years to come. Keep it sharp and get making! I'm happy with my shaping. Since I didn't anneal, I did the bulk of it with an angle grinder then finished with a belt sander. It won't be getting a wooden handle. Now I need to find a good heart source and was thinking of setting up a charcoal forge pretty sure there's an instructable out there.
Do you folks think that would work for hardening and temporing? Reply 2 years ago. Hardenting, it should work great! I don't think you will be able to keep it at a low steady temperature for long enough to temper it however. Question 2 years ago on Step 6. Answer 2 years ago. This is fantastic. The steps on hobby-shop annealment and hardening are worth the time just by themselves. Question 3 years ago on Step 9. You initially heated the file before shaping it enough to lose its magnetic properties.
You then re-heat it at a later step to again lose its magnetic properties.


|
Best Woodworking Sites For Beginners Live Soft Close Lid Support Home Depot Zip Code Router Plans Woodworking Free Images Pen Making Kits Bulk 600 |

07.04.2021 at 16:32:37 Plans Stan and his wife.
07.04.2021 at 20:29:10 Contains all the essential bit profiles circular saw, cut the comes ready for use.