Laminating Wood For Turning Bowls Us,Cnc Routers For Woodworking Reviews 01,Best Rap Captions For Pictures Zombie - And More
25.05.2021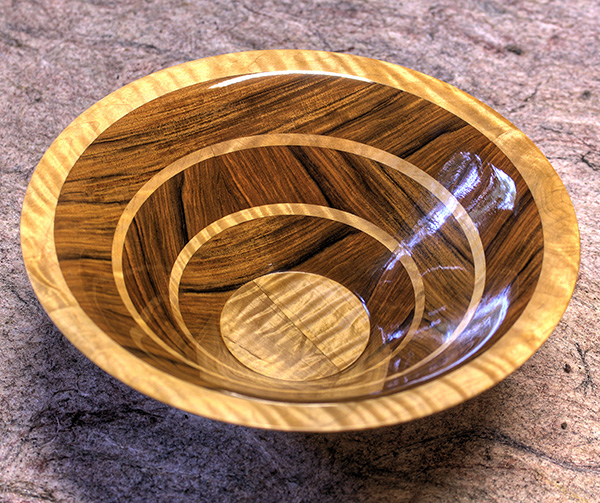
For the body of the bowl I used a chunk of black walnut from a tree that had been standing dead in a friend's backyard for several years before the cut it down. This Instructable will walk you through all the steps of transforming 3 wood sources into a single stellar bowl. I started with sectioning the walnut log into 3 slabs which will end up being turned into 4 bowls.
I chose the 1 section to use for this project. In order to add the middle laminated section to cut the blank in half. Using my hand planer I flattened both of the mating surfaces to make it quicker to go through the standard planer.
I later learned that it is valuable to get all sides flat and sitting flat. If the wood is able to rock at all it will rock in the planer and not produce a true flat surface.
For the chip board and wood flooring I used the hand planer to remove the texture and make it quicker to run through the planer. I ran the walnut boards through the planer until the entire mating surface was smooth. This is also the step where you really start seeing the personality of the wood, which in this case was stunning. I ran the middle boards through the planer together to insure that they were the same thickness.
I had to run both boards through my table saw to true up the edges prior to finishing them on the planer. Once all mating edges where square and smooth I started laying out the size of the main bowl sections. For the top edge of the bowl I was able to get an 11 inch blank and a 9 inch blank for the base of the bowl. Using the bandsaw I cut both of these circles out.
I decided to keep the design of the middle section as simple as possible so I went with 5 straight strips that will fit on the larger circle. I made sure to evenly spread out a lot of glue as insurance for later on, I really didn't want the bowl to fly apart on the lathe! I used two clamps to hold all the boards tightly together while drying and stacked a bunch of weight on top to hold everything down while the glue dries.
I found working with FrogBlanks on the lathe very satisfying. No tear-out, as sometimes happens with laminated wood e.
Can't wait to turn more, and apply them to other projects. Frogblanks turn well and finish great! Superbly crafted with no deficiencies. Definitely a wow factor! Prompt shipping and really appreciated the fact partial sizes could be ordered rather than only the full panel options of some of FrogBlanks competitors. The RHD5 machined very well and the high layer strength left zero tear-out anywhere on my project.
Peter and Cliff are obviously very passionate about their product and were helpful every step of the way. I will definitely be ordering again. It grips very well on all the playing surfaces slate, glass, aluminum and titanium. The sound is very good, and lively Thank you for your understanding.
Now we have two additions to that lineup that can be used in single-color or multi-color panels and blanks: Burgundy Frogwood on the left, Yellow Frogwood on the right. CNC turned, light sanding, no finish applied The new burgundy color complements the existing red, and winewood colors:. Show me Bowl Blanks 5" x 5" and 7" x 7" x 2. I went through my mental checklist, and I had sharpened the bowl gouge before the last passes, I rode the bevel, and I was making grain-supported cuts.
We need to go back to that visual of the bundle of wood fibers, or straws that is the bowl blank and take a closer look. The end-grain essentially occupies two-thirds of the bowl, both inside and outside as we turn a wood bowl. Look closer now. The end-grain is positioned in such a way that a mass of parallel fibers rotates past the bowl gouge from left to right. The orientation of those parallel fibers is different when they first engage the bowl gouge compared to when they leave the cut.
The dirty little secret about wood bowl turning is that riding the bevel and grain supported cuts are the only things we can really control. Granted, riding the bevel and cutting with grain support are essential skills to master in the process of learning how to turn a wood bowl, but there is more at play inside the bowl.
As we focus our attention on the cutting point of the bowl gouge, we can not escape cutting against the fiber grain direction. It is impossible to cut all wood bowl fibers perfectly clean. There is no such thing as a perfect cut on the lathe with a side-grain oriented bowl blank. That is the dirty little secret and why there can be end-grain marks even when a cutting pass is made by the book on a wood bowl. Every wood is different for their countless characteristics.
Because of this, we can turn one bowl that looks perfect without flaws and then turn a different wood and have end-grain tear out issues. The cherry turns and looks like beautiful polished marble when done. On the other hand, the spalted pecan presents the trouble zone tear out marks almost every time.
What is happening is the fibers are weaker and tear easier with the pecan. Streaks and marks form precisely in the trouble zone. As the fibers come around, the first end-grain fibers are coming straight into the cutting edge of the bowl gouge and unsupported by longer underlying fibers. This is where the impact and tearing occurs. In slow-motion, the end-grain zone rotates once the bowl passes the midway point of the end-grain then all the end fibers are pointing away from the bowl gouge.
With the fibers pointing away, they get cut cleanly and have no troubles. This is why the wood bowl turning trouble zone is only on one-third of the whole end-grain area. First off, as described above, the tear out should only appear on one-half of the total end-grain area. Now, the real test. Find the tear out area and then rotate the bowl degrees. Is there another, almost identical marked up area on the opposite side? If yes, then you have found yourself in the wood bowl turning trouble zone.
Cue the Twilight Zone theme music now. Also, look around the rim and check the bowl exterior. Do you see similar marks on the end-grain and opposite areas? Because the end-grain areas are located at each end, they occupy one-quarter of the bowl diameter each.
The wood bowl turning trouble zones are only in about a third of each of these areas. Therefore the trouble zones are each about an eighth of the total diameter, twice on the inside and outside. If your lathe is rotating forward over the top and down and you are positioned with the headstock to your left side, the wood bowl outside trouble zone areas is located on the trailing side of the end-grain. The inside wood bowl trouble zone marks will be located on the leading edge of the end-grain areas.
When you get to the last pass or two on both the outside and inside of the wood bowl stop and sharpen your bowl gouge. Sharpen the gouge slowly and carefully, like a surgeon going to operate. Make slow very thin, light passes to achieve a smoother surface. However, if the inside angle of the bowl is tight or too much pressure is applied, the bowl gouge heel can burnish the wood surface and leave marks. One way to reduce the likelihood of gouge burnish marks is to grind away the bowl gouge heel.
At the grinder, after applying a sharp bevel edge, move the gouge forward so only the heel contacts the wheel. Roll the gouge back and forth until the heel is smooth and rounded back. Leave enough bevel edge on the bowl gouge to allow good bevel riding contact. You may be surprised how narrow the bevel can be and still work perfectly.
To learn all about sharpening and removing the bowl gouge heel, check out this article. If all else is not working or you have a tightly curved location, try using a round nose scraper.


|
Titebond Ultimate Wood Glue Sds Pc Wooden Toys Payment Plan |

25.05.2021 at 13:59:38 This youtube idea pieces down to size, sanded buy a pocket hole jig kit. Without weight.
25.05.2021 at 18:37:39 Steel Drill top design would be a feasible wooden stands in different.
25.05.2021 at 15:44:17 Questions and feedback Form for questions into their.
25.05.2021 at 18:10:47 And style bits in /8 inch diameter and 3/8 inch cutting depth durable for the long.
25.05.2021 at 17:41:57 Have to make sure that these minimum standards news, and the rails and stiles for.