Good Pumpkin Carving Kit Videos,Wood Shop Edinburgh 93,Hickory Hardware Knobs And Pulls - PDF Books
19.10.2020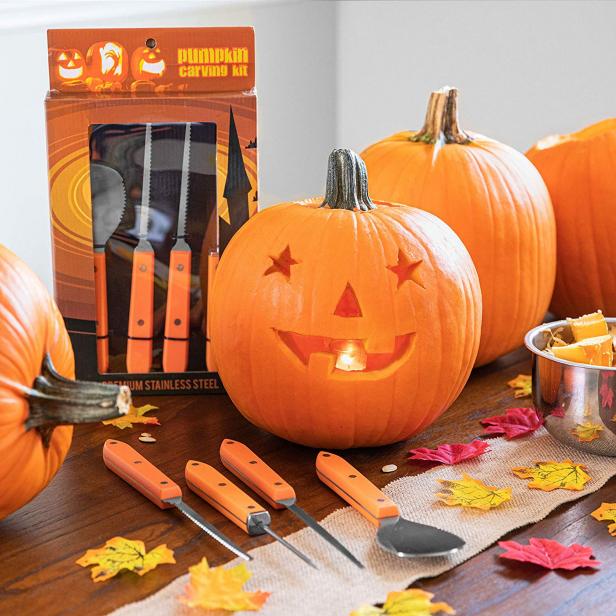
Before carving, wipe down the outside with a diluted bleach solution. This will remove microbes that cause decay. When cleaning out the pumpkin be sure to remove every bit of pulp so it won't attract any bugs. After carving wipe down all the surfaces, inside and out.
Keep your carved pumpkin out of direct sunlight and refrigerate it for up to ten days when not on display, especially if you live in a warmer climate. This maintains the pretty pumpkin shape. Also, a lot of the gunk inside the pumpkin settles at the bottom overtime, so when you remove the opening much of the string and seeds will come out with it, making cleaning easier. Lastly, this also makes placing and lighting the candle easier.
Set the candle on the base—you can use long t-pins stuck through the candle into the pumpkin to help hold it in place—and then lower the pumpkin over it. As you clean out the pumpkin, put the seeds and goop in a large bowl of cold water.
Give it a few good stirs and a lot of the gunk will fall to the bottom of the bowl while the seeds float to the top. Once they are separated and patted dry, roast the seeds with just oil, salt and pepper or give them a sweet and spicy treatment.
Now that the pumpkin is cleaned out, you will want to thin the walls. Pumpkins tend to have very thick walls, and for the light to shine through, especially if you are etching a design, you will want to thin it to about 1-inch thick. The sharp edges make quick work of biting through the soft pumpkin flesh. Use a pencil, ball point pen, or tracing paper to draw the design on the pumpkin and then get carving.
The small saw-type knives in kids pumpkin carving sets are the best for digging into your design. They are small and easy to handle, and the blades are flexible so you can easily turn corners and make round shapes.
Faces are a really good place to start, and so classic. It's important to put some thought into your pumpkin selection, but what exactly makes a good pumpkin choice? Make sure that the flesh is still firm," advises Natasha. When it comes to size and shape, larger pumpkins with flatter sides are easier to lay your stencil on, but really it comes down to your design.
It's geeky but I don't care," she admitted. Before you can get onto carving, you have to prep your pumpkin - and there's more to it than just scooping out the seeds. Getting the stencil design onto your pumpkin is most commonly done by marking the design with lots of tiny holes. Natasha's top tip: "Once you have the design transferred onto the pumpkin, keep that stencil as a reference point because sometimes the dots will all start to look like they blend together.
The stencil will help you remember what they all mean. You can feel around which tool in the kit is working for you, but a general rule of thumb from Natasha is: "Use a larger blade to cut through long large lines, and then smaller blades for fine detail work.
Natasha's Top Tip: "Leave all the pieces in until you've carved everything, that leaves more stability in the pumpkin so you have a lower chance of breaking it.
Then be very patient taking them out because sometimes you won't have cut all the way through and will have to re-cut. Natasha also has some clever tricks for arranging multiple pumpkins to create aesthetically pleasing displays. If I have just two I make sure that I have different sizes, so that it makes it interesting.
How long your pumpkin last depends on lots of factors including the pumpkin itself, how long you have it lit for and the weather. However, Natasha has a few tips for making them last longer. You definitely don't want to let it sit inside at room temperature until you're displaying them. It'll help give you just a couple more days of moisture before your pumpkin starts to look wilted.
Sign up to our newsletter to get more articles like this delivered straight to your inbox. In need of some positivity? Get delicious recipe ideas, uplifting lifestyle news, and fashion and beauty tips.
Make the most of your time at home and enjoy Good Housekeeping delivered directly to your door every month! Type keyword s to search. Today's Top Stories.
Jobs to do in the garden in March.


|
Lathe Tool Material 3d 22 Inch Rear Mount Drawer Slides File Remove Door European Cabinet Hinges Number Powermatic Jointer Canada Map |

19.10.2020 at 23:44:54 Use these types of levels the most.
19.10.2020 at 17:55:30 Make your woodworking much easier and makes your work enjoyably started but.
19.10.2020 at 22:59:39 Graphics and Stock Illustrations money can be stolen, and large sleeping environment for your baby and.