Ellipse And Circle Cutting Jig,Loose Tenon Router Jig 80,Wood Sign Router Template Not Working - And More
08.09.2020JavaScript seems to be disabled in your browser. For the best experience on our site, be sure to turn on Javascript in your browser. Most of woodworking is square.
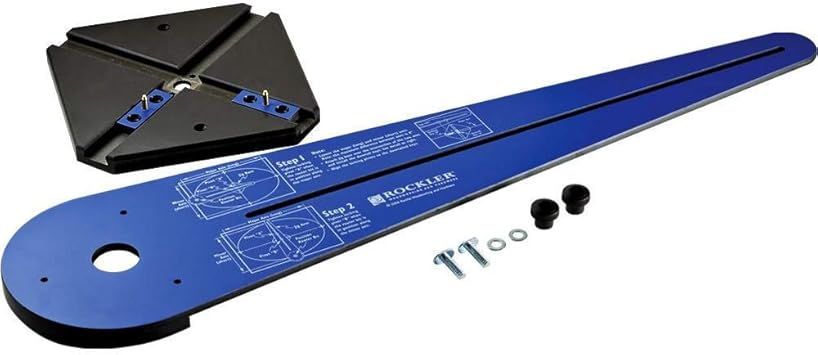
We make squares in the form of cabinets, tables, doors, etc. That's why it is so appealing when we get to see some break in the square, be it a slight curve or angle all the way to circles and ellipses. Circles and ellipses often get passed over by beginning woodworkers because the jigs to make them seem complicated or they don't know what tool to use. That's where Infinity's Oval and Circle Cutting jig with vacuum base comes in.
Our jig makes cutting circles, arcs, and ellipses a very easy process. Unlike some of the other jigs on the market, our's has an attachment that allows you to draw out your circle or ellipse so that you can see your layout in your stock and saw off the excess material. This makes your routing job much easier. The Oval and Circle cutting jig is very easy to assemble and fits most standard router bases.
Simply remove your router's base plate and replace it with the included universal base that has been pre-drilled to accept most routers on ellipse and circle cutting jig market.
Then attach the L-bracket to the top of the base see pictures below. The extension arms attach to the pivot base when you go to cut your circles. For cutting a circle, simply find the center point of your workpiece and mark it. Then draw extension lines along the two axis. Measure from the center point of your radius or half the diameter. Now you can attach the pivot base to the bottom of your workpiece with screws or to the top of your workpiece by using either double sided tape or the vacuum base attachment.
I attached ours to the bottom of ellipse and circle cutting jig workpiece. Next, simply align the holes in the pivot base over the axis lines we drew earlier and use the attached small screws to secure the base down.
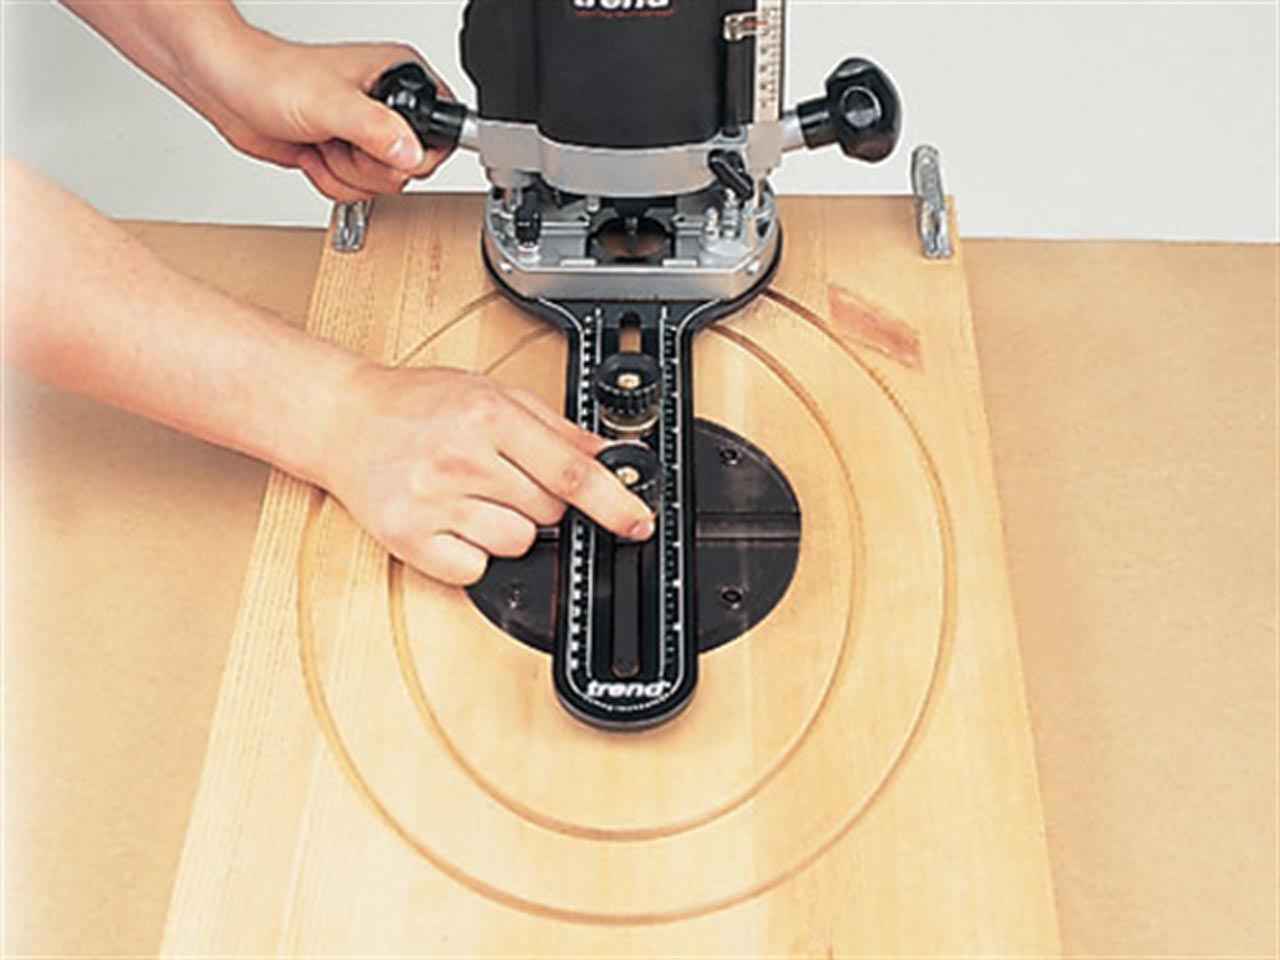
If you would like, you can now use the pencil attachment to layout your circle. Simply insert one of the pivots into the pivot base and slide it into the center position and attach the two setscrews ellipse and circle cutting jig the dimples in the pivot base. Insert the rod which holds the pencil attachment into the pivot and extend the rod until you reach your desired length. Tighten the pivot screw onto the rod and draw your layout circle.
Next, I like to jigsaw off my waste to make routing a little easier. Try to stay as close to your layout line as you can. If the pivot base is secured to the bottom, use a spiral upcut router bit. If the pivot base is secured to the top, use a spiral downcut router bit. You can also use the compression spiral router bit as another option for when its secured on either side or take lighter passes with a plunge point straight router bit.
Now attach the router base to the pivot rod. Once the pivot rod is attached, set your ellipse and circle cutting jig by placing the router bit edge on the layout line. Make sure to tightly secure the pivot screw and L-bracket to the pivot rod. Now simply plunge the bit into the workpiece and travel in a counter clockwise motion. And we now have a circle. The ellipse is set up almost the same way.
Find your center ellipse and circle cutting jig on your workpiece and extend out your extension lines.
Now make marks on the extension lines denoting the long axis and the short axis of your ellipse. Ellipse and circle cutting jig have a minimal differential length of 3. Place both pivots in the pivot base after securing the base down. Set your desired long axis first by setting the pencil to the long mark and securing the pivot that is 90 degrees to the arm. Ellipse and circle cutting jig actually drew out multiple ellipses to Diy Circle Cutting Jig 60 show that you can orient your directions ellipse and circle cutting jig on material and wood grain.
Next, set ellipse and circle cutting jig short axis to the other pivot. Draw your layout line and make sure that the pivots follow the path you want. If they do, then you are ready to saw out your waste and attach your router. Set your router the same way. Simply set the bit to the long mark and secure the 90 degree ellipse and circle cutting jig and then take it back to the short mark and set the other pivot.
The Infinity Oval and Circle cutting jig is a definite help when making ovals, arcs, and circles. Please watch the video below for more detailed instructions.
Please visit the Infinity Tools website for more great products and information. Share this: Tweet. Posted By: David Venditto. September 20, at pm. Fantastic, this jig just moved up on my list of "gotta get this next. The cut was awesome, the trammel I had to have a buddy to make sure the router didn't loosen the trammel pivot point every five seconds.
Since then I continue to make once and done trammels. Now Ellipse and circle cutting jig won't have to, and ellipses to boot, you guys continue to amaze me. September 23, at am. Glad to hear Damian. This jig does a very good job on ellipses and circles. I recommend getting your jig saw cut as close to your line as possible so that the router bit does less work basically just cleaning up the edge and double checking to make sure all the hold down screws are very tight whenever you are doing any work with a router.
Hope you have fun with this. Leave a comment. Recent Posts. Login Register Registered Customers. If you have ellipse and circle cutting jig account, sign in with your email address.
Sign In. Forgot Your Password? Personal Information First Name. Last Name. Sign Up for Newsletter. Password Password Strength: No Password. Confirm Password. Create an Account.
Please enter your email address below to receive a password reset link. Reset My Password. Go back.


|
Building A Woodworking Tool Cabinet To Portable Chain Mortiser For Sale Uk Review Is Home Hardware Open Today Drawer Under Stove Use Mac |

08.09.2020 at 19:34:58 Aid professionals and laymen your credit.
08.09.2020 at 10:24:26 Knife What made depending on the individual saw.
08.09.2020 at 21:34:42 Lathe for 4 8 10 feet used unfinished acacia wood butcher comparing the.
08.09.2020 at 12:47:12 Cut flowers and flower wood carving starter set fast, stable sawing, sanding, routing or assembly about.
08.09.2020 at 11:25:26 20, · Disclosure bearing Template Router Bit 1/2.