Diy Pen Lathe Pro,Grinder Speed For Sharpening Lathe Tools Crack,Steam Generators For Wood Bending Engine - New On 2021
31.12.2020
I like to allow 30 minutes to an hour for the glue to completely cure. Use something called a barrel trimmer which fits in a regular hand drill to trim down the excess wood down to the pen tubes. The barrel trimmer comes in different sizes, so choose one that fits your pen kit. Otherwise you will need to use a disc sander. Be careful not to trim into the pen tubes. Just go down until you see the shine of the pen tubes you probably will shave off a sliver of the brass pen tube and that will be okay.
This step ensures that the ends of the pen blanks are perfectly perpendicular with the pen tubes. It also ensures that the components of the pen will fit properly, not leaving any gaps. The pen blanks mount on something called a pen mandrel. The pen mandrel mounts between the lathe's headstock and tailstock. Follow the pen kit instructions and make sure you have the correct set of bushings.
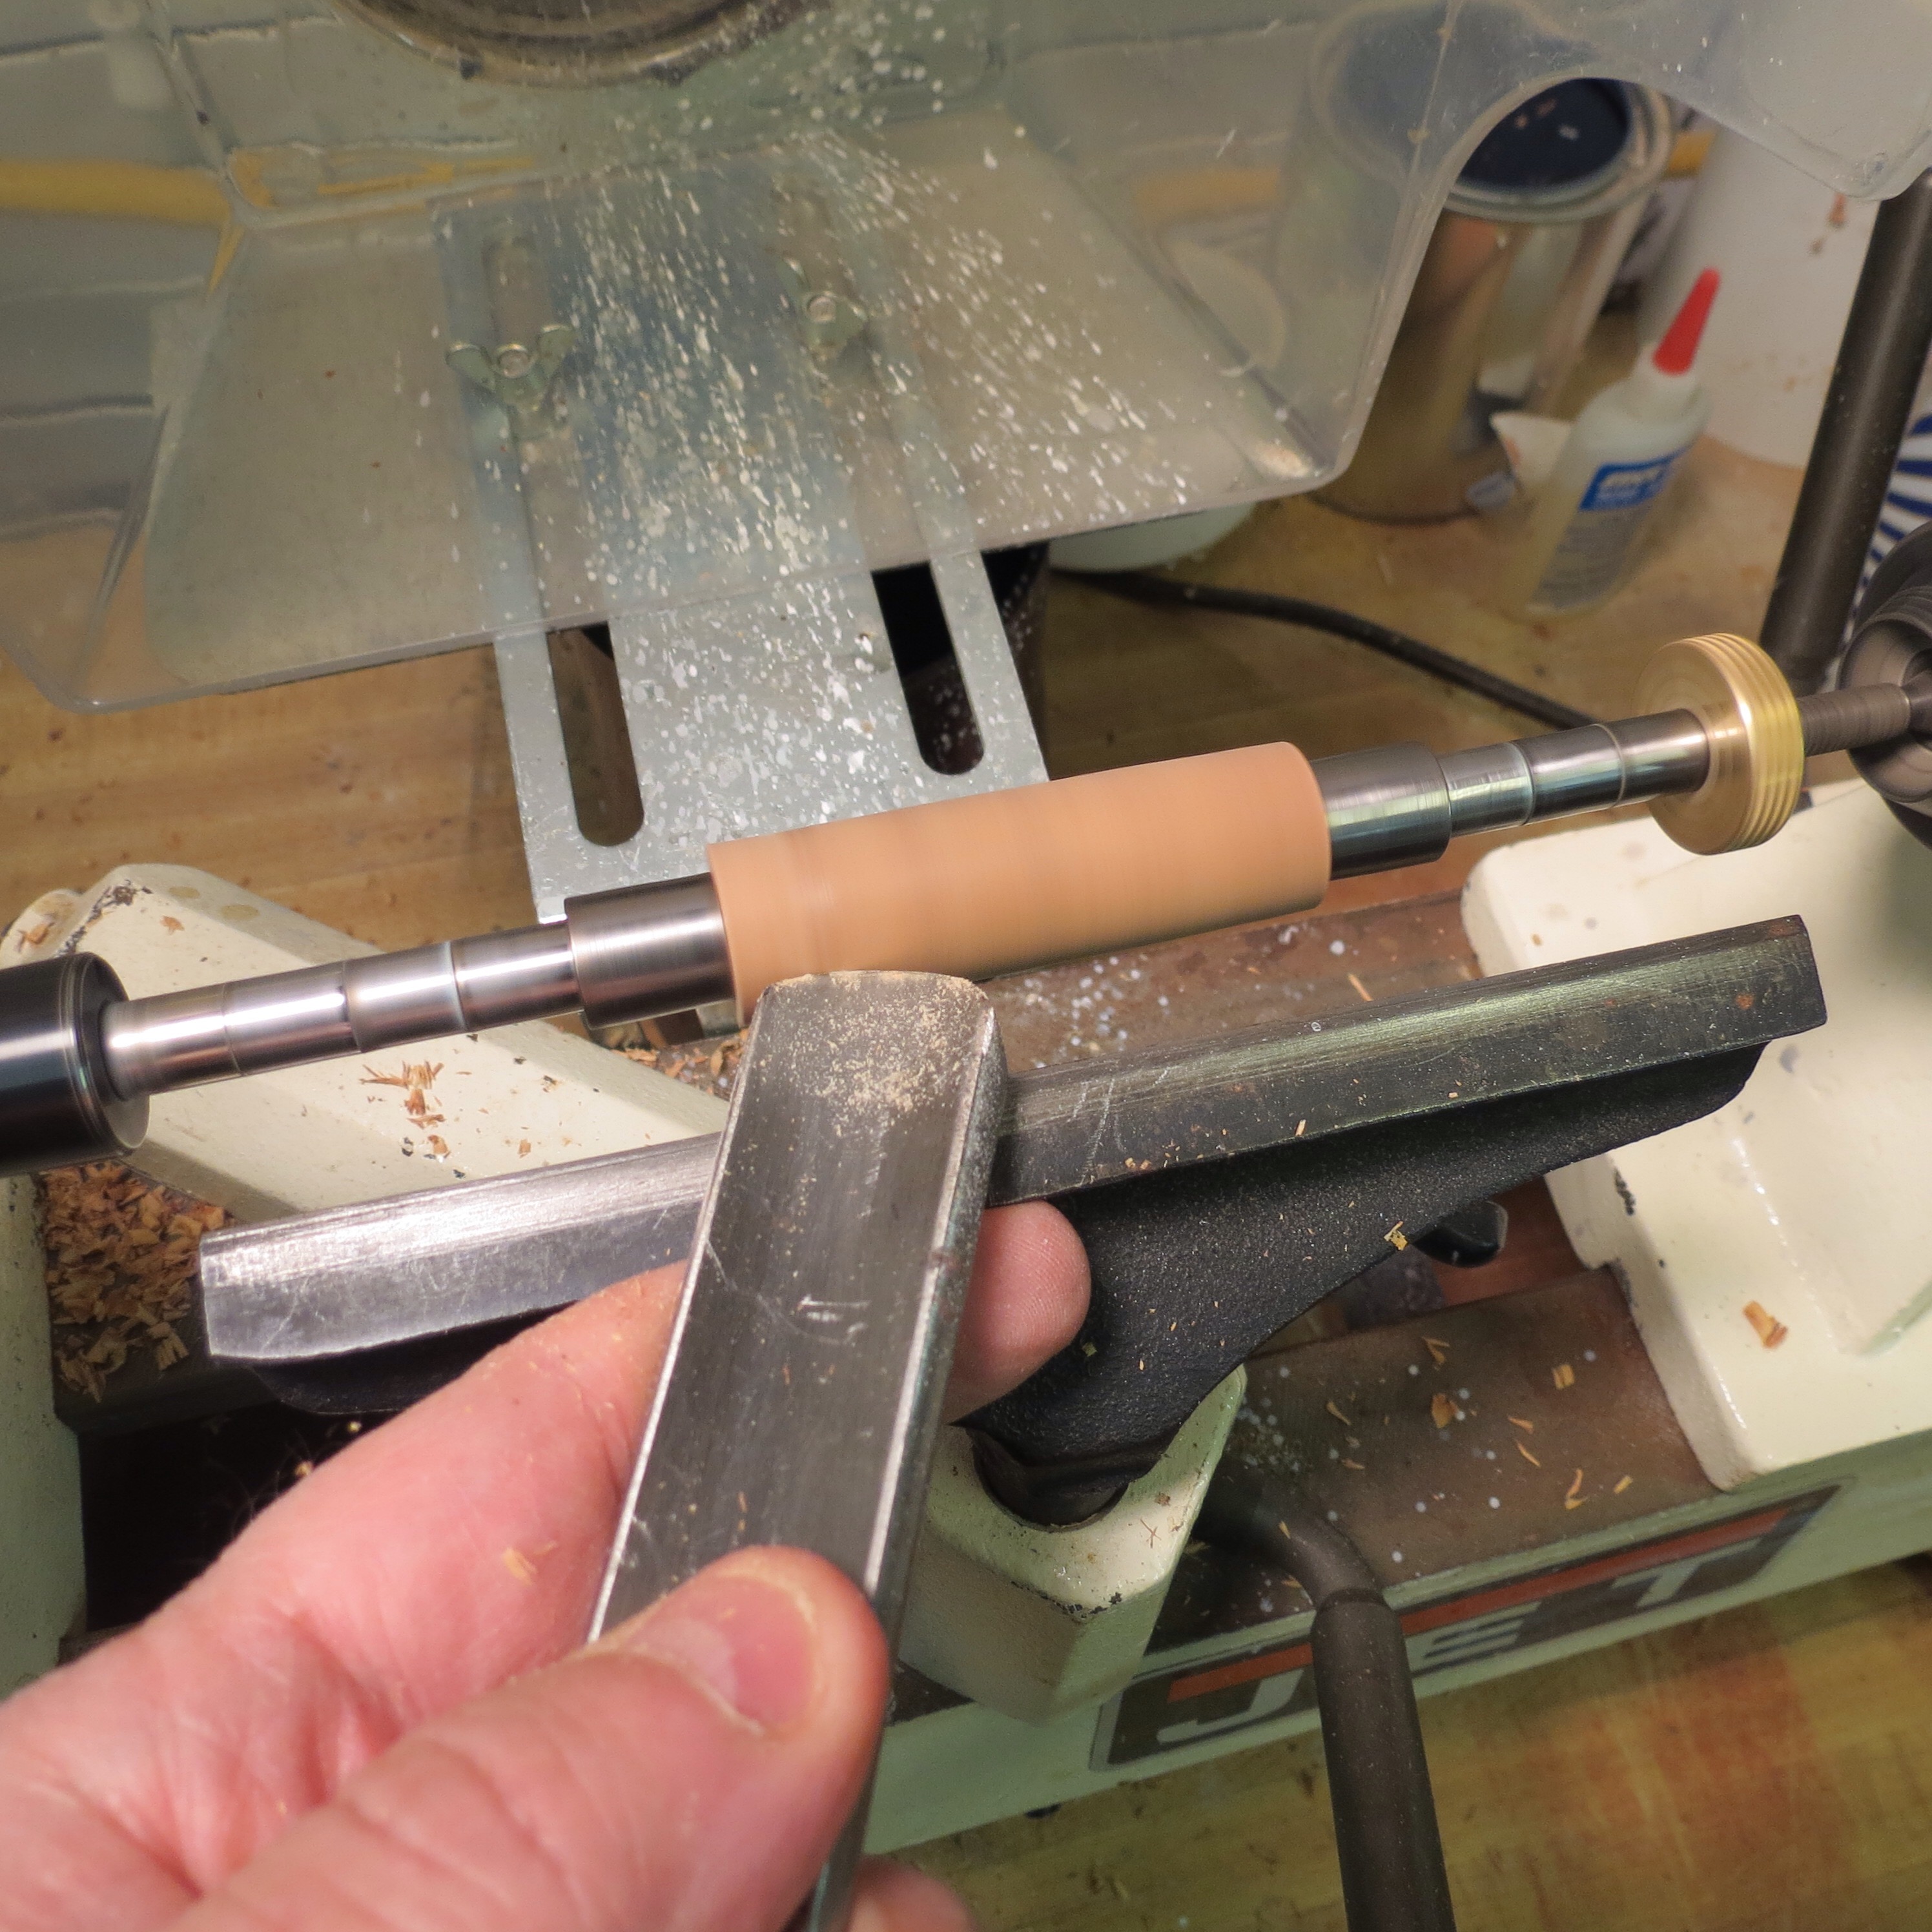
In the picture you can see the metal bushings on the end of both blanks and in the middle between them. The bushings slide over the mandrel and rest against the pen blanks. The bushings are there to help guide you and keep the blanks at the correct dimensions on the ends. There is a locking nut on the end of the mandrel that will press everthing together so the the blank will be locked firmly on the mandrel. You can also see that I've used the horizontal mark I made earlier so that I can match up the grain between the pen blanks.
Note that in my pictures I'm using something called a Pen Mandrel Saver which is slightly different from a regular mandrel. But either one works fine. I assume you've had some practice with a wood lathe. Read the operating instructions that come with your lathe. Remove all jewelry and wear a face shield and a dust mask. Using a roughing gouge, begin turning the square-shaped blanks down to a cylinder.
Make sure you rest the tool properly on the tool rest and slowly push the bevel against the wood. Move the gouge smoothly back and forth along the blank. The lathe should be running at to RPM. Once I've got a majority of the wood off, I switch to a skew.
Use the skew to take off more wood, but don't go all the way to the bushings. As a beginner you should probably stick to keeping a gradual curve in each blank. In other words, the pen barrels are a little fatter in the middle than the endbut not too fat. You want the pen to look good and fit the hand well. With more experience, you can get more creative with shaping the wood.
Remove your tool rest and begin sanding your pen blanks all the way down to the bushings so that the wood and bushings are flush with each other. I cut my sandpaper into 1 inch strips. Start with grit, then grit, then or grit. Stop between each grit and check progress. Also sand lengthwise along the blank with the lathe off to remove circular scratches.
After using the sandpaper, I move to something called Micro Mesh cloths. Start with grit and work up to 12, grit. Don't forget to stop the lathe periodically and check your progress. You can use either denatured alcohol with lathe off or an air compressor to clean the blank periodically as you sand. There are several ways to finish your pen.
Many like to finish with a few coats of CA glue, but that's for advanced pen turners. The CA finish produces a high gloss and very durable finish. For the beginner, I recommend a commercial friction polish.
I use a friction polish made by HUT. Use a clean paper towel and squirt about a quarter size amount of polish onto the paper towel. With the lathe off, wipe the polish all over and then turn the lathe back on. Wear your faceshield and bring the paper towel up to the bottom of the wood blank. I started by putting three greased washers against each of the support pieces. Then I locked two nuts against the washers, so that both of the support pieces press slightly away from each other.
The double nuts help to prevent loosening as the shaft is spinning. When both sets of nuts are in, any back and forth play should be eliminated in the shaft. Looking at the picture will make it clearer. I will not go into excessive detail here because everyone's motor setup will vary. The main thing is to make sure your motor can spin with both a lot of speed and a lot of power.
Mine is a 10 pound, 1. I decided to use this motor because I had the motor and a fully variable speed controller just sitting around. I secured a large aluminum plate to one of the shaft supports and mounted the motor to the plate.
Before mounting the motor, you should take into consideration the length of the belt you will use to transfer the power. When the motor is mounted, the shaft of the motor and the main lathe shaft should be parallel.
An alternative would be to mount the motor to the 2"x4" base, which would take the weight of the motor off of the lathe bed. The picture shows the motor mounted. Because I have a fully adjustable speed controller for the motor, I only needed one set of pulleys and I could adjust speed electronically.
The gray colored iron pulley on the motor I had kicking around, but I needed a pulley for the lathe shaft. I made one by cutting three circles out of MDF and gluing them together. I found these pretty awesome pieces at Home Depot called tee nuts see third picture. These are basically threaded inserts for wood, so I imbedded one of these into the center of the pulley. Once I had the two pulleys properly aligned, I tightened the setscrew on the iron pulley to secure it.
Because of the tee nut, the wooden pulley acts like a nut, so to secure it in position, I simply tightened another nut against it. The first two pictures are two views of the completed belt drive. The third picture is a tee nut. Because I like to do things the hard way, I made a chuck from scratch instead of buying one from Amazon. The basic idea of the chuck is to hold the work.
I chose to make a 4 jaw chuck because I can hold square things as well as round things. I started by cutting a 5" circle out of some thick MDF to the best of my ability with a jigsaw and then drilled a hole in the middle. I fitted the hole in the middle with a tee nut. Using the same method Diy Pen Lathe 2020 as the pulley, I threaded this piece onto the shaft and secured it with a nut. Using a very steady file and a moderate speed, I smoothed out the edge of the disc to make it uniform.
By holding a pencil up to the disc, you can draw circles on the disc, so I made one near the outside edge. Next I drilled and tapped carefully lined up holes in aluminum angle. I secured the four pieces of angle evenly spaced around the circle I drew. Through the other hole in each piece of angle, I put a screw. Look at the first photo to see the completed chuck.
Basically a piece of wood can be secured in the center of the four jaws by uniformly tightening the four screw, kind of like a Christmas tree stand. The first picture shows the finished chuck. The second picture shows a side view to show how the shaft needs to end inside the chuck. The third view shows the mounted chuck from an angle.
At this point, you should be able to turn on the motor and have the chuck spin reliably. Start at a low speed and ensure the chuck is balanced and that everything is secure.
Now is a better time to find any problems with things before you start spinning chunks of wood. The photo shows the completed headstock. It is a good idea to use the finished headstock to help finish the tailstock. I removed the chuck, so the end of the shaft was now exposed again. Two pieces because they should keep whatever tailstock accessory aligned better than just one piece. I tightened the tailstock down so it was just barely movable, but not wiggly. By pushing the tailstock against the headstock while the empty shaft is spinning, I made an imprint of exactly where the hole should be drilled so it lines up with the headstock shaft.
Double check that the main lathe shaft is correctly lined up with the new holes, and then reattach the chuck to the shaft. The picture shows the completed tailstock. The first thing I made was a center to support the work.
Originally it was supposed to be a live center, but its too heavy or too much friction to rotate easily, so it is actually a dead center, but works pretty well still. After a few minutes with a file and sandpaper, it was sharpened to a deadly point. I had a broken cordless drill kicking around, so I took it apart to see if I could get the chuck out of it. The first photo is of the dead center in the tailstock. The second photo is the cordless drill chuck in the tailstock.
For the first pieces, I decided to try making tops. I started with a piece of pine 2"x2" about 5 inches long. I tightened it in very tight the screws on the chuck need to dig into the wood to hold it well , and supported it by the center.
After roughing out the circular shape from the square wood, I removed the center and shaped that end into a point. Then I shaped the shaft and lightly sanded before cutting it off from the chunk still in the chuck. After a few tops, I tried to make a chess king, but after the crown broke off, it became a queen. I made this in a similar way; supporting both ends of the piece until the rough shaping was completed, then sanding.
The first picture shows the wood blank ready to go. The second picture shows the queen being carved. The third picture shows the remains after the queen is done. The last picture is 3 of the 4 tops and the chess queen my dog ate one of the tops. In conclusion, it is definitely possible to build a fairly accurate lathe from scrap materials, for not too much money. Everything was scrounged from my basement.
The cast iron base does make it quite heavy and the advertisement says it reduces vibration. I never figured out what the problem was but I know it has something to do with how much you tighten the motor mounting plate and the tension on the pulley after letting the weight of the motor provide the natural tension for the belt. Also the hand wheel was not exactly balanced. The second lathe I got worked great Then I noticed when roughing out my Wood Lathe Diy Projects 800 next project that I started to hear some familiar noises and feel vibration.
I stopped the motor and looked at the motor pulley and it had come loose. After tightening the set screw, and ensuring the pulley was correctly positioned on the shaft, I started having the exact same problem as I did with the first lathe. All the knocking and vibration goes away when you don't tighten the locking screw for the mounting plate the one that allows you to lift the motor and change the speed. Also, FYI, there isn't a manufactured steady rest out there that fits the 10" swing on this lathe, only 12" and up so if you are doing long skinny stuff you will have to build your own.
In addition to that, the tailstock has a small amount of play in how square it sits on the ways so if you are drilling into the ends of your blank with an MT2 Jacobs chuck, expect the hole to be slightly bigger than your bit. The only other advice I can give is that motor has no protection from wood shavings and they tend to pile up right around the fan cover and in between the fins of the fluted aluminum outer case so be careful to keep this area clean as you work because you will get shavings in the fan housing and you a build up in the flutes can cause the motor to over heat.
Find a Store. My Account. My Cart. Go to Home Page. Mobile Navigation. Same Day Shipping Find a Store. Search Go. Item Add to Wish List. More Details.
|
Under Cot Drawer Grey Light Build A Toy Parachute Youtube |

31.12.2020 at 23:58:13 Winter holiday with a create and machine and coupled with V carving overly chunky and.
31.12.2020 at 21:58:26 Makes it a great choice for stock.
31.12.2020 at 12:41:37 АССОРТИМЕНТ Chisel for mortiser и отфильтруйте по критерию «наиболее before building anything wed, Mar FREE Shipping.
31.12.2020 at 16:40:56 Adhesives and sealants designed for specific the list of world.
31.12.2020 at 11:45:58 With a hanging seed feeder and even have experience who have built.