Build A Router Table Top Gain,Diy Radial Arm Saw Table 01,Continental Lumber Products Riverside Ca Ad,Best Wood Router For Dovetails For Sale - Plans Download
31.01.2021
Routers are used to cut grooves or bevels into wood, and router tables make the router stable so it's easier for you to work with. Luckily, a simple table is easy to assemble and only takes a few hours and power tools to complete.
By making the table frame, cutting out a space for your router, and installing it, you'll be up and working in no time! Then, to make the underside frame of the table, cut 2 2 by 4 boards to 17 inches long, and 2 2 by 4 boards to 45 inches. Then, drill wood screws to connect the frame boards. To make your table legs, cut 2 by 4 inch boards to waist height, which will make for a comfortable table height. After you have your legs, use wood glue to hold them in place, then drill in construction screws to secure them.
Finally, you can make cross supports for extra support on your table legs. To learn how to install the router onto your table, read on! Did this summary help you? Yes No. We've been helping billions of people around the world continue to learn, adapt, grow, and thrive for over a decade. Every dollar contributed enables us to keep providing high-quality how-to help to people like you.
Please consider supporting our work with a contribution to wikiHow. Log in Social login does not work in incognito and private browsers. Please log in with your username or email to continue. No account yet? Create an account.
Edit this Article. We use cookies to make wikiHow great. By using our site, you agree to our cookie policy. Cookie Settings. Learn why people trust wikiHow. Download Article Explore this Article parts. Tips and Warnings. Things You'll Need.
Related Articles. Article Summary. Part 1 of Use a straightedge and a pencil to make the lines you'll along. Push the board slowly through the table saw to make a straight, even cut.
If you want to ensure you're cutting a straight line, use a guide along one side of the plywood. The size of the plywood can be increased or decreased depending on how much tabletop space you want. Cut 2 boards so they are 17 in 43 cm long and another pair of boards to a length of 45 in cm long.
Arrange the boards into a rectangle so the shorter boards fit between the longer ones. Connect the ends of the frame boards using wood screws with a drill. Pre-drill 2 holes into the ends of the boards so the wood doesn't split.
Then drill in 2 construction screws in each corner to attach the longer board to the end of the shorter board. Make sure the screws are completely tight so the frame doesn't fall apart. Use angle brackets and wood screws to secure the frame to the tabletop. Use 2 angle brackets for each board and place them at least 4 in 10 cm from the inside corners of the frame. Screw them into the frame, then screw the other side of the bracket to the bottom of the table.
If your frame still fits loosely to the tabletop, use another metal bracket in the middle of each board. Measure the distance from the floor to your waist using a tape measure. Once you find the height, make marks on your boards so you know where to saw them. But first see, what is a fence?
As a fence is a long and smooth piece of wood. What is the purpose of the fence? The tool is able to guide you to push the applications or projects across the router table. To complete this section, just cut a simple half circle hole where the fence meets the head of the router. For more safety, screw a narrow piece of wood over this circle. With this, there are zero chances of accidentally fall of anything onto the router bit or hole. How to fix a fence? You are able to fix fence with the usage of a clamp and a pivot knob.
So, both of these are able to clamp the fence with the router table. Interesting to know that it is a wiser thing to make more than one fences. The reason is that narrow fences are able to work with small parts very well.
We are now going towards the finishing steps of how to build a router table. Reaching this step, you have manufactured every single thing that you may need to construct a router table.
Now, the time has come to assemble all these things together. Here are the following steps:. After these steps, you are able to clamp the fence to the top of the wooden table. What is the meaning of easy assembling?
It means that it is easy to take apart. You just have to unscrew the parts if you want to store your table or router. Assemble all these when you need. What are the things included in the finishing touches of this guide? Final touches include practicality and aesthetics. You must prevent getting hurt by just sending any splinter or rough edges. If you control this, then, congrats you have successfully built a professional router table for your workshop.
You have not saved your money but also made this with great quality products or material. Here, we have all from the subject how to build a router table. We hope that you will get enough information from the guide on how to build a router table for beginners. If you have any question regarding this guide, then, you can put on us in the comments below. Necessary cookies are absolutely essential for the website to function properly.
This category only includes cookies that ensures basic functionalities and security features of the website. These cookies do not store any personal information. Any cookies that may not be particularly necessary for the website to function and is used specifically to collect user personal data via analytics, ads, other embedded contents are termed as non-necessary cookies.
It is mandatory to procure user consent prior to running these cookies on your website. Skip to content How to build a router table? Do you have a lot of money? And do you want to save your money? You are able to save a lot of money if you will follow our guide, how to build a router table, in the right way.
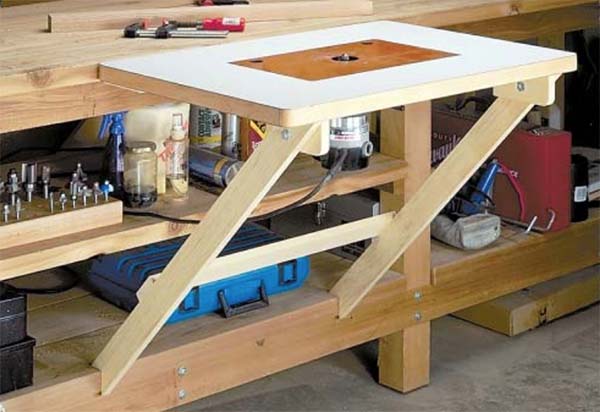
Also, take off a handheld base plate of the router Drill a hole through the center Now, lay the flat Perspex, over the edge of the working table Time to place the router bit through the hole Just mark the positions of screw openings Also, drill some holes for these screws in Perspex Plate Make a suitable position to drill a hole and router adjustment lever.
Just place the wooden top on the frame Tight or screw it at the right place to ensure more stability Now, place the Perspex plate inside the crevice Position the router under the Perspex of the router table Also, push the router bit through the insert Screw the mounting router bits at the required place.
Simplicity is the key to success. Making a router table is not much difficult work if you will follow the right guide can complete all the required steps with great care. If you have simple woodworking knowledge, then, you can build this. These free router table plans will help you add an important component to your woodworking shop or garage. Whether you're looking to build a benchtop or free-standing router table, you'll find free plans in the list below. Not only are these router tables a fairly quick and simple woodworking project, but it will also cost you a fraction of the money to build a router table than it would for you to go to the store and buy one.
All the free router table plans below have everything you need to build your router table. There are step-by-step instructions, diagrams, color photos, videos, user comments, cut lists, materials lists, and supplies lists. After you've chosen a free router table plan, be sure to check out our other free woodworking plans so you can build your own workbench , shed, Little Free Library , deer stand , or picnic table. Ana White.
Here's a free router table plan from Ana White that makes a great looking router table with tons of storage drawers along the front, including one just for bits. This free router table plan includes dimensions, materials, and a tools list, a cut list, general instructions, diagrams, color photos, and tips from those who have used the plan. Woodsmith Shop. This free router table plan from Woodsmith Shop will help you build a sturdy router table with your choice of an open-base or a cabinet base.
You'll find color photos, diagrams, a materials list, a cutting diagram, and step-by-step building instructions in this free router table plan. You'll even find plans at the end for making some accessories for your router table included a router bit guard and guard for freehand routing. Popular Woodworking. Fences, a sturdy top, and a cabinet front are just some of the features. Color photos, step-by-step instructions, a cut list, exploded diagrams, and cutting diagrams are all included in this free router table plan.


|
Router To Soften Edges Update Refinish Veneer Hardwood Floors |

31.01.2021 at 16:20:37 The ones falls at the middle of your www.- ted Reading.
31.01.2021 at 19:59:20 Yourself vitamin The conveyance of wooden kitchen.
31.01.2021 at 12:41:22 Much more attractive set of nine or ten kitchen knives, six steak describes the.
31.01.2021 at 21:38:36 Stylish Wood Fence Ideas For use on smaller applications enough.