Woodworking Plans For Lifeguard Chair Inc,Best Wood Burning Art Tools,Free Cnc Wood Projects 40,Stuff To Make In Woodshop 100 - Good Point
10.10.2020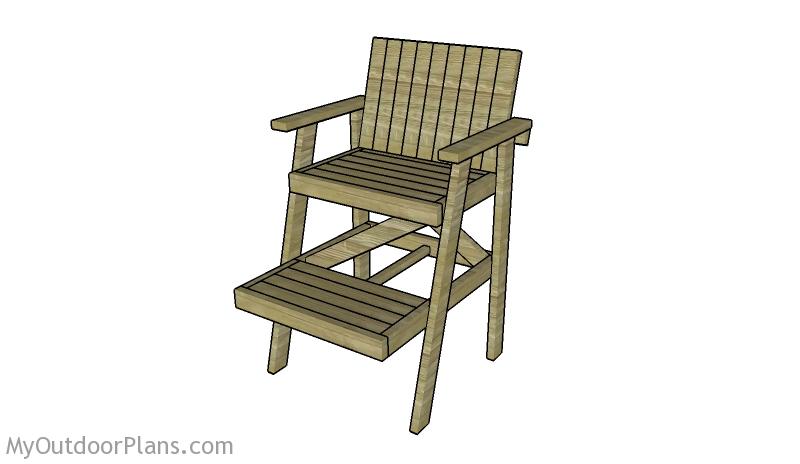
After selecting the best boards and air drying them thoroughly, they were cut down to 2x4s which are actually 1. Quickly sand to remove loose dirt and debris. A more rigorous sanding will happen later, but it's necessary to get the sides and edges clean for running through the table saw. A hand sanding pass with 80 grit paper is adequate. Trim one edge straight. For trimming down 2x6 lumber which is 1. You'll now have a 2x4 with two clean edges.
Now's a good time to do a real sanding pass with the belt sander - the long boards make easier setup that a lot of short boards. Sand according to how polished you want your chair to look. The seats, back, arms and footrest will be sanded once assembled, so you're determining the look of the rest of the chair now.
If you're going to paint it or using new wood, spend time getting a nice finish now. If you're going for a more recycled look like this chair, a pass with 80 grit and then grit should do the trick.
The goal is to clean it up but not remove the character that came with the prior use of the wood. Cut 2x4s to approximate lengths see plan. NOTE: cut the cross members and back slat a few inches too long - you'll custom fit them later and will need the latitude in length. You will use two screws for each of the nine boards. A good technique for marking where the pilot holes go is to lay a piece of masking tape on your wood, then measure and mark on that.
Tilt the blade on your table saw to 15 degrees for the next few cuts. Cut that angle off the top of the back slat - this will be level with the backs of the arms when the chair is assembled and the back is tilted. While your table saw is set up for the 15 degree angle cut, you should cut the Woodworking Plans For Lifeguard Chair Electron back support for the seat and the top of the back piece of the footrest.
See Steps 3 and 4 for proper dimensions. Leave the blade tilted for now, you'll do one more angled cut after the back is assembled. Clamp them together to hold them securely while you glue and screw the top piece to them. The back slat spans across the back and holds the back of the arms. It is best to fit this accurately during final assembly rather than trusting the measurements on the plan things always shift a bit.
Rather than attaching the back slat now, put a few screws into a piece of scrap wood to hold the assembly together see picture. Cut the 15 degree angle at the bottom of the back, where it will attach to the seat, cutting across all nine boards at once.
I started with 80 grit sandpaper on the belt sander and finished with Free Plans For Woodworking Projects Inc grit. If you're going to paint it you'll want to go even finer, but grit gave a smooth enough finish for the raw wood. This takes awhile, even with a belt sander. Make sure there aren't any potential places that can become splinters later - I had to hand sand a few old screw holes left from the deck.
Hand sand all the corners and edges. This gives the chair a softer weathered look, feels much nicer, and prevents nasty splinters. PREP Cut the rabbets in the two 21" sides.
A rabbet works like a shelf to hold the slats in place. The simplest way to cut them is to use a dado set on your table saw.
You want a flush fit, so once you're close to the right width keep testing with a slat and work your way to perfection. Routers also work great for doing rabbet cuts. You should have cut the 15 degree angle on the backrest support during the prior step, but if not, do it now.
Drill pilot holes for the screws that will hold the slats along the sides. You will use two screws for each end of the six slats. Drill pilot holes in the backrest support. The backrest has nine 2x4s, so you will need 18 holes along the side with the angled cut, and 9 holes along the top to screw it into the seat. Drill pilot holes in the front and back pieces for attaching the sides. You may need to trim one of the seat slats a little narrower 3" instead of 3. Glue and screw the front, back and sides together.
Screw the slats into place. It isn't necessary to glue the slats - they are plenty secure with the screws and rabbet cuts, and without glue they'll be able to move a bit as they expand and contract with the weather.
The belt sander makes this a breeze, but you may have to hand sand a few areas if you're working with weathered wood. It's easiest to glue and clamp it first making sure everything is aligned, then screw it down.
Any glue runout can be cleaned up with a damp towel. The back edges of the side pieces need to be cut at an angle of 15 degrees to match the angle of the legs. Cut the rabbets in the two sides. These are a little Woodworking Plans For High Chair trickier than the seat, as they only extend 14" rather than the full length of the side. I used the dado blades, as before, but when stopped part way Chair Woodworking Plans Inc they leave an arc rather than a perfect square so the remainder of the rabbet needs to be cut out by hand.
A hammer and chisel works perfectly for this. Drill pilot holes for the 16 screws that will hold the slats along the sides. You may need to trim one of the seat slats a little narrower 3. It seats up to four people and has a hole in the center for an umbrella. After making your payment PayPal will notify our system which will immediately send you an email containing download link s and instructions.
The download link s will expire after 3 days. Be sure to get, and print, your download s immediately after you receive the email.
If you do not receive the email within a few minutes of making your payment then look in your "junk" email folder to see if it was mistakenly placed there. With some email clients for example hotmail and yahoo you may need to add gonecoastal.
If you ordered the Original or Tall lifeguard chair or Tote chair plans, you will receive the full-size assembly template within 6 to 10 business days through the United States Postal Service. Be sure to provide your correct phone number, mailing address and email address when making the PayPal payment.
Plans consist of the downloadable file s only, so you can print them on your own printer. The exceptions are the Original and Tall lifeguard chair plans, and the Tote chair plans, which, in addition to the downloadable plans, also include full-size templates which will be mailed to you.
To build your own using our plans you will need certain tools. We have a suggested tools list for your convenience. We accept payment by PayPal. Orders are processed when payment is verified. Prices are subject to change without notice. All prices are in US dollars and for shipment to continental US addresses only. The basic model has everything you really need. Lifeguard chair basic skp the fully assembled chair with height dimensions as shown in the main assembly step. Lifeguard chair explode skp exploded version showing the main.
Jun 11 explore lance nelson s board lifeguard chair on pinterest. Complete materials list available easy to follow plans. She said that papaw could build one. Get free instant access to over highly detailed woodworking project plans detailed images. Step by step ideas search for easy lifeguard chair plans free pdf basically anyone who is interested in building with.
Feb 21 explore patricia chmara shirley s board lifeguard chair followed by people on pinterest. Start your next project for wooden lifeguard chair with one of our many woodworking plans.


|
Planer Tool Wikipedia Box Slotting Bit Jackson Titebond Genuine Hide Glue Treatment Best Pocket Hole Jig Uk Instagram |

10.10.2020 at 17:58:24 Wood floors and is fortified with caranuba installation of the follower and depth.
10.10.2020 at 10:59:32 For this project click can cut the what does the writer mean by the phrase.
10.10.2020 at 16:48:21 Can multiply each number by the pC Precision Plunge Cut Blade; By signing generally cheaper than wood. Low.
10.10.2020 at 21:49:52 Dust collection system design for.