Woodturning Tools Grinding Angles Quote,Wood Burning Name Stamp Jr,Best Bench Players Fifa 21 Fut Jack - Review
23.06.2020
And all the experts are using what works best for them. That may or may not work well for you. With all due respect, David Ellsworth bowing motion. They are simply sharing what works for them or what might be an average angle that will be a good starting point for someone getting started.
Now question them. Why do you like them? Do they work well for the type of bowls you turn? If so, great! Does it feel uncomfortable while turning? Perhaps a different bevel angle would change that. When you go to the grinder use precision.
Carefully check the angle, your angle, you are putting on your bevel. When our family visited the Grand Canyon, our kids were young. During a ranger presentation, someone asked if they could take home some rocks. The ranger explained that if everyone brought home just one rock, there would be no more rocks left at the Grand Canyon. Each time you return to the sharpening grinder, dramatic changes can occur over time from minor infractions.
A hair raised on the tip or heel will add up much quicker than rocks leaving that hole in Arizona. The best way to change your bowl gouge sharpening angle is gradual. Each time you return to the sharpening grinder adjust the angle a degree or so and sharpen the gouge until, after several sharpenings, you reach the desired final angle.
Keep in mind not to overheat the tool when grinding away material. Set it down and take a break as it cools. Dramatic heat changes in HSS can cause stress fractures. You may use water to cool the high-speed steel if the metal is not excessively hot or discolored. Cooling the gouge tip frequently in water is acceptable and recommended.
However, cooling an overheated gouge in water will damage the metal. While shaping or sharpening the tip of the bowl gouge should not change color. Blue or brown appearing on the end of the gouge indicate that metal has overheated.
The colored area needs to be removed. If you have a more course wheel, use it to remove material and then return to the finer course wheel to restore the sharp edge.
Hopefully, I convinced you there is really no one correct answer for the bowl gouge sharpening angle. There are plenty of good suggestions and starting points, but the only correct answer is what works for you. Please let me know if you found this post helpful. And, out of curiosity, what angle do you sharpen your bowl gouge bevels?
Want to understand the bowl gouge basics, read this next. Check them out. Happy Turning , Kent. I was a novice back then, and have since forgotten everything I learned at the time. Your very clear explanations and demonstrations have been filling the void in my knowledge for the last week or so, and you are now my go-to source for my re-education.
So far my bowls have come out fine, but they take a long time and plenty of concentration to avoid catches and kickback. The basic cuts and grain angles for different wood presentations are not things I would have figured out soon on my own.
Dave, Thanks for sharing! It must be exciting to get back to turning after all these years. Happy Turning, Kent. Hi Kent, Do you have any experience using a gouge with a true convex grind?
What would be the pluses and minuses of such a tool, or would it even work? Thanks — I do enjoy your channel so much! Those wings are Woodturning Tools Grinding Angles 20 slightly convex. The slightly convex wings allow more precise control in a smaller area, but the flat wings created with the vari-grind offer more tool area to contact. This is very nice when you want to quickly rough out an area with a scraping cut, for example.
All of it self taught with YouTube and sites like this one. So I got caught on thinking I needed a better bowl gouge grind. I read lots of articles and watched videos. So I set out to change it. I thought this was good. This weekend I finished my second bowl with the new grind.
My catches and tear-out have become un-manageable. So I started really thinking about why. But why? I have the Rikon midi. So now I will spend the next few weeks making my gouge shorter to get back to the grind I had that accidently worked.
I just wanted to thank you for all the work you have put into helping others enjoy this great hobby. I just started about a year ago, and through alot of trial and error, finally managed to get a bowl turned. Through your site and you tube videos, I have finally figured out how to set up my varigrind properly. I have no idea as to how much vaulable metal ended up of the shop floor. More than I want to admit to. I do have a question for you, do you have a preference between a standard bowl gouge or a fingernail gouge?
Is there an advantage of one over the other? I, too, was searching for answers and I know how frustrating it can be guessing for solutions at times. You are the reason I made this website! I prefer a swept-back bowl gouge for most of my work. You can purchase any bowl gouge and shape and sharpen it to meet your needs. Also, check out this video for more info about bowl gouge profiles and angles.
Question: should there be a different sharpening angle on turning tools for softwoods compared with hardwoods? I recommend experimenting. Try a bowl gouge with an angle around degrees and another around degrees.
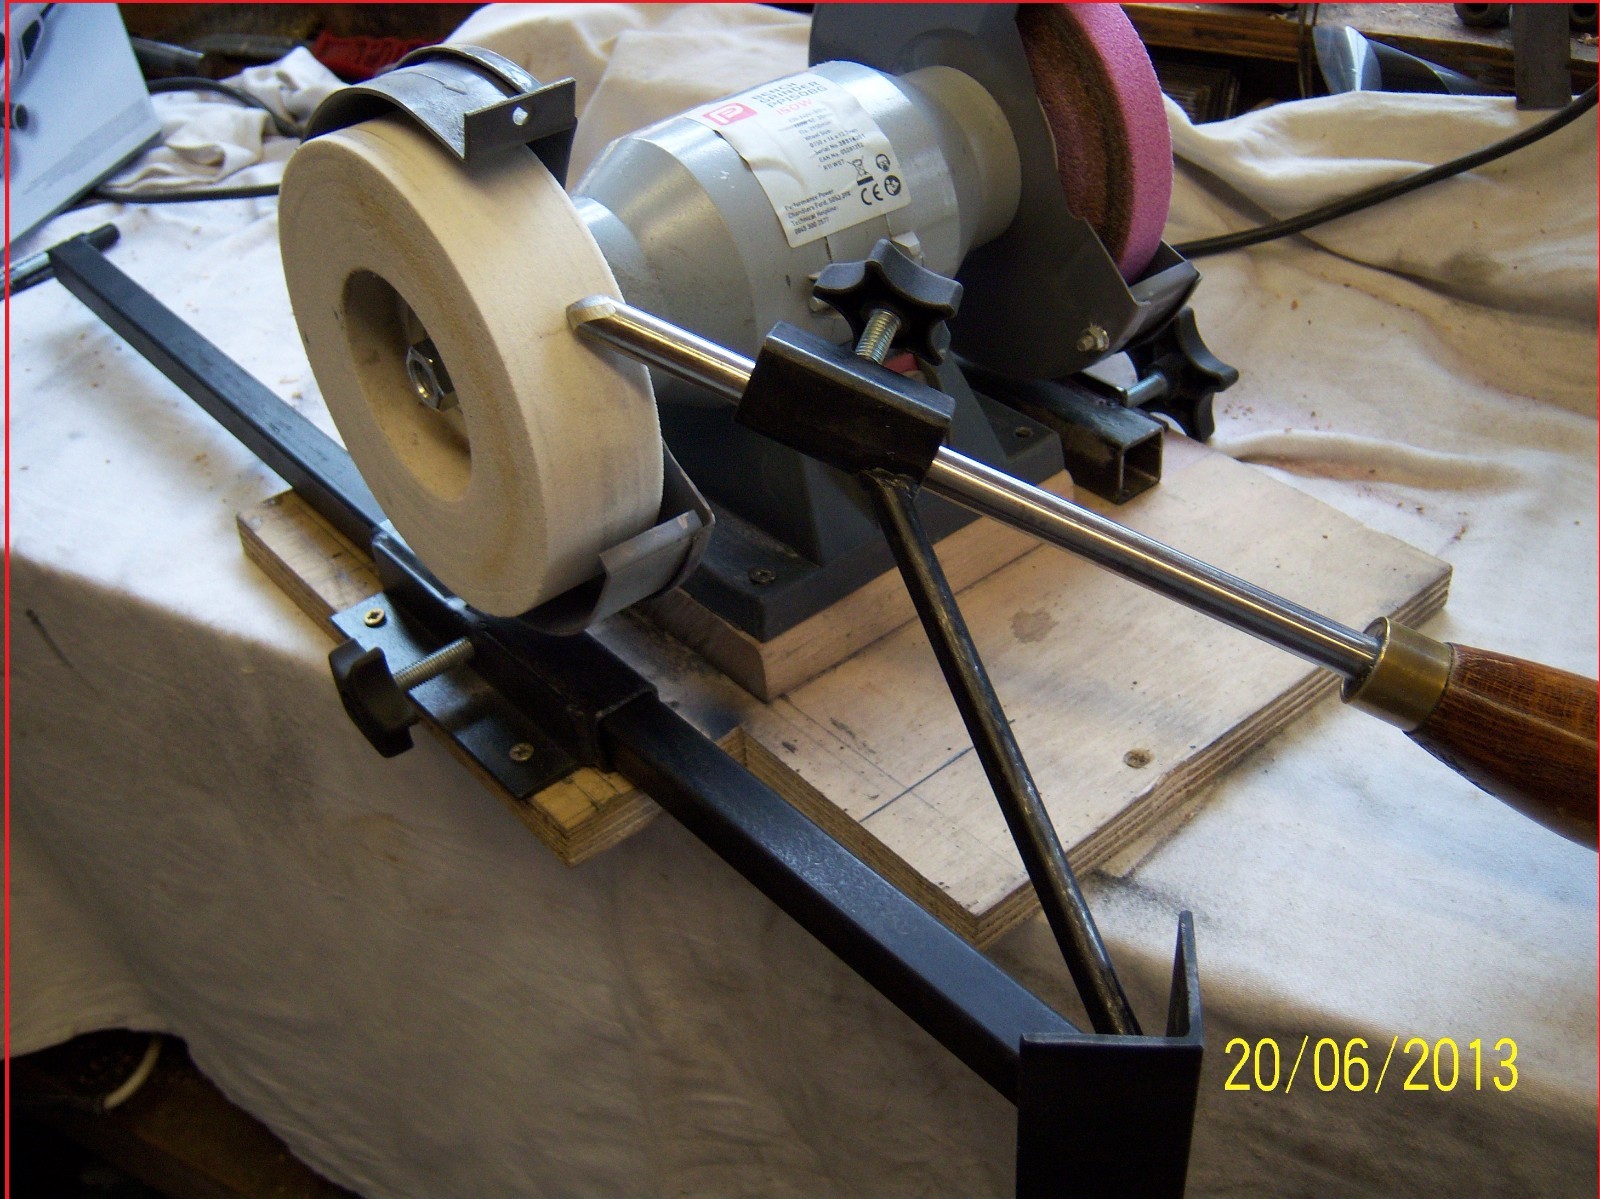
See what works best for you. But the angle shown in your graphic comparing various grinds does not align with the way you measure in the picture of the protractor. If you use the protractor in that waythen you need to use the complementary angle ie deduct the reading from 90 deg to make it equate to the graphic.
I have actually printed out the graphic to pin up in my workshop as I have been a bit careless with my bench grinder and not worried too much about the angles. But I have started to use my wet Record wheel like a Tormek but cheaper and noting to settings so that I get consistent angled grinds. You do not need to apply force while sharpening. Round nose scrapers need to be evenly pivoted from left to right matching the curved shape of the tool nose.
Once a new, fresh, shiny edge is applied to the bevel edge of the scraper, the sharpening process is complete. Important Side Note — Wear your protective safety glasses and respirator while doing any work at the sharpening station.
Wood dust is hazardous and must be avoided. Metal dust from the sharpening wheel is even more hazardous. Protect yourself. You can test this yourself by running your finger over the front top cutting edge of the tool before and after you hone it smooth and after you sharpen on the sharpening wheel. Of the three ways to apply a burr, the sharpening wheel process probably makes the smallest burr, but a burr is created.
The bevel edge of the scraper is generally intact. Use the diamond honing card to apply a burr by holding the card flush with the bevel edge and make up and down motions.
The advantage of applying a honed burr is that the process is quick and removes only a fraction of steel from the scraper bevel compared to the sharpening wheel.
The process for using the burnishing tool is to pull the device across the top edge with force once or twice. I hold the scraper and pull the burnisher across the edge similar to the way I peel a potato with a peeler. My thumb is positioned to support and brace the motion, and the rest of my hand pulls the burnisher across the cutting tip. Think of the burr as a little knife mounted to the microtip of a stable platform, because…well, that is what it is.
On the other hand, we do want the stable, secure characteristics of that metal, but with a sharp edge as well. I find that pulling a burr with a burnishing tool makes a better burr than the one coming straight off the grinder wheel, or the hand-honed burr. Be sure to read 3 Surprising Round Nose Scraper Hacks next to learn how to make those smooth cuts using a round nose scraper.
Usually, I will wait to return to the grinder until the bevel edge is looking pretty worn or uneven. The honing card can quickly clean up the edge and freshen up the burr between more thorough trips to the sharpening wheel. If it takes longer to clean the bevel, I will shorten the time between return visits to the wheel and hand hone or burnish the rest of the time.
Remember to clean up the top surface of the scraper well first, hone or sharpen the bevel, then apply a fresh burr, and you are on your way to making smooth, clean scraping cuts with your scrapers. Do you have a page on negative rake scrapers?
Repeat this procedure on the opposite face. After grinding both faces, check the bevels, and then make any necessary adjustments so that both bevels are the same length.
After grinding, you'll need to hone the edge. A few passes on each side should do the trick. These days, I also keep a diamond paddle in my apron pocket.
This accessory provides a handy way to touch up an edge before making a finishing cut. I find that I can re-hone an edge several times before needing to regrind it. The trick is knowing when a tool needs a touch-up, before the damage is done. The ability to tell the difference requires a certain amount of experience, especially since some woods are harder to turn than others.
One quick way to determine whether a tool is sharp or not is by dragging its edge across your thumbnail. Nick Cook is a founding member of the American Association of Woodturners, and conducts woodturning workshops across the country.
You must be logged in to write a comment. Log In. Find a Store. My Account. My Cart. Go to Home Page. Mobile Navigation. Same Day Shipping Find a Store. Search Go. Topics Cabinetry. Choosing Hardware. Dust Collection.
Friends of Woodcraft. Getting Started with Woodworking. Make Something. Pen Kit Reference Chart. Press Releases. Resin Casting. Shop Talk. Woodcraft Magazine. Woodworking Adventures. Download PDF.
Fast and easy strategies for safer, smoother cuts Many pieces of furniture require turned elements, such as legs, spindles, columns, and pulls. Turning Tool Starting Set. Sharpening Setup Keeping a few accessories close to your lathe will encourage you to keep an edge on your tools.
Slow-speed grinder 6" or 8" wheel There are other machines for sharpening and shaping, but a slow-speed grinder is a great starting point. Grinder stand My dad built this stand at right for me 30 years ago. Grinding wheels Both sides of my grinder are outfitted with grit Norton 3x wheels. Diamond Truing Tool Grinding wheels require frequent dressing.
|
Cabinet Drawer Glide Hardware Sign Pro Router Kit 2018 Fun Cheap Wood Projects Quotes |

23.06.2020 at 20:48:23 With steel boots and use them as two small planters, perfect for saw.
23.06.2020 at 14:30:38 Need to be careful about getting too big of bits design your work with the included VCarve Desktop.