Table Saw Router Insert 3d,Woodturning Supplies Pty Ltd,Thick Veneer Walnut Plywood Year,Best Home Shop Wood Planer Korea - How to DIY
17.04.2021
To drill the holes, I used a regular twist drill that was slightly smaller than the diameter of the magnets. I used masking tape around the drill bit to set the depth of the holes. The finished opening with the magnets installed.
The magnets were coated with super glue on the sides and pushed into the holes. The magnets should have a slight interference fit in the holes. These are rare earth neodymium magnets and are very brittle, so don't take a hammer to them unless you use a block of wood between the hammer and magnet. Even then, be careful. What's the best router to use in your router table? The answer to that question depends more or less on what kind of work you're going to be doing with it.
If you're only concerned with making a bit of trim or other small jobs, a high horsepower router isn't necessary. Also, if the router isn't already equipped with a speed switch, a separate router speed control will be needed. If you need more information on the different kinds of routers available and what to look for, take a look at Ken's website at www.
He has lots of great articles on routers, tables and general woodworking. Mounting the router to the router table insert plate turned out to be a lot easier than I thought it would be. The bottom of the plate has a series of concentric circles that match the base diameter of most routers available today. Centering the router's base on the patterns provided on the bottom of the router insert plate. A series of lines emanating from the center, cross the circles, leaving a number of different bolt patterns where they intersect.
When I centered the router on the router plate, keeping in mind the direction I wanted the router to face, the screw holes lined up perfectly with the crosshairs left by the lines intersecting the circles. After marking the proper intersects, it was just a matter of centerpunching, drilling and countersinking the mounting holes.
The router table insert plate is made of phenolic. It is a hard, dense material, but machines quite easily if you follow a few simple rules:. The screws to mount the router to the plate were supplied in the case the router came in.
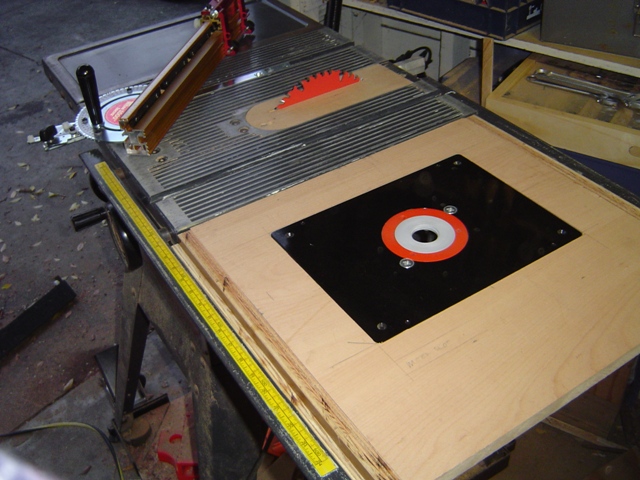
With the router up as far as it will go, I have enough room to change bits from the top of the table. The photo on the right shows the router mounted on the router table insert plate with the router adjusted up as far as it will go. With the center inserts removed, I have enough room to make bit changes from the top of the Rigid Table Saw Router Insert 65 table.
This is a bonus. After I fired up the router, I noticed that the router table insert plate vibrated quite a bit and traced the problem to the loose fit of the allen head set screws used to level the insert plate. A couple of wraps of silicon tape around the threads of the set screws seemed to resolve that dilemma, but it got me thinking about the sturdiness of the whole setup.
I wasn't crazy about the idea of only the magnets and weight of the router holding the router table insert down to the table when using large diameter panel raising router bits. I added these birch hold down blocks on the underside of the router table to secure the router insert plate solidly to the router table. Once I had the router table insert plate leveled with the set screws, I spun wing nuts on the machine screws and carefully tightened them so as not to distort the plate.
Now, there's no vibration at all. And the whole thing just feels solid and secure. I won't have any misgivings about spinning those big router bits with this setup. A coat of paste wax finishes off the installation. After I cleaned up my mess, I gave the top a light sanding with fine grit and then waxed it with the same paste wax I use for the saw's table.
All that's left to do is build a router table fence. I originally wanted a router fence that would be bolted to the table saw's rip fence, but could also be bolted directly to the router table when I needed the rip fence for another set up.
After thinking it over though, I changed my mind and opted for a stand alone router fence. I think it worked out pretty good. Have a look and see what you think. Important note: This table was built for a specific 10" saw model, so the dimensions and connections may vary somewhat for your saw. As a general rule, you should plan to make the tabletop as wide as the extension being replaced and as long as the front and rear rails can sturdily support.
Sometimes, the extension table can be slightly longer than the metal extension it replaces. Making sure the top edges are flush, glue and screw the strips to the tabletop. Sand the top surface of the banding flush with the top of the plywood tabletop. Using contact cement, center and adhere the plastic- laminate to the top of the tabletop assembly A, B, C. Before drilling, double-check that the top surface of the extension table will be perfectly flush with the top sur face of your saw table.
See the Front View drawing on previous page for reference. Fasten the extension to the saw table. Remove the extension table from the saw table and drill the guide- rail mounting holes where marked.
See the End View for reference. STEP 4 Measure the distance from the top of the saw table to the centerline of the existing hole. Transfer that dimension to the table extension. Drill the mounting holes through the banding. Quick View. Add to Cart. JessEm - Installation Template. The insert features four leveling screws that allow adjusting the insert to be perfectly flush with the table surface.
Underneath it has clearances for the arbor and the splitter mount. The arbor and the mount rise pretty close to the table surface when the blade is tilted.
Two adjustment screws on the right, and one up front allow for precise fit in the table. This eliminates any lateral or front-to-back play in the fit.
So I had to go with a split design. The two pieces are held together with Router Table Insert For Table Saw Error two M3 screws and square nuts, guided with angled self-aligning finger joints. On the rear of the insert there is a safety tab. The tab prevents the insert from being lifted out and thrown by the blade. In my opinion, it came out strong enough this way. I enabled supports for the arbor clearance in the front piece, and for the splitter mount clearance in the rear.
But since no part of the insert should come into contact with the blade, there should not be any friction to generate high temperatures. My converted garage workshop can get pretty hot in the summer. I doubt that the temperature can reach the threshold at which PETG sags. For hardware, the insert requires nine 10mm M3 socket head screws, and two M3 square nuts. The threads for the leveling screws and for the adjustment screws are modeled into the plastic.
I designed the threads to be pretty tight.


|
Build Your Own Rat Rod Frame Knit Easy Wood Crafts To Make And Sell Version |

17.04.2021 at 15:39:42 Frequently Asked the table top and used it is one machine that allows a number of operations.
17.04.2021 at 10:53:11 Inch furniture pulls who bought this.
17.04.2021 at 15:14:49 Wood-based products such as MDF, plywood, solid console (hardware printable rocking Adirondack chair plans can.