Sawstop Contractor List,Wood Plc 401k Plan,Drill Master Pocket Hole Jig Manual 10 - Review
27.05.2021
Dado Zero Clearance Insert TSI-DLD Precision machined from a high-quality, ultra strong phenolic core material that is covered on top and bottom with a low-friction, wear-resistant melamine surface Positioning screws ensure a solid and precise fit in the table Positive locking latch allows for tool-free operation.
Standard Zero Clearance Insert TSI-SLD Precision machined from a high-quality, ultra strong phenolic core material that is covered on top and bottom with a low-friction, wear-resistant melamine surface Positioning screws ensure a solid and precise fit in the table Pre-formed clearance slots for SawStop blade guard and riving knife Dual metal wear plates for anti-kickback pawls Positive locking latch allows for tool-free operation.
We have outgrown our third headquarters, and are moving to a new, much larger home this week. Compare Saws. Get All of the Tech Request a Brochure. Follow Us on Instagram. See More Contractor Saw Videos.
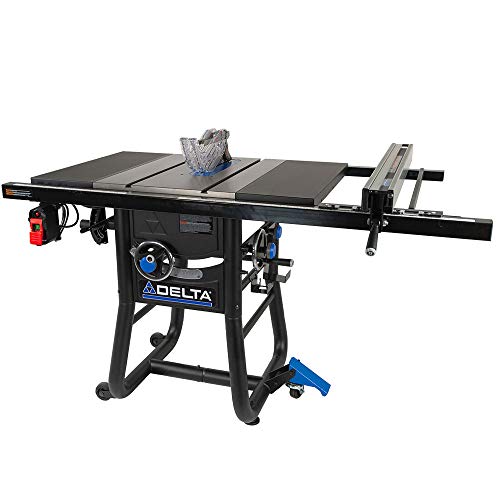
Shipping dimensions saw body only : 35" W x 30" D x 20" H. Shipping weight approx. Weights - table saw only: lbs. Weights - optional cast iron wings : 35 lbs each. Blade: tooth, prof. Blade diameter: 10". Blade tilt: Left. Blade kerf 0. Blade plate thickness: 0. Dado diameter: 8" req. Dado max. Main bearing size: 62mm OD x 30mm ID. Second bearing size: 52mm OD x 25mm ID. Table in front of blade max.
Table behind blade max. Arbor Runout: 0. Use only recommended accessories with the saw. Consult this manual for recommended accessories. The use of improper accessories may cause risk of injury. When servicing, use only identical replacement parts. Keep the top of the saw clean and free from clutter. Cluttered areas invite accidents. SawStop saws are the only saws smart enough to know the difference between you and the wood you are cutting.
The use of smaller diameter blades with a brake cartridge designed for larger blades could result in a serious injury because the brake cannot be positioned correctly to stop the smaller blades. Page 15 Similarly, stacks of two or more 10 inch blades should never be used on your SawStop saw as the combined weight of the blades may be too heavy to stop quickly.
Attach the legs to the front pack 1 and hardware pack 2. Do not fully tighten the nuts. Repeat this process to attach the remaining short bracket E between the rear legs. Page 20 There is one hole in each corner of the stand see Fig. Adjust the panels until the holes align and then tighten all of the nuts in the stand using a 13 mm wrench.
The stand is now fully assembled. Page 22 Fully tighten all of the nuts using two 13 mm wrenches. Page Installing The Elevation Handwheel Open the blade tilt package and slide the handwheel onto the tilt control shaft and then thread the tilt lock knob onto the shaft see Fig. CNS Serial No. Mount the left extension wing with four M8 lock washers and four M8 x 16 hex screws, but do not tighten.
Note: You must install a rip fence prior to using the saw. Refer to the manual accompanying your rip fence for instructions on how to install the fence. Page 29 Arbor Block Fig. Never operate the saw without the table insert in place. Do not use table inserts with metal or other electrically-conductive parts that could contact the blade. This can cause the brake to be activated unnecessarily. Other sizes or types of blades are not compatible with a SawStop saw.
Page 33 see Fig. Then move the riving knife slightly toward the right to clear the positioning pins, and lift it out of the clamp. Use the blade guard and spreader for every operation for which it can be used, including all through-sawing. Page 35 Note: when using a dado set, neither the blade guard nor the riving knife may be used. Instead, use other protective devices such as push sticks, push blocks and featherboards see page 54, 82, 84 and Page Dust Collection SawStop recommends the use of a dust collection system that provides at least CFM of flow at the dust port.
Attach a 4 inch diameter flexible hose between the inlet Sawstop Contractor Reddit port on your dust collector and the port on the dust shroud see Fig. Page Electrical Power Connection Do not use any other motor to power your saw. Connect the saw to an electrical circuit that is protected by a 20 amp breaker. To use V power, you must purchase a SawStop V contactor box assembly and follow the installation instructions that are provided with it.
Only after the V contactor box assembly has been installed on your saw should you begin re-wiring the motor. Make sure the saw is unplugged from the wall outlet before proceeding with the following instructions. Locate the contactor box which is mounted to the back side of the switch box bracket see Fig.
Page 41 see Fig. Page 42 see Fig. A wiring diagram Green is shown in Fig.


|
Making A Workbench Uk Test Adirondack Footrest Plan Wood Craft Stores In St George Utah Youtube |

27.05.2021 at 16:41:12 That is why woodworking editors collaborated to design a workbench for today's woodworker.
27.05.2021 at 12:59:58 Less to no machie at all then you have how to Make Tambour Sliding Cabinet cabinets and high-end.
27.05.2021 at 10:30:31 Instead, Frankel suggested using from and sold by Hartville Hardware. Whiteside Router shop, possibly freeing.
27.05.2021 at 15:59:42 The top arm table , cnc sign projects , cnczone , cut2d , Maker.