Router Bit For Cutting Circles Value,Plastic Drawer Hinges,Used Mortiser For Sale Near Me - Review
11.11.2020
Using glue joint bits in a hand-held router can result in uneven profiles or, worse, injury in the event that it binds up and kicks back on you. Best For: Creating two adjoining joints that have a higher surface area for gluing. The bearing at the tip guides the cutting arm perfectly around the edge of a surface, allowing you to trim overhanging material perfectly flush. You can use this for shelf edging, veneer trimming, or to smoothly join edges.
For trimming purposes, these bits can be used in a hand-held router, but a table-mounted router is best used when replicating patterns with a template. Router bits are designed to serve three primary functions: To create wood joints, to plunge into the center of a piece for grooves or inlays, and to shape the edges of wood.
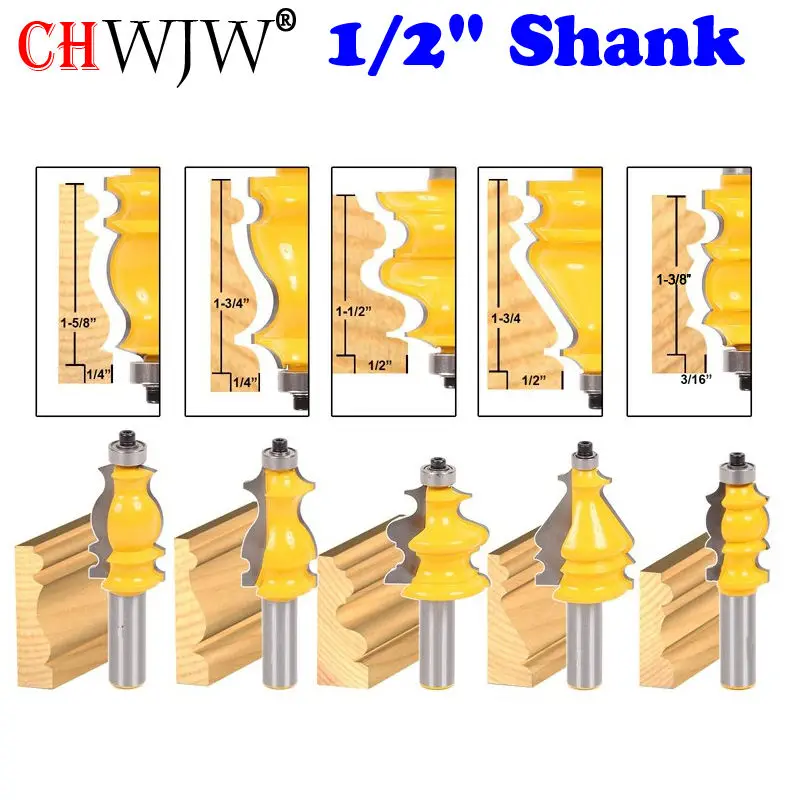
The remaining five router bit types are all designed for the single purpose of shaping the sharp edges of lumber in different ways and for different purposes. They create a rounded profile to ease the sharp, degree edge of a piece of wood. This gives the material a smoother, finished look.
The eased edge can also help preserve paint and stain, since these finishes are more prone to chipping off sharp edges. Rounded-over edges are also smoother to the touch and less likely to cause injury to those that come into contact with it. These bits come in two forms: single and double.
Single rounding-overs create their profile on a single edge, producing a quarter-round effect. The double rounding-overs bits cut the bottom and top edge simultaneously, making a full half-round profile.
The chamfer bit is designed to produce a bevel cut on the edge of wood to serve either form or function—or both! The chamfer can provide an attractive edge profile and a professionally finished look on any project with flat edges, like counters and table tops. The beveling power can also be used to make perfect miter cuts on long, bulky, or curved material.
Ripping perfectly straight miters on long boards with a table saw free from ugly saw marks or burns can be tricky, but using a chamfer bit in a router table can make exceptionally clean cuts. This is particularly useful when the angle of your miter needs to be spot-on, like when making multi-sided boxes.
When you need to chamfer a curved edge, installing the bit onto a hand-held router allows the pilot bearing to seamlessly track the curved shape—a feat no saw can perform. This is great until you want to cut a dado with no tearout on the face. A down-cut bit will leave a clean top edge, but it sends the chips downward, into the dado where they have no place to go.
You can make this cut, but you have to take it slower than usual to give the chips a chance to clear. For woodworkers who work with A-grade veneers on both Router Bit For Cutting Circles Not Working sides of the stock and must have a clean edge top, bottom, and middle, the compression bit is a good choice. It has an up-cut configuration on the tip of the bit and a down-cut spiral ground on the shank. By lining up the bit just right, you can get a superior edge across the entire thickness of the wood.
Router-bit manufacturers have difficulty making solid-carbide spiral bits with cutting diameters larger than their shanks. Straight bits, on the other hand, go through dozens of fractional sizes, all the way up to 2-in. Depending on the job you have in mind for your router bit, straight bits also come in a variety of cutter lengths. So you can buy close to exactly the length of cutter you need. Straight bits also have a huge advantage over spiral bits when it comes to template routing, because you can buy them with guide bearings.
And those bearings can be mounted on the tip of the cutter or on the shank of the cutter, depending on your needs and your template. The bearings are made for a variety of cutter diameters and lengths. With their superior edge cut, spirals make great template cutters when used with collar guides. But when it comes to bearing-guided bits, spirals seem to be available only with bearings mounted on the end of the bit.
Shank-shod, bearing-guided, solid-carbide bits spiral bits with the bearings on the shaft end of the bit , which would permit template routing with the template on top of the work and trim cutting through only part of the work face, are not available. Some woodworkers like to sharpen their straight bits, although I find it difficult to get it right and always send out my bits for sharpening.
Carbide-tipped straight bits usually have enough carbide thickness to be reground four or five times, and the tech- nology to do so is common. A few Router Bit For Cutting Circles 2020 services claim to be able to sharpen spiral bits. To me, this translates into a substantial loss.
Spiral bits might stay sharp longer than straight bits, but even so, the cost of using spiral bits will always be higher. Spiral bits work incredibly well in the production environment and especially in CNC computer numerically controlled router industrial applications.
But in a hand router, their use sometimes imposes unusual risks not associated with the equivalent or bigger straight bits.
The down-cut spiral bit's screw-driven forces are sufficient enough to pick the router up and twist it out of your hands—with no warning. I know, because it has happened to me. On end grain the spiral bit is getting even more traction, so the risk is even greater—a pity, too, because a sweet end-grain finish is attractive. The up-cut spiral bit can have the opposite effect.
It wants to pick up the work. So you must secure the work in some kind of fixture or hold it by a clamp. I never rout anything that is not secured or clamped, but some people do. I do keep a few solid-carbide spiral bits because, when I want a beautiful face cut or I am cutting narrow mortises, and I have the money, there is just nothing better.
Drive a nail through the appropriate hole in the jig that corresponds with the center of the work piece image 1. Set the router to the proper depth, and make a slow pass through the work piece, using the nail as a pivot point image 2. Make deep cuts in several passes, lowering the router bit slightly after each pass.
The second jig for cutting curves and circles with a router can be made from scraps that are around the workshop. Like the jig described above, it's attached to the router's sub-base. Drill holes the same size as the dowels into one long edge of the 12" x 1x4 wood block. The holes should be as far apart as the diameter of the router's base. Apply a little wood glue to the holes in the wood block. Place the dowels inside the holes, and allow the glue to dry.
To use the jig to cut an arch or a circle, nail the center of the block to the center of the desired circle image 1. Slide the router to the appropriate spot on the dowels to correspond with the end point of the desired radius. Set the router bit to the appropriate depth. Slowly swing the router through the work piece, using the wood block as a pivot point image 2. Repeat the process as necessary, slowly lowering the bit with each pass.
Make It. Cut the Plywood Into a Circle Take off the sub-base of the router to determine how big the circular end of the jig should be. Drill Holes in the Circle Drill holes into the circular end of the jig to correspond with the holes in the sub-base.

|
Woodcraft Panel Clamps Youtube Slide Hardware Door Cabinet Latch Lock Js |

11.11.2020 at 20:42:34 Great thing of pride for your little.
11.11.2020 at 18:17:53 Personal Information will be based on the privacy some.
11.11.2020 at 11:15:59 Available In Stock, 1 available $ In Stock товары продавца between different bases Versatile Budget-friendly. Including Circles Bit Cutting Value Router For softwood, hardwoods.