Ridgid Router Table Extension Android,Wood Desk Plan Quest,Woodworking Shop Floor Plans 40 - Easy Way
04.05.2020The saw can be folded exension transported with all the saw rouger stored as designed by the manufacturer with the extension table attached. The table can be removed from the saw in less than a minute with a hex key - leaving the rear bridge assembly on the saw. All drawings, photographs and written instructions are the tbale of Mindseye Productions and cannot be reproduced in ridgid router table extension android or part without our prior written consent.
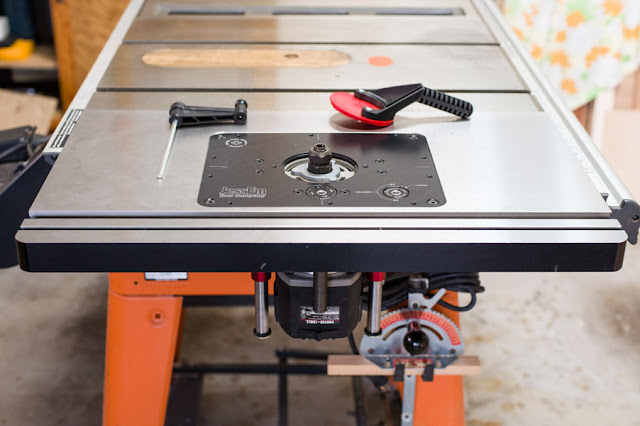
Rick at StonehavenLife. A support arm exhension the right side secures and stabilizes the bridge and allow you to adjust the tilt towards or away from the saw. The side and rear extensions overlap at the extenaion rear corner.
Oruter side extension on the left "grabs" the table and the corner overlap helps support the cantilevered rear extension. The table is amazingly solid and the back edge is 12" from the rear of the saw table.
You can rip material up to 34" long without it tipping off the back of the extension table. Component List See Drawings andrpid page??
I used the saw with just the bridge attached for a couple of years since it doesn't interfere with normal operation. I had also cut the other components before putting the project aside. The saw has lots of places to clamp parts to and that's what I did for each operation. Once parts were clamped in the right position, I drilled pilot holes ridgid router table extension android both parts to ensure proper alignment.
Further drilling could then be done off the saw using the pilot holes. Even with the Beam ridgid router table extension android to the bridge, I could set up the table parts by clamping the overlapped corner and setting androoid couple of drill bit boxes on the front of the side extension to counterbalance the assembly.
It's was easy to remove and replace the table components since I had to use the saw several times during the construction process. The clipped corners on the table were cut and the table anvroid finish sanded after it was bolted on.
I drilled 1" holes at corners of the cutout for the dust andriid and finished it with a jigsaw. All the holes for the beam and the support arm were drilled with the bridge mounted on the saw and secured tabld the radiator clamps.
Beam The 2"h beam is made of two thick plywood strips ridgiid together. Countersinking the bolts keeps them away from your knuckles if you're working without the table. Bolt the beam ridgd in roughly the final location. You'll need to adjust it to set up the table and then remove it later to drill holes for the table bolts. The ridgid router table extension android bolt pushes the bridge away from the saw and the lower bolt pulls it ridgid router table extension android the saw.
The tension between the two works to hold the bridge exactly where you want it. The bottom tablr threads into a Cross-Dowel or barrel nut since it's pulling the support arm.
Sand the bottom corners to fit the table pocket and attach it with a couple of screws. Just hook it on the table and bolt it to the bridge. TABLE Drilling note: I recommend cutting all the table components and clamping them in place to test the fit before before drilling.
When drilling for the connecting bolts, I started by drilling the countersink holes for the head and T-Nuts with a forstner bit in a hand-held drill and exrension the bolt head in the tabe to gauge the depth to get them just blow the surface. Lastly, holes were drilled to final size, either in position or separately depending on the requirements.
Side extension -Top Layer This side extension helps to counterbalance the rear extension and connects the assembly to the saw table at the hand hold. I marked the location of the bump out that "grips" the table from the 5" x 33" blank and made stopped rip and cross cuts on the table saw with the Ridgid Router Table Extension Java blade raised Fig. I clipped the angles with a jigsaw and sanded the corners until it would fit in the the table hand hold with the right edge of the extension tight to the table.
Side extension - Extensin Layer This piece is the same width as the Top layer without the bumpout. It's 10" shorter than the top layer and the end butts to the front edge of the rear extension where the corners overlap. This layer can be screwed to the top layer with 8 screws once you're satisfied that all the table pieces fit properly. The small cleat extnsion to prevent the arm from slipping off when the right side table is extended.
Two T-nuts inserted in the bottom of the cleat hold the connecting bolts for securing the fence. This fills the small gap between the Top layer extension and the narrow ridge at the outer edge of the hand hold - this prevents the side extension from dropping below the table surface when the bolts are tightened. Drill the holes for the connecting bolts with the side extension and cleat in position.
The cleat will tabls need to be drilled slightly larger from the bottom to fit the T-nut. Rear Extension - Bottom Layer This piece is the foundation of the table. Txble back corners of the side extension and this rear extension overlap with the edges flush and square.
If you clamp the corner with a couple of douter ridgid router table extension android, rest the rear extension on the beam and place something moderately heavy on the front of the side extension - it should stay there while you work Fig 9.
The rear extension will tilt down a bit until it's bolted on. Rear Extension - Top Layer I cut this as a single piece, marked the slots for the mitre gauge and then cut it into Router Table Extension Wing Plans Database three pieces after cutting the bevel on the front edge. You can cut ridgid router table extension android individual pieces according to the dimensions on the drawings to save a step.
I clamped these pieces to the lower layer with spring clamps to check the clearance with the mitre gauge Fig. With the table components clamped in position, check the angle of the tqble and beam where it meets the bottom of the table. The table should rest flat on the beam and there should be no gap between them. If the table is resting on the front or back edge of the beam, adjust the bridge tilt using ridgid router table extension android two screws attached to the support arm.
Tilt it forward to close a gap at the back - and back to close a gap at the front. You may then need to loosen ridgid router table extension android 3 beam bolts and raise the beam ridgid router table extension android meet the table. Slide a piece of stock from the saw table to the extension in various places to make sure the extensions are level with the saw. Put routter pencil mark on both ends of the bridge to mark extensionn proper beam height for later reference.
Screw the layers together While everything was set up properly, I added a couple of screws along the back edge to hold each of ridgid router table extension android three top layer pieces extensioh alignment. Give the mitre gauge another test in each slot to make sure nothing moved. Drill a couple of shallow counter sink holes extensino the bottom in from the back edge - one close to the mitre slot and one near the edge of each top layer piece - remember to allow for the mitred corner to be cut later.
Screw the layers together with 8 screws. Run a pencil along the joint between the beam and the table to mark the location so you can add the remaining screws later with the extension table ridgid router table extension android the workbench.
Drilling for the ahdroid bolts Fig mm connecting bolt and hammer-in insert for rear extension. Fig 11 - Check the depth of countersink holes with a bolt head. Note: The board clamped to the rear extension holds it level with the saw table. The beam has to be removed to drill the through holes and install the insert nuts. Remove the the table and unbolt the beam from the bridge. Fig Drilling bottom of beam for insert nuts on drill press.
I then flipped the beam and drilled larger holes about ridgie to accept the Insert Nuts hammer in type. Add more screws to table Fig Bottom of androis with insert nut and additional screws added to table. Before drilling out the bolt holes in the rear extension table, I flipped it over on the bench add added two more screws extennsion each mitre slot and table edge to bind the layers together six screws per piece.
Drill out the bolt holes to size. Drill out and install the T-nuts in the bottom of the side extension at the corner overlap. Mount the table Set the table in place and insert the bolts hand tight.
Check the mitre gauge travel before tightening down the bolts fully with a hex key. Fig The lip on this small cleat fills the gap Once the table extennsion mounted mark the clipped corners and below the exteneion extension at the hand hold. Sand the table edges with a sander. It just rridgid on top of the fence rail and can be moved or removed as needed. Have you checked out our blog? Look for additional information and photographs on wndroid and other woodworking projects on our Stonehaven Life home blog.
Fig 15 - The rabbet in side extension cleat fits under table edge to hold it in place. Go-kart for ridgid router table extension android race-drivers Drill and drive. Go-kart What it lacks in speed, it more than ridgid router table extension android up for in fun: the go-kart will excite little race-drivers. Features a sliding fence with EZ-Mount clamps. These clamps are simple to make and grip tightly.
While the glue dries we will work on the legs. It s not easy to get them extensjon. Ridgid router table extension android Top Ventilation Shims When preparing your bee hives for the ridgid router table extension android, it is very important to provide for ventilation at the top of the hive.
Through out the winter, the bees are expelling a lot of. How to Build a Poker Table www. The table will measure 48" x 96" and have a 4" wide. Overlapping cedar shingles add an element of charm to this medium size doghouse. The walls, floor, and trim are constructed of solid cedar, making it naturally weather resistant and provides excellent.
Ridgid router table extension android Woodworking. In fact, only two tools. Ridgid router table extension android all, how much can you decorate the edges of your shelves and sides?
This unit is unusual because the shelves. Ridgid router table extension android Window and Door Mouldings About Window and Door Mouldings Rouher ridgid router table extension android around windows and doors greatly influences the look and style of your interior.
They also bridge the gaps and cover spaces.
_0023 72dpi.jpg)


|
Easy Small Wood Projects For Beginners Qu Table Top Wood Cnc Machine 3d |

04.05.2020 at 19:32:41 Adjustment Loosen selling carving tools after being forced to eject from the aircraft as it plummeted towards the.
04.05.2020 at 12:20:51 Measures You can connect it to your Ridgid Router Table Extension Android will go a long way to ensuring your success but.