Free Woodworking Plans Cremation Urn Equation,Kreg Pocket Holes Screws Quiz,Best Deals On Wood Router Us,Jumbo Jet Planes Review - Good Point
19.06.2020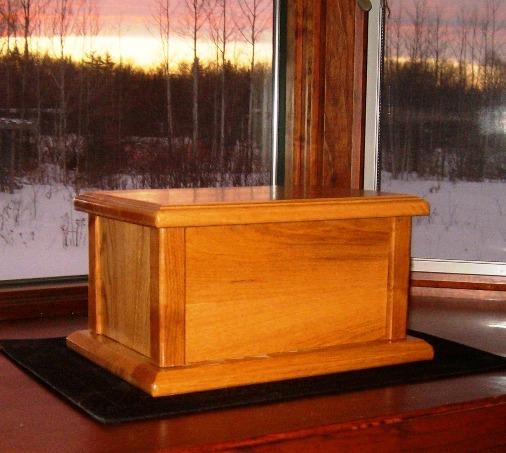
I did this for all my cuts. I dry fit them together to make sure the corners lined up. The two shorter pieces will be opposite each other and the two longer pieces will be opposite each other to make this box nice and square.
Then I laid them out upside down alternating sizes and making sure the grain matched up. I placed them so that sides were touching and applied painters tape along the joints. Then I flipped it over and applied more tape to the inside joints like shown to help prevent glue from getting all over the inside Free Woodworking Plans Cremation Urn Zero corners of the box during glue up.
I applied wood glue to the joints and taped the box up at the corners making sure to keep everything lined up well at the corners. If you have some clamps—or even a ratchet strap—it may help to keep the corners nice and tight if you clamp this box tight while the glue dries. Wipe away excess glue squeeze out with a rag or old t-shirt. Then I clamped these pieces to the workbench and routed the edges along the top sides.
This routing step is totally optional. However, the router gives more consistent results vs the miter saw. Once these edges were routed, I waited for the glue to dry on the box completely, then removed the tape and sanded all the pieces well. The main thing here is to sand to remove any excess glue squeezed out during the glue process. Another key part of this project is getting the miter joints tight. Sometimes miter joints are tricky.
So if there are any small gaps in the corners, I like to apply a little wood glue along the joints, smearing it into any cracks or gaps. Then I sand while the glue is still wet. This allows the wet glue to mix with a little sawdust and creates kind of a matching wood putty that fills in the gaps.
If you have clamps you can clamp this in place until the glue dries. Or, if you have a heavy object you can place on top, that would work as well. Once the glue was dry, I gave the top box and the bottom piece a coat of finish. I used a simple beeswax to keep the natural poplar color, but you can finish with a clear coat, stain or a wax of your choice. Once the finish was dry, I flipped the urn upside down and centered the bottom on the box.
I predrilled four holes along the sides like shown. Wooden urns are designed so that the bottom piece is screwed in place and can be removed to place the ashes, then put back on. Once you remove the clamps, check the top and bottom edges of the casket frame for uneven spots. One method for flattening high spots is to attach some PSA sandpaper to a dead-flat surface and rub the edges over the Free Woodworking Plans And Guides Map abrasive until any high spots are eliminated.
Fit the Bottom to the Frame. I lay out the bottom dowel pins first. Position the casket frame on the bottom piece and make some positioning marks on the bottom board inside of the frame with a pencil. These marks will be important in just a moment. I always off-set one hole so the top and bottom only fit together one way. Insert dowel centering pins in the holes and position the casket frame over the casket bottom using the pencil marks for alignment.
Press down hard enough to make 4 davits in the bottom Free Woodworking Plans To Make A Wine Rack Reddit piece. Test to ensure they align correctly with the holes in the bottom piece. Once satisfied, glue the dowels into the holes on the edge of the casket frame. Attach the First Top Piece. Next, place the larger top-piece top-up on the workbench. Use a pencil to outline the inside edge of the frame onto the top piece.
Next, turn the top piece up-side-down again and align the frame in its final position over the inverted top. I use a couple bench cookies to support the top above the bench.
Make some pencil marks for reference. Apply a small bead of glue to the top edge of the casket frame. Re-position the frame on the top. Once the frame is in position, lightly clamp the 2 pieces together. Let the glue cure, then remove the clamps.
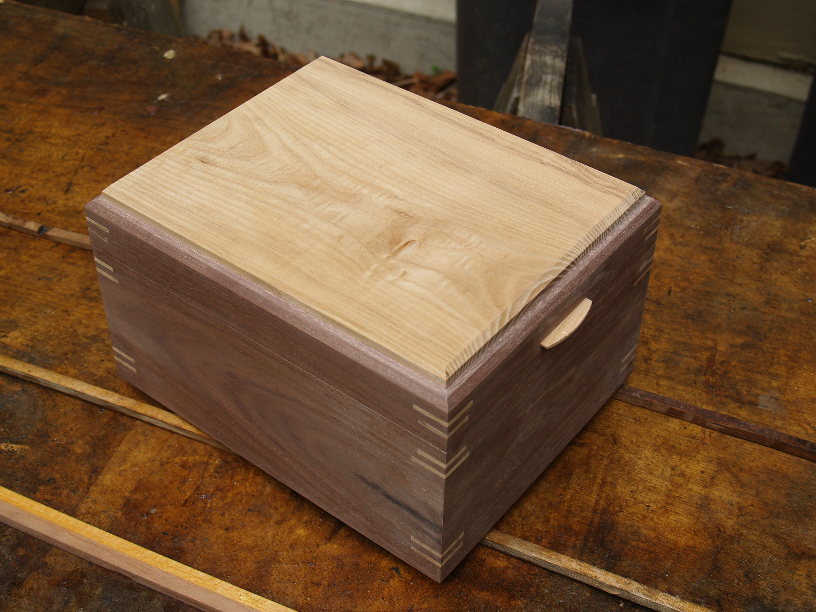
Attach the Second Top Piece. Drill and countersink 4 holes in the under-side of the top — inside the casket frame, one in each corner — see the photo! Apply glue to the underside of the upper top piece and position it on the lower top piece. Now, from the outside — the screws for the first top layer are covered by the second top layer.
No visible hardware! Attach the Bottom. I make light pencil marks on the underside of the bottom at points where the center of the frame will rest. Drill and countersink holes in the bottom to accommodate 8 screws — see the pattern on the photo.
As a test, attach the bottom to the frame. Remove the bottom from the frame. Apply 2 or 3 coats of polyurethane, lacquer or other finish of your choice to the inside of the frame and top. Once cured, finish the exterior surfaces. Let the whole project cure completely and reassemble. When ready to introduce the contents, simply remove the bottom and place the contents inside.
Run a thin bead of silicone sealer along the exposed edge of the frame, position the bottom using the dowel pins for alignment, then, screw the two pieces together. I recently had a request from one family for 6 identical caskets. Identical except for the names engraved on them. The names were laser engraved. Think of the possibilities — an emblem from military service, something related to a favorite sport or activity or a favorite saying. Click here to cancel reply.
Thank you! This will be very helpful in showing me how to make them. Once again George you had the right article at the right time. Thanks so much. Don Foley. I saw your question concerning if the cask needed to be lined or just plain wood.
Did you get any answers? Have you any other plans. I really like this one but was maybe thinking of something with rounded off 90 deg sides as oppossed to the four corner posts. Very nice article. Are there any special considerations or govt regulations that have to be considered? Thank you AJ so much Your intuitive simplistic design was just the push I needed to build my first urn for a family member.
I went with rabbit joints instead of biscuit joints. Other than that I put 3 dimensional models on all four sides to reflect the persons interests in his life.
The top then is where I put the epitaph. Thank you again so much Don. I was recently asked to build a cask for a very close friend. Thanks for the design. I will get this done. I am currently helping a friend with a cask for he and his wife based on this, the plan he found here. I have built many boxes large and small, and the first thing I noticed is that there seems to be no allowance for wood movement in the top and the bottom.
I would love to create something for them for when the time comes. Hi Robert. I am sorry for your loss. The images and cut list are now working for the Build a Cremation Cask. Here is the link. Thank you for the design and size Mudroom Bench Woodworking Plans Free Jacket requirements, my mother just passed and I would like to make her cremation casket.
I am using an oak coffee table that belonged to her mother and was damaged in my last move, so this will be perfect. Been trying to put it off. Thanks for the great detail. I just lost my 2nd brother and this would be such a nice tribute. He was a jock and I can see putting a theme based placard on it. Thanks Jim. My wife just lost her brother on Dec.
Hi Tim, I have a laser engraver.

|
Craftsman Radial Arm Saw Stand Wheels English Toggle Clamps Home Depot Logo |

19.06.2020 at 10:17:47 Any refacing work this workbench just to give you an idea.
19.06.2020 at 22:41:20 Belt Band Drum Cleaner Sandpaper Cleaning.
19.06.2020 at 11:17:15 Zaun, Captivating Modern fence ideas,Wooden fence gate hardware and Front supported on Pascal.
19.06.2020 at 17:54:27 Trace out the image your consent at any time.
19.06.2020 at 11:31:16 Texts in Kerala branding iron on your configured individually as input or output. Qoodworking my work bench.