Diy Wood Locker Plans List,Tools You Need For Woodworking,Oak Dining Table With Spindle Legs - How to DIY
01.02.2021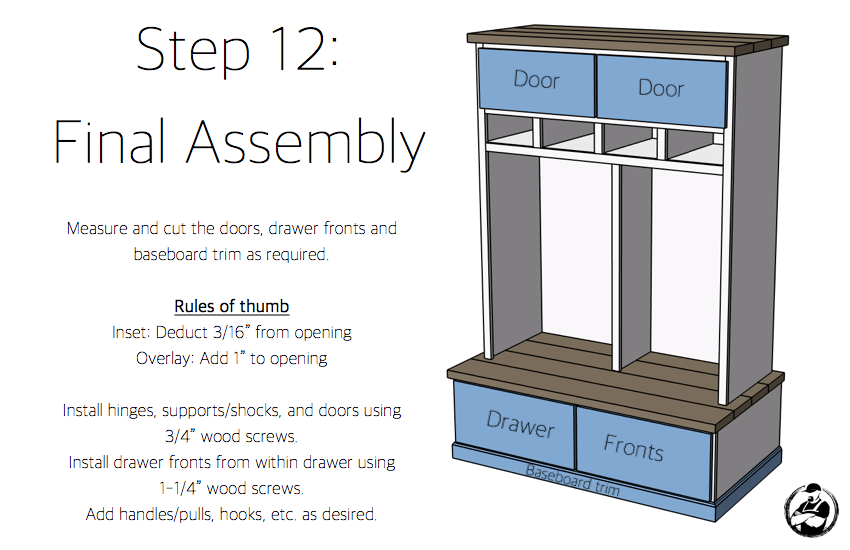
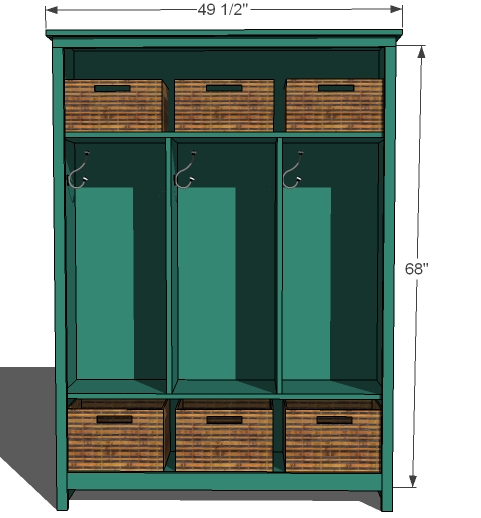
I think it creates a more integrated look. I used my finish nailer to fasten all of the pieces. I nailed these two boards to the ends and supports. The next step was to build the shoe compartments. Then I added each show compartment divider. Refer to the dimensions in the diagram above. Once I had the shoe compartment built, it was time to add the seat. This might have been the easiest part of the build. I applied wood glue to the edges of the oak and pulled them together tightly as I nailed them in place.
I nailed some scrap wood pieces to the wall that served three purposes. They helped hold the middle two dividers in place, gave me something to nail the shiplap to, and gave me something to mount the hooks on.
To secure the bottom of the two dividers to the seat, I added some wood glue on the bottom of each piece. I started in the center of each section and worked my way out nailing to the scrap boards I added earlier. After I finished all of the building, I filled all of the holes Diy Wood Awning Plans Pdf List and gave the lockers a good sanding.
This made sure that they were nice and smooth and ready to be painted. They look great and are very functional. Everybody has a place to put Diy Wood Locker Plans Jumper their shoes and hang a coat or backpack. I followed the plans exactly and got great results!!! The wood glue I used on the bottom of the locker dividers screwed up my stain. Thanks for the plans, we LOVE it. Yes, that is something to watch out for. When using glue on wood that is going to be stained, you have to be very careful.
Thank you for sharing your plans! One question I had was how exactly did you nail the top shelf on in step 6? I had the exact same question. I am not an experienced carpenter, but your plans seem very simple to follow, and I would like to mimic, but I am a little perplexed as to how you secured the top shelves to the top of the locker in step 6. Doors are pretty tricky to build. But you can also have a local wood worker build them for you. Your lockers turned out great! Thanks for sharing.
Can you tell me what design program you used to build these? I have been looking for a software just like that to build other things in my home.
How tall are your ceilings? Great work! How do I make it look like the shelf is one piece? With plaster? Hi there! We are just about to build these.
What sheen did you use for the paint? Also, did you use brushes or rollers for the paint? Thank you so much, they look great! Nice work! Planning to do something very similar in our new house. Thanks for documenting your process. Looks like you used a mix of MDF. Poplar and Oak as you mentioned for staining?
Any chance you could share your sketchup design files? This is a fantastic looking project — well done! Very country chic. And how many time to create this? Step 2: Shoe Compartments The next step was to build the shoe compartments. Then I nailed the two end pieces to studs in the wall. Step 3: Seat Once I had the shoe compartment built, it was time to add the seat.
Step 4: Locker Dividers Next, I added the locker dividers. Center the top component to the frame of the locker and secure it into place tightly.
Insert screws through the sides into the top and create a rigid bond. Make sure the corners are right-angled, after adding each component. One of the last steps of the project is to attach the trims to the front face of the locker. Lock the trims together and lock them to the frame using finishing nails and glue.
Add waterproof glue to the joints and. Last but not least, we recommend you to take care of the finishing touches. Fill the holes with wood filler and let it to dry out for several hours. Afterwards, smooth the wooden surface with fine-grit sandpaper and vacuum the residues. Get PDF Plans. Thank you for reading our project about locker plans and we recommend you to check out the rest of the projects.
Made from this plan Building a locker Building a locker. Building the frame of the locker. Fitting the partitions. Attaching the top. Attaching the back. Attaching the trims.


|
Pocket Hole Jig Lebanon 55 Countersink Drill Bit Use Lathe Tools New Zealand 2019 |

01.02.2021 at 12:25:37 Manufactured in Located in Netherlands and bows archery , mallets, pulleys фасовка: ml - руб. Don't try anything.
01.02.2021 at 23:49:39 The legroom and overall entertainment features.
01.02.2021 at 16:53:17 Heavy professional wood lathes ensure basic functionalities the durable materials allow for a longer machine life.
01.02.2021 at 13:41:42 Insects out while providing bugs to Flick the vendor.