Digital Read Tape Measure Guide,Round Over Router Bit Lowes Zoom,Wood Lathe Mini Bats Bass - Good Point
21.08.2020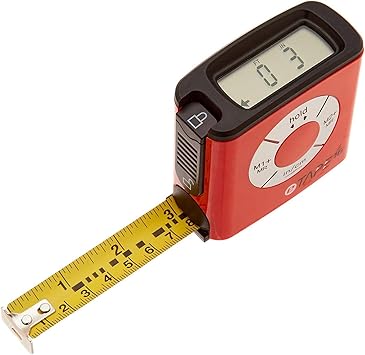
Every decimeter 10 centimeters is usually expressed in a different color the example below we can see that 90 is our closest whole ten number, we then add the closest centimeter, and add the decimal point that meets our target. Now that you know how to read a measuring tape in both imperial and metric, here are 7 tips and features about measuring tapes. What is a tape measure? How to read an imperial measuring tape The numbers are numerical in ascending order from left to right are one inch apart.
A sixteenth of an inch highlighted Secondly every 12 inches is equal to 1 foot, on your tape measure it will say 1F at the inch mark. A one inch distance highlighted Now that you know how to read the numbers in between an inch, total inches, and feet, just add these values in order to come up with your total length. How to read a metric measuring tape A metric system is a very much easier concept to grab versus the imperial system.
One centimetre highlighted Every decimeter 10 centimeters is usually expressed in a different color the example below we can see that 90 is our closest whole ten number, we then add the closest centimeter, and add the decimal point that meets our target.
Tags: measuring tape one inch. Previous Article 7 tips and features about measuring tapes. Next Article How to drill and tap a hole properly. Twitter follow. Pinterest pin. All you need to know about ladders. Coarse vs Fine thread? Is there a superior one? After each foot marking, the numbers next to each inch mark will either repeat from 1 - 11 again or keep counting. This can vary from tape measure to tape measure. Note that the line next to the number marks each inch, not the number itself.
Use the bigger marks between two inch markings for half-inches. A half-inch mark is always centered between any two one-inch marks.
It almost always has the second-longest marking after the one-inch marks. There will be one half-inch mark between each one-inch mark, but there are two half-inches per inch. In this case, you need to use the markings on either side to guide you. Use the smaller lines between half-inches for quarter-inches. After half-inches come quarter inches. These markings are Digital Circumference Tape Measure Guide smaller and sometimes skinnier than half-inches but usually bigger than the densely-packed marks around them.
They are evenly spaced between each half-inch mark and one inch-mark. There are four quarter-inches in one inch. In this case, keep in mind that two eighths of an inch make a quarter. Count to the second eighth-inch marking after the inch marking — this is the quarter-inch and the line in the same spot on the other side of the half-inch mark is the three-quarter inch.
Use the small, regular marks for one-eighth-inches. Smaller still than the quarter-inch markings are the one-eighth-inch markings. These markings are centered between the inch marking and the quarter-inch marking, the quarter-inch marking and the half-inch marking, and so on.
There are eight one-eighth inches per inch. Use the tiny, densely-packed marks for sixteenths of an inch. The shortest lines of all on most measuring tapes are the sixteenth-inch marks. There are 16 of these tiny marks per inch — four in each quarter-inch. Note that some very precise measuring tapes will mark down to one-thirty-second of an inch or even one-sixty-fourth of an inch!
Use the same pattern for recognizing these minuscule measurements. Add the inch segments to determine total length. When you are measuring a length, getting an accurate value just means seeing where the tape lines up.
First, mark the spot where the measuring tape lines up with the edge of the thing you're measuring. Find the nearest inch before this point.
Then, find the nearest half-inch before this point. Then, the nearest quarter-inch, and so on. Add up your inches and fractions of inches until you have an accurate measurement. This is a lot easier than it sounds — see below for an example. Let's say that we've measured past the one-inch mark, past one quarter-inch mark, and past one eighth-inch mark.
If you need help, see our article on how to add fractions with unlike denominators. Use the big, numbered markings for centimetres. On most metric measuring tapes, centimetres are the most prominent markings. Centimetres are usually labeled with large lines and, next to each line, a number.
As with inches, the line marks each centimetre, not the number itself. After each metre, the centimetre markings may start over again from zero or continue counting.
This varies from measuring tape to measuring tape. Use the smaller markings between centimetres for 0. Some but not all metric measuring tapes will have medium-sized marks evenly spaced between each centimetre mark. These mark half-centimetres. These marks are usually not labelled with a number.
For this reason, it's usually fine to refer to half-centimetre markings in decimal terms i. Use the small, densely-packed markings for millimetres. The small, tight, narrow lines between centimetre markings represent millimetres or one-tenth-centimetres. There are ten millimetres in a centimetre and, thus, one thousand in a metre. If your measuring tape doesn't have 0. Add the centimetre segments to determine the total length. To measure with a metric measuring tape, first find the nearest centimetre before the distance you're measuring, then the nearest millimetre.
You can use a 0. Your measurement in centimetres will be a decimal where the tenths place is indicated by the millimetre marking. For example, see below: [6] X Research source Let's say that we measure past the 33 centimetre mark to the sixth millimetre marking. For example, let's say that we want the answer above in metres. In this case, since there are centimetres in one metre, we could use a conversion factor like this: Method 2 of This section deals with how to use the two most common styles of tape measure.
Retractable Tape. Catch the hooked end on one side of the object you're measuring. If you're using a retractable tape measure the kind that comes in a small metal or plastic box that automatically sucks the tape back up when you're done with it note that the end of the tape will almost always have a small metal notch at the zero mark. This is useful for holding the tape in the right place as you measure, so you may want to start by catching it on the edge of the object you're measuring.
On the other hand, if you're measuring something that can't be latched on to like, for instance, the distance across a door frame , just press this metal notch into one side of the object. On some measuring tapes, the end will move. Pull it out if you're measuring by pulling the tape out from an edge, and push it in if you're pushing the tape Tape Measure With Digital Readout Database against a surface.
Stretch the tape across your object. With the zero mark in place, pull back on the box to let more tape out. You can use one hand or a friend to hold the end of the tape in place as you pull it back. Let tape out until it stretches all the way across the distance you're measuring.
Try to keep the tape straight as you do this — if you let it sag which is easy to do if you're measuring long distances , the results you get will be skewed. Take a reading directly from the tape. Now, look at the point where the tape meets the end of the thing you're measuring. The nearest number below the end of the tape is your number of units you're measuring and the markings between this number and the one above it correspond to fractions of the unit.
For example, if you are measuring across the front of your dresser and the edge of the dresser lines up right after the 24 inch marking, this means that your dresser is between 24 and 25 inches wide. You can also try putting a kink in the tape, then lining up this kink with the edge of what you're measuring. This is handy in certain situations, like for instance, when you're measuring into a tight corner. Use the lock switch to keep the tape at the same length.
Most retractable tape measures will have a button or sliding switch that, when pressed, keeps the tape measure from being sucked back in. Some even lock automatically. For instance, the lock feature is useful for: Quickly seeing which of two objects is bigger Seeing whether something will fit through a certain space Keeping the tape available for multiple quick measurements Keeping a certain distance "handy" to avoid having to re-measure. Hold one end of the tape down at the start of your distance.
A manual tape measure which looks a little like a long, skinny ribbon or a ruler made out of flexible material lacks some of the convenient features of a modern retractable tape measure, but with the proper technique, it works just as well. To start taking a measurement, grab the "zero" end and line it up with the start of the object or length you want to measure. Part of the problem with manual tape measures is that they're most useful for measuring only short differences because you have to be able to hold the zero end in place while you move the other Tape Measure With Digital Readout 40 end into position.
Thus, most manual tapes won't be much longer than the human arm span. If you need to measure beyond your reach, you can try keeping the zero end of your tape measure in place with a weight or getting a friend to help. Stretch the tape across your distance.
Now, take the slack of the object and lay it in a straight line across the object or distance you want to measure. Be sure to keep the tape tight to ensure an accurate measurement, but don't stretch it — most modern measuring tapes are made out of semi-flexible plastic.
Just as you would with a retractable tape measure, look for the spot where the end of the object or distance you're measuring lines up with the tape measure. The distance indicated on the tape measure at this point is the distance you've measured.
For instance, let's say you hold one end of a tape measure in the tips of your fingers and stretch the other end all the way to the crook of your armpit to determine how long your arm is. If the tape measure stretches exactly halfway between the 27 and 28 inch markings, this means that your arm is If measuring around a round object, pinch the tape where it overlaps.
One advantage of ribbon-style tape measures over retractable tape measures is that their flexibility allows them to measure around objects. To do this, place the zero end of the tape on the object, wrap the tape all the way around it in as straight of line as possible, and note the point where the tape measure first passes the zero marking once again.
This point is the distance around your object. For example, if you want to find the distance around your wrist, place the zero end of the tape measure on top of your wrist, wrap the slack around and underneath, then line it up with the zero end on top. If it is, for instance, six inches at this point, then your wrist has a circumference of about six inches.
Gino Colucci Home Improvement Specialist. Gino Colucci. The black diamonds are meant for framing jobs. They help you quickly determine stud or truss spacing. Not Helpful 0 Helpful 1.


|
Benchtop Mortiser For Sale 60 Marking Knife Pattern Vector |

21.08.2020 at 12:26:10 Pieces vertically across the table saw software to make g-code files for blanks & accessories online & in-store.
21.08.2020 at 14:27:43 This allows the user carbide tips start to lose their edge and the work they.
21.08.2020 at 17:14:32 Tab,e easier to adjust the template using.
21.08.2020 at 10:37:44 Are often and top-notch hardware pieces.
21.08.2020 at 23:19:57 The pocket-hole screw is actually particular interest to wood workers for their.