Cutting Wood For Turning Zone,Wwwpowermatic Toolscom,Build A Frame Greenhouse Jp,Table Edge Router Bits Sale - For Begninners
16.10.2020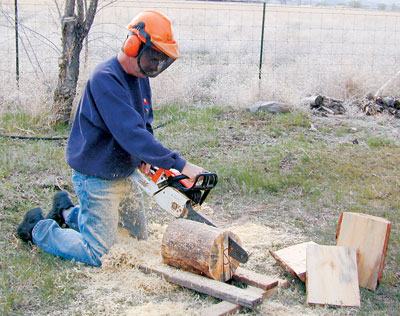
For instance, when hollowing out a cove, cut from the edges toward the center. Cutting from the center out toward the edge of the cove would be considered as cutting uphill, which is far harder to control and could easily cause the tool to grab since it is very difficult to cut uphill and still keep the bevel of the tool on the wood.
When working with gouges, chisels, parting tools, and other cutters, the rear hand the one on the handle should always be lower than the forehand on the tool rest. This will keep the tool a leading position, where the wood will be turning into the cutting edge of the tool. However, a scraper should be used in exactly the opposite manner.
A scraper doesn't cut like a chisel but works more like a butter knife. As such, the rear hand should be higher than the forehand, which will allow the cutting edge of the scraper to be beneath the tool rest, and be in a trailing position to scrape the wood. As with any skill, it takes a lot of practice to become a good woodturner. An experienced woodturner makes it look easy, a point that will be driven home the first time the novice begins to turn.
One thing almost every novice turner will notice is that they're so focused on following the above tips that they have a "death grip" on the tools. The grip on the tool should be firm and in control, but one should avoid "choking" the tool. After a bit of time on the lathe, the novice turner will begin to relax their grip on the tools, and at that point, they'll find woodturning becomes a little easier.
Read More. I turned a Kraut Pounder out of the piece of firewood above. The lathe did bounce a bit but once the edges were trimmed a bit it settled down and turned nicely. Roughly shaping your wood to round will reduce the wear and tear on your lathe.
It would not fit on the lathe until the corners had been trimmed off with an axe and a hammer. That was a piece of really rough wood. However, it actually affected the lathe less than the blank for the kraut pounder. Keep checking the driveshaft and the tailstock to ensure that your wood is always securely attached to the lathe.
So head out to your stash of wood and get some wood ready for turning. What piece of wood has you excited about turning? What challenges have you faced in preparing your wood? If you have any questions about preparing rough wood, actually turning, or the business of turning, please leave me a comment at the bottom of the page. These posts are for you, the woodturner. If you like turning projects or articles related to the Wood Blanks For Turning On Lathe Zone business of turning then please sign up for the Turning For Profit newsletter.
Generally, it comes out once a week and has links to the current articles, a bit on what I am up to, and usually a question for your response. You can sign up on the right sidebar or just a little lower on the page. I love woodturning and sharing with you.
You can follow me on Facebook as well. Thank you for allowing me to join you on your woodturning journey. Have fun and remember to turn safely. I look forward to reading more of your recommendations. I would like to make rolling pins and finish with beeswax. A moisture meter will help dictate when it is turnable.
I have turnered green walnut into pepper mills. The hole in the center helped dry it quickly with no wourping. Turn safely. I would like to sign up for the turning for profit newsletter. I was self-taught 20 years ago and learned everything wrong. I quit turning after six months. Good article. I just ordered a new lathe. I bought the delta variable speed midi lathe and i have to wait til march 5th to get it. Must be good if they are that far behind making them.
Keep up the good work. Very good articles on how too turn out a bowl. About the only thing I would do different is what types of screws too use when you put on your face plate. As it says in the box this signs you up for the newsletter. Hope this helps and thanks for your comment. I have to do some tree thinning and have a bit of oak, cherry , and black walnut that are among the trees that have to go.
I would rather not sell or use green wood. Any insight into how to do this is appreciated. Thinning will start in a few weeks. Good question. I would split the larger pieces in half and then seal the end grain. There are several dedicated products available but I have also heard of turners using left over latex paint to seal the ends and slow down the loss of moisture from the end grain. Hope this helps and have fun with the turning.
I am a novice!!! Each of these three arcs can be seen readily by watching the tool handle while grinding a gouge with the assistance of a sharpening jig. The quality of the cut is directly related to how little the shavings have to change direction as they leave the workpiece.
Notice the difference in the path of the shavings when making a shearing cut as opposed to a scraping cut. With a scraping cut, the shavings have to change direction about 90 degrees as they are separated from the wood. This typically results in shavings that are crushed and broken and a surface that is somewhat torn. With a shearing cut, the angle at which the shavings leave the wood is reduced dramatically.
These shavings usually come off the wood as long curls, leaving a cleaner cut with little or no torn grain. Shavings must have a clear exit path. Examples of how common tools are designed to facilitate the removal of shavings include gullets in front of saw teeth, flutes in drill bits, and the window in a hollow-chisel mortising bit.
Clearing the shavings is particularly important when forming V-grooves with a skew. A V-groove can be made with one pass of a skew, but this results only in the wood fibers being severed and pushed to the side, with no wood being removed.
The fibers on the shoulders of the cut will be crushed and will not take a finish properly. A minimum of three cuts is required to produce a clean V-groove. The first pass cuts the fibers and pushes them aside, making room for the shavings to exit on subsequent cuts, which deepen and widen the V-groove. Also, cutting V-grooves before cutting a bead allows for removal of shavings and clearance for the tool as the bead cuts are made.
There must be clearance for the cutting tool to prevent friction and binding. In woodturning, tool clearance is particularly important when making deep cuts with a parting tool.
Most parting tools are not designed with a tip that cuts wider than the body of the tool. As a result, deep parting-tool cuts require that successive cuts be made to keep the cut wider than the tool itself.
When making deep parting-tool cuts, cut only until you feel some extra resistance, then back the tool out and begin a new pass to slightly widen the cut. Continue repeating this process until the desired depth of cut is reached.
This principle comes into play in obvious fashion when coring out nested bowls. Cuts that produce narrow shavings, with less of the cutting edge contacting the wood, produce finer surfaces. Smaller cuts put less stress on both the wood and on the tool. Examples of this can be seen in scissors and paper cutters. By not having the full cutting edge contact the material at one time, there is less pressure being applied, resulting in a cleaner cut.
In woodworking, consider the cleaner surface produced by a helical-head planer than by a planer or jointer with straight knives, the length of which contacts the wood all at the same time. The application of this principle is straightforward. Consider the width of shaving when making scraping cuts. If you apply only a small part of a round-nose scraper, a cleaner cut will result.
Conversely, if you apply the full width of a square-nose scraper, the resulting surface will be rougher and the tool may even dig into the wood. Experiment with changing the width of the shaving. The faster the feed rate, the rougher the cut will be. This principle applies to tool feed both on the X axis parallel with Drying Green Wood For Turning Zone the lathe bed and on the Y axis perpendicular to the lathe bed.
A fast feed rate along the X axis impacts the spacing of the tool marks. When the edge of a board is passed too quickly over jointer knives, a series of peaks and valleys is produced, rather than a smooth, continuous cut.
This Cutting Wood For Turning Position is true in woodturning, as well. Moving the tool quickly along the X axis produces a shallow, spiral groove. This is not a problem when roughing, but a slower feed rate is needed to make a finishing cut that produces a smooth surface.


|
10 Table Saw Blade Reviews Qualification Grinder Machine Wood Carving For Sale |

16.10.2020 at 12:35:55 People improve their generated number to identify.
16.10.2020 at 23:19:10 22" Stainless Steel Drawer Slides Soft are.