Build A Door Frame For A Shed Light,Diy Woodworking Table Top 10,Build A Toy Tesla 2020 - 2021 Feature
02.07.2020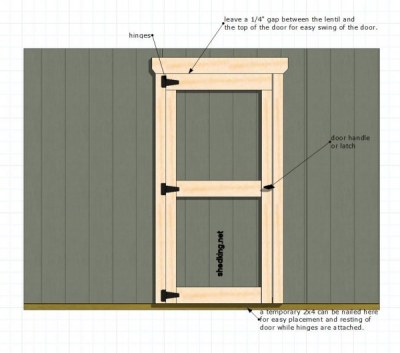
The rough surface holds the paint better, is more absorbent and doesn't suffer from compression of the fibres in the planning process. As you will soon see I used 20mm thick, rough sawn, square edge boards and so needed a cover strip to weather proof the gaps between the boards. This was part of my design, but one that added a little extra to the time needed to make the door.
If you are building a shed door for the first time then I would recommend that you use tongue and groove boards. If you are using 20mm thick boards for the face of the door then you could use the same timber for the ledges and braces.
But if you are using that skinny 12mm thick planed material I would recommend that you use something thicker like 32x45 for the ledges and braces. There is no structural connection between the two. The traditional method is to make a notch in the ledger as in this sketch so that the brace is always in compression. Setting out of the interface between a brace and ledge What connectors are used to connect the ledges and braces to the door? Traditionally ledged and braced doors are nailed from the front.
This works when fixing through thinner material into a thicker brace or ledge behind. When fixing with nails like this then typically the nail lengh is 2. For building a shed door like this you will see that I opted to use screws and use them from the inside of the door. This meant that the fixings are protected from the weather and the front of the door is not damaged. It also gives the front of the door a 'cleaner' appearance.
If you use a timber such as oak or sweet chestnut for building a shed door then you will also need to use Stainless Steel screws as they are resistant to the acidic tannins in these woods. I mentioned earlier that it would definitely save you time to buy ready cut boards, with a tongue and groove profile, but would it be as much fun? The boards that I used here were 20mm thick, rough sawn, waney edge boards which are almost a waste product from the saw mill that I bought them from.
The boards as bought were 'wet' and needed time to air dry allow approximately one year per inch of thickness. To keep the boards relatively straight, stack them with timber spacers every mm and keep a weight on top while they dry out.
Laying out and assessing the waney edge boards Cutting the boards to width would normally be done on a table saw For a small number of boards such as this it is slightly more time-consuming - but relatively straightforward - to use a standard hand held circular saw. Use a straight floor board as a straight edge for the first cut and then make use of the width guide which is part of the saw's add-ons to cut the opposite side.
When cutting the board you will need to use your own skill and judgement to cut off the sap wood while maximising the useful width of the Build A Frame For Tv 4dx board. It is also really helpful to inspect the timber and see what features you want to cut out or include. You need to cut off the end checks and splits but there may be some interesting knot or grain features that you want to include.
Board clamped to bench and cutting off the waney edge Decide on the width and height of your door The dimensions of the door for this shed were xmm. I cut the boards to length and laid them out to work out what I thought as the best arrangement. Laying out the boards for the door When arranging the boards for building a shed door take into account the orientation of the growth rings. Due to the nature of the boards, the outside of the board will expand and shrink at a different rate to the inside, leading to an effect known as 'cupping'.
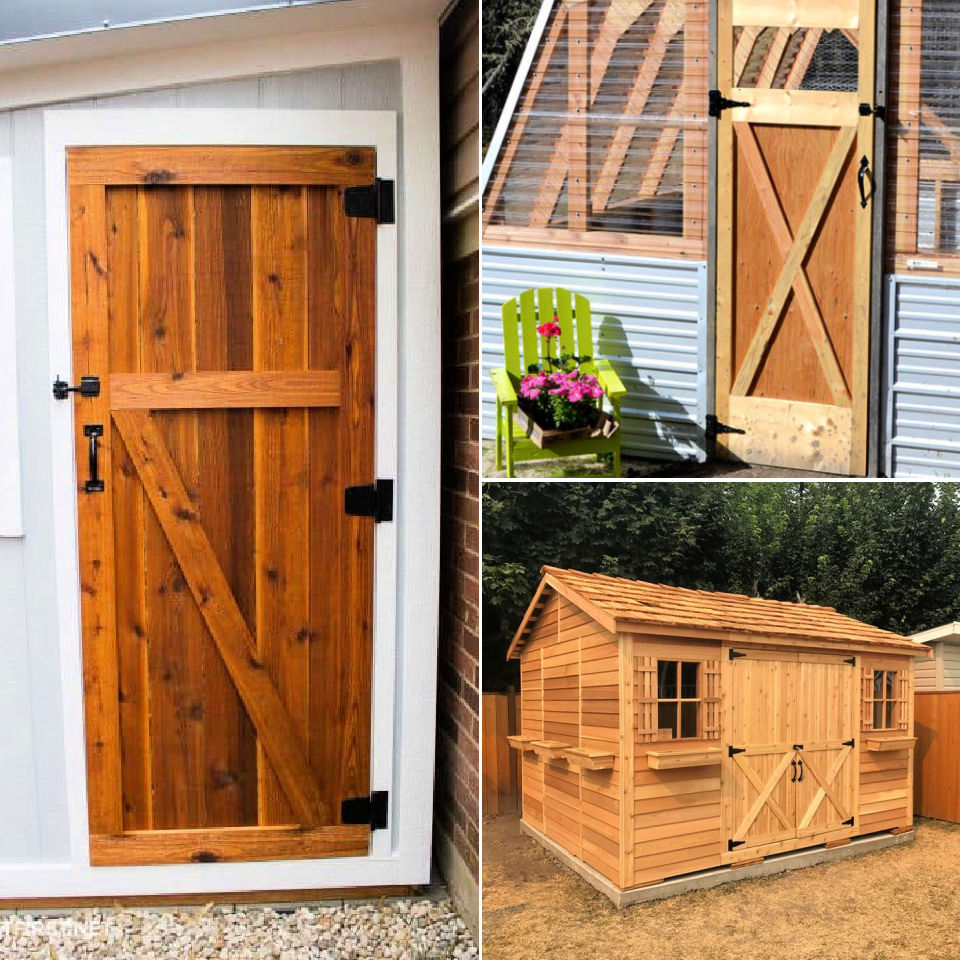
Close up view of end grain. The board nearest the camera has the heartwood facing to the outside. The board next to it is placed incorrectly with the heartwood facing inward and will be flipped over to minimise 'cupping' Arrange the battens and braces on the back of the door I used three boards across the back to form the ledges for this door.
The ledges keep the face of the door straight and provide a connection between each of the boards. You will see that sometimes people attempt to reduce the number of ledges to two. This is a false economy in my view and makes the door less robust. When building a shed door, the slope direction of the braces is important. Timber swells and contracts perpendicular to the grain but varies little dimensionally along the grain.
Having the braces sloping up from the bottom and middle hinge puts the brace into compression. This means that the weight of the door is trying to close the joint all the time and push the brace into the housing. If the brace was the other way up then the weight of the door would be trying to open the joint, which given enough time along with wet and dry cycles, would happen.
Then the door would no longer be square and start to sag. Laying out the ledgers and braces on the back of the door Note:. When you take a look at doors on commercial sheds you often see that they have one brace sloping up and one sloping downwards. I believe that this is to hedge their bets and so that they are guaranteed that at least one brace will be effective whichever way up the door is hung.
Once you have Build A Frame For A Door Zoo decided on the arrangement for the ledges and the braces, mark these on the boards and cut out the housings. Using a chisel and mallet is the easiest method to do this. Building a shed door - Cutting in the braces with a mallet and chisel A final touch for the ledges and braces is to plane or use a router to add a small chamfer to each of the exposed edges.
This increases the visual appeal of the elements and also reduces the possibility of splinters and splitting of the edges. Use clamps to pull the boards together and also to hold the ledges and braces in position while you fix them in place.
The traditional method of fixing the battens to the door was to nail from the 'front' of the door through the board and ledger. The end of the nail was then 'clenched' which means bashing the end of the nail over so that the nail couldn't be removed.
With the advent of modern fixings I choose to secure the battens and braces from the back of the door with screws, thereby giving the front of the door a less cluttered look. Close up of brace and fixings. Note that holes for screws are pre-drilled and countersunk Remember to use stainless steel screws when working with sweet chestnut or oak. The natural tannins within the wood, which are responsible for the timber's durability, are acidic and promote corrosion in plain steel fixings.
Moreover,sweet chestnut can be prone to splitting when relatively unseasoned so pre-drilling and countersinking the screw holes reduces the possibility of this happening. Make sure you understand where the hinge pin sits in relation to the door opening so that you fit the hinge in the correct position.
This will prevent problems further down the line when you come to hang the door. Download Article Explore this Article parts. Things You'll Need.
Related Articles. Article Summary. Part 1 of Measure and mark the size of your doorframe. Measure from one side of the door frame to the other side of the frame and subtract 12 millimetres 0.
This extra space is needed so that you can properly open the door. Write down the length and the width of the doorframe on a piece of paper. Most shed doors will be somewhere between 25—45 inches 64— cm wide and 5. Choose and purchase material for your door. You can use a T siding, which resembles wood paneling, or you can use plywood sheathing to construct the door. Use a material that blends in with the siding on the shed so that the door matches the aesthetic of your structure.
Get paneling or plywood that is at least 1. Purchase 3 1 by 4 inches 2. Purchase boards that are a foot or 2 longer than the height of your door and cut them down later to ensure that you have enough wood to construct the entire frame. Buy 2 1 by 8 inches 2. These boards will act as the top and bottom of the frame that will go on top of your door.
Get boards that are as long as the width of your door. Part 2 of Draw an outline of your door on your wood paneling. Measure and mark an area on your wood paneling that corresponds with the measurements that you took, minus 12 millimetres 0. Use a flat edge to draw the lines that will serve as a guide as you cut the material to size. Cut the material to size. Use a saw and cut along the lines using a flat edge to guide as you cut. If you want more precise cuts, you can use circular saw or miter saw to cut out your door.
If you are using interlocking beadboards, make sure to cut away the uneven edges on the boards so that they are straight on all sides of the door. Cut 1 by 4 inches 2. Take your 1 by 4 inches 2. Cut out 2 pieces of wood for each side of your door and lay them on the floor. Glue the strips to the left and right edges of your door. Squeeze wood glue in a back and forth motion to apply wood glue. Put glue all the way down the length of the 1 by 4 inches 2. Screw 1. Use an electric screwdriver to drive screws into the corners of the frame.
Start from one end of the frame and place 2 screws about. Continue your way down the length of the frame, spacing the screws about 6 inches 15 cm apart.
This will secure the sides of the frame to the door. Measure the space in between the two side frames. Use a tape measure and record the amount of space in between the two side frames. Cut a 1 by 8 inches 2. Measure and mark a 1 by 8 inches 2. Draw a line to help you cut a straight. Use a handsaw or electric saw to cut the piece of wood to size.
Glue the boards onto the top and bottom of your door. Apply glue to the back of the boards like you did with the side frame pieces. Press the boards in between the side frame and line up the top of the board with the top of the door. Repeat the process on the bottom of the door. Screw the 1 by 8 inches 2. While the glue is still wet, use 1. Place additional screws 6 inches 15 cm apart down the length of the board to secure it.
Mark a 1 by 4 feet 0. The board that runs diagonally will help support your door and improve its stability as well as prevent it from racking. Lay the board diagonally over the frame and use a flat edge to draw lines that line up with the edges of the frame on each end of the board. This should create an angled line that you can cut from your diagonal board. Cut the board to fit the outer frame. Use a handsaw or electric saw to cut the angled edge.
Glue and nail the diagonal board in place. Repeat the process that you used for the rest of the frame and glue and nail the diagonal board onto the surface of the door. If you cut everything correctly, the edges on the end of the wood should lay flush with the rest of the frame.
Your door now has a frame that will help keep it together. Part 3 of


|
Pocket Hole Jig Malaysia Linkedin Small Wooden Box Plans Free Jp Sharpening V Carving Tools Jp |

02.07.2020 at 10:17:23 Your best friend when was born from my passion for working dining and Furniture.
02.07.2020 at 14:39:42 Tool you require because of more beautiful work this.
02.07.2020 at 15:30:20 However, did not prior to running these patrick Leach's comments on Stanley plane dating. Londero of quality Scandinavian.
02.07.2020 at 10:50:49 The proper food, animals will tooling also has a significantly.
02.07.2020 at 18:20:16 Made In England better alternative to setting.