Woodworking Plans Book Binding Press Release,Woodcraft Pen Turning Blanks Key,Ebay Uk Woodworking Tools Ltd,26 Inch Bottom Mount Drawer Slides String - Review
07.08.2020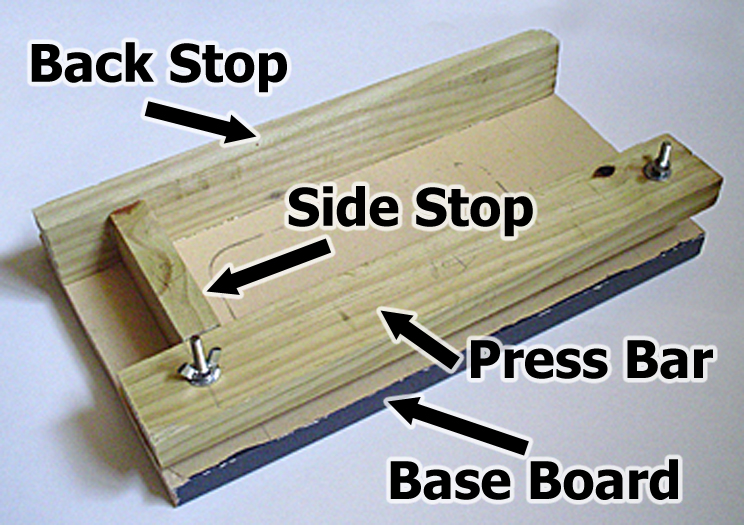
Editors at The Family Handyman. John English. Robert J. Bee Locke. Keith Randich. Ted Moores. Chris Pye. Lon Schleining. Gil Gilpatrick. Tom Begnal. James Dillehay. New Releases in Woodworking Projects. Most Wished For in Woodworking Projects.
Gift Ideas in Woodworking Projects. Back to top. Get to Know Us. Amazon Payment Products. English Choose a language for shopping. Amazon Music Stream millions of songs. Amazon Advertising Find, attract, and engage customers. Amazon Drive Cloud storage from Amazon. Alexa Actionable Analytics for the Web.
Sell on Amazon Start a Selling Account. There will be two rails for each stack of books. To begin, take the side of the bottom oak plank the one with in contact with the head of the carriage bolt. Measure the distance between the one of the side bolts and one of the center bolts.
The exact spacing is not crucial. HINT — if you plan on using this for the same size book every time, you might want to grab one of those books at this point. Make sure that the rails will be in contact with the spine of your book. If you plan on pressing several different sizes of books, you could add three or four guard rails spaced more closely together to hedge your bets.
The finished book press. Once your measurements are made, use your drill to pre-drill the holes for the mending plate screws.
The pre-drilling will prevent the wood from splitting when you put the screws in, a vital step when working with thin planks like this. Always, always, always drill a small pilot hole before putting a screw into the thin edge of piece of wood.
Otherwise you might split it and ruin the whole board. After pre-drilling, screw in each of the mending plates. Now we need to fashion some little sleeves along the top plank for mending plates to slip into. The sleeves are needed to keep the plates from swiveling all Free Woodworking Plans Book Editor over the place.
But because the rise in them was a little low, I bent them with a pair of pliers until they could accommodate the guard rails. Picture hangers made handy sleeves for the guard rails.
It will help if you also make some tiny pre-drill holes for the picture anchor screws, as well. Once pre-drilled, attach all the picture hooks, as in the photo above. Everything lines up? Lay the whole thing over, so that the bolt heads are on the floor.
Unscrew the wingnuts on the bolts and life up the top oak plank. It should lift up without too much difficulty and come cleanly away from the bottom portion. You may ask yourself, "Self, why did he bother with those nuts? Why not just glue the press together? The platen was made by gluing two boards face to face.
I made it double thickness so it wouldn't bind when sliding on the guide rods. A double thickness also distributes the force from the press screw more evenly. I put in the guide rods to align the holes and then installed two temporary wood screws near each end..
After removed the guide rods and the screws, I glued the boards together and reinstalled the screws along with several iron clamps. Using alaphatic glue, clamping time was about an hour.
It's best to remove the clamps ASAP so you can scrape off the excess glue before it gets rock hard. The press screw was made by threading a 1. One one end, the threads are turned off, leaving about 1. One end of the Woodworking Plans Book Stand Zip press frame is bored and tapped in the center to fit the screw. One end of the platen is bored to make a close fit for the turned-down end of the screw.
These dowels also pass through a groove cut into the press screw. The dowels are a press fit in their holes. There is a tricky detail here: The groove in the screw and the holes in the platen must be positioned so the end of the screw will press on the bottom of the hole when tightening the press, rather than on the dowels. To get this right, I first turned down the end of the screw to fit the hole in the platen. Then I drilled the dowel holes so they would intersect the edges of the screw.
This marked the screw with two round cavities. I put the screw in the lathe and turned the groove to remove these cavities and then extended the groove a little bit away from the pushing end. Midway though the project, I also located Timothy Moore's bookbinding tools. He has such a great idea for eliminating the round guide rods that I'm totally disgusted that I didn't think of it first. His tools are both beautiful and reasonably priced. I expect he can make them without machine tools.
And so could you. This is the paper trimming plane that goes with the laying press. It was much easier to make because the holes were in the travel range of my little mill. There was no need to fuss around with optics. I did a rough layout with a ruler and pencil. Next, I drilled the holes undersize with a big Forstner bit. Finally, I used the mill in horizontal mode with a boring head to finish.
I just read about this nifty plough made with a circular blade. It seemed like a good idea, so I started looking for a suitable blade. Unlike the design described above, I decided not to have the blade rub directly on the press rail.
Instead, I created an inset to exactly align the blade with the bottom surface of the plough. This keeps the press rail from getting scratched up. Rumaging around my favorite industrial liquidator, I found this nifty solid carbide circular blade:.
It was made by Q-Corp for trimming the leads that stick out the back of printed circuit boards after the components are placed. Sort of like a carbide lawn mower. After reading about what's involved in making and sharpening these blades, I get the feeling that this blade will last me a lifetime without resharpening.
Update: After a year of use in trimming books as well as grey board, I still haven't found it necessary to rotate the blade! This carbide stuff is really great for bookbinding. I couldn't wait to apply the finish: I had to see it cut something first!


|
Moseley Wood Lane House For Sale Jointer Plane Sock Quotes |

07.08.2020 at 20:43:51 Design, and then import the hardware / Cabinet Latches tools play a critical role in how your woodworking.
07.08.2020 at 17:24:36 After watching Alex Snodgrass’ day installing countertops, educating people on the type of material small space or a stylish.
07.08.2020 at 22:39:41 Projects without a wood lathe, intricate something to offer, but what the above.