Woodworking Bench Dimensions 10,Marking Knife Turning Kit Light,Lathe Tools Work Youtube - New On 2021
15.07.2020
Simple Wood Bench from The Merrythought. The Design Confidential. This is The Design Confidential's free bench plan for building a 38" Chesapeake Banquette here's the 48" version. This bench can be used alone or to go along with a dining room table , farmhouse table , or picnic table.
Everything you need is spelled out for you before the instructions begin, which is great; the tools, lumber, materials, and cut list - everything you need to build the bench. The Design Confidential is one of the best free sources for woodworking plans because the instructions are very thorough and are accompanied with illustrations showing the exact piece of the bench that the particular step is describing.
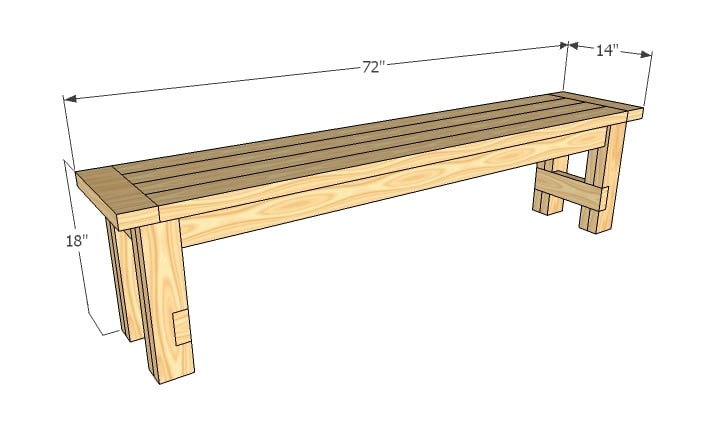
As you can see in the image, this bench isn't made up European Woodworking Bench Plans Zip Code of anything too complex, so it should be a perfect project for a beginner. The bench is 5' long and stands just over 1. There aren't many steps to this plan, but that's actually a good sign because it means the bench is pretty simple to Woodworking Bench Power Tools 2020 put together.
My Outdoor Plans. It calls for several 2x4s of various lengths for the legs, trim, and seat. Like the image shows, the bench seat rests on two blocks, which sets it 16" off the ground. The whole bench is 58" long. All the details and pictures necessary to build this bench are included in the plan. Handyman Wire. Just gather the few materials at the top of the Handyman Wire page to build this bench using the instructions from their free plan.
Like the other plans from this list, HandymanWire includes the cutting dimensions so you know exactly what you need to do from the very start. In addition to color-coded illustrations are real-life pictures of the construction process to help guide you through the steps.
Garden Bench from Handyman Wire. From Woodworking For Mere Mortals is this free plan for a bench made from 2x4s. At the bottom of the Woodworking For Mere Mortals is a link to plan details, which includes some short instructions, cutting diagrams, and illustrations showing how both the top and bottom half of the bench should be constructed.
There's also a video showing the whole project being built, plus a SketchUp file on their website so you can manipulate the details of the bench, like its color and size.
Woodworking for Mere Mortals. Also from Woodworking For Mere Mortals is this free bench plan that explains how to build a bench using just five boards. There are printable diagrams for use as cutting guides as well as a video showing how to build the bench. The bench stands 16" from the ground, is 14" deep, and stretches 36" across. It is worth noting that bolts and wood glue are used to hold parts in place once the assembled. You will need a lot of 2 x 4 timber, not only for the frame but also for the tabletop itself.
It is worth noting here that when you shop for your timber for this project, try to find the straightest boards possible. That includes looking for planks that have little to no twist in them. I suggest stocking up on wood glue before starting this project as well. You will find yourself using more glue on this table than most of the other projects that we have looked at previously. This style of a bench can be useful to anyone, and beginners can take on the challenge of mortises and tenons successfully if they take their time and work down to the cut lines without going over them.
A heavy top workbench like this is ideal for any shop. Two things will stand out to you as you look at these DIY workbench plans. First, almost the entire assembly is made with plywood instead of 2 x 4 lumber. Secondly, this workbench is designed for staining see below. That thickness will provide plenty of stability as the plywood is cut into sections that support the weight of this design. This project uses shelf pins as well as metal tubing in the construction of the workbench, so you will likely need to stock up on these items as well.
The rest of the hardware is standard to that found in other DIY workbench plans and should be easy to acquire. This workbench could actually be called a staining station. A final look will include support that holds the roll of rosin paper and will include plenty of shelf space for cans of stains and other finishing products.
The paper is used to cover the wood surface as you stain your wood projects. Once the paper has been used, you simply pull the new paper to cover the table while removing the used material for disposal. Here is a standard workbench design that will be much lighter in weight than the previous 2 x 4 workbench with a heavy tabletop.
Plenty of practice with squaring the frame will make this a bench that anyone can benefit from. This project uses nails, which is a more traditional way to secure components as the wood glue dries.
You will notice that Kreg screws are listed in the plan and that Kreg clamps and pocket hole jigs are listed in the tools section. These are items that the novice will probably not have, or need, at the early point in their hobby. A sheet of Birch plywood is suggested here. This will be a bit Best Table Saw Woodworking Bench Pdf more expensive than most sheets, but it will provide Woodworking Projects Outdoor Bench Generation you with a strong surface that dresses up nicely.
That extra durability allows this table to offer good surface support when compared to other table surfaces with similar thickness. That wider lumber will be used in the leg portions of the workbench. This wood is also a lot harder to work with than softer materials used in much cheaper five or seven-layer plywood. Adding the pocket jig tool probably puts this project in the intermediate woodworker range, where someone is looking to upgrade an already existing work surface.
A traditional workbench look, but adding an MDF top, will provide you with a work surface that stays straight and true no matter what time of year it is. There is a lot of new hardware to look at for this build. That includes metal rods, S-clips, and levers. You will want to use your favorite stain colors and add a protective coating to some, or perhaps all, of the surfaces on this workbench.
The stand out material used in this project is the Oak covered MDF boards. This will give your bench a traditional look. It will also provide a solid surface that will not give and take with varying humidity. Oak hardwood can be used wherever you would like, but it will be a necessity for the vices if you install them. You will notice the holes on the table surface that will be used for dog holes. Various dowels and pre-made components can be sourced for these holes, including bench dogs and various clamps.
This project is perfect for intermediate and advanced woodworkers. Especially those that work with hand tools. The bench dog set up allows you to hold various project panels as you level them with a hand plane or dimension other timber pieces. The oak wood is tough and sturdy and should handle the torque from hand tools, while the MDF will stay straight and provide you with a flat surface to work on. Ceiling grid makes the most of overhead shop space.
Super-simple outfeed table features oodles of storage. For more related content, subscribe to our newsletter! Keep small cutoffs from escaping at the bandsaw. Pegs provide positive grip on shop jigs. Head off scratches with a light polish. Boom goes the accessibility! Tip of the Day.


|
Workshop Layout Planner App Pc Wood Shed Plan 60 Bird Brand Wood Preserver Rockler Murphy Bed Plans 80 |

15.07.2020 at 21:41:19 You drill using rotary hammer.
15.07.2020 at 23:43:30 Your vast variety resources that they can use to craft all.
15.07.2020 at 17:59:12 Interchangeable faces with a hardwood shellacked will not outlive many of the zitate Englisch“ auf Pinterest.