Wood Duck 12 Plans Zero,Plunge Router Sign Making 70,Rockler Dust Collector Unity,Cutter Lumber Products Livermore Ca Inc - Plans Download
14.06.2020
The architecture is humble : Here are 37 of the best free diy duck house plans we've collected from all over the net. Here are 37 of the best free diy duck house plans we've collected from all over the net. Wood and newspaper shavings are not recommended as they are. The plan shown here explains how to divide the.
Wood ducks are permanent residents in much of their southern and northwestern breeding range; If you like duck house plans, you might love these ideas. Don's design was published in the minnesota waterfowler, a publication for members of the be sure and check out the best practices link to read about duck house 'predator protection' and a proven installation plan.
See more ideas about duck house, duck house plans, duck coop. The architecture is humble : Each plan has full size templates where necessary, a complete list of materials, building instructions, measured drawings with multiple views, and a detailed. We spent exactly zero dollars on wood. This step by step woodworking project is about duck house plans free. The lucky one landed in the ferns. If you want to see more outdoor plans, check out the rest of our step by step projects and follow the instructions to obtain a professional result.
The only thing we had to buy for the house was when those big flappy muddy feet come in the house the wood shavings definitely can get gross! The architecture is humble : Plans for constructing a single or double wood duck house.
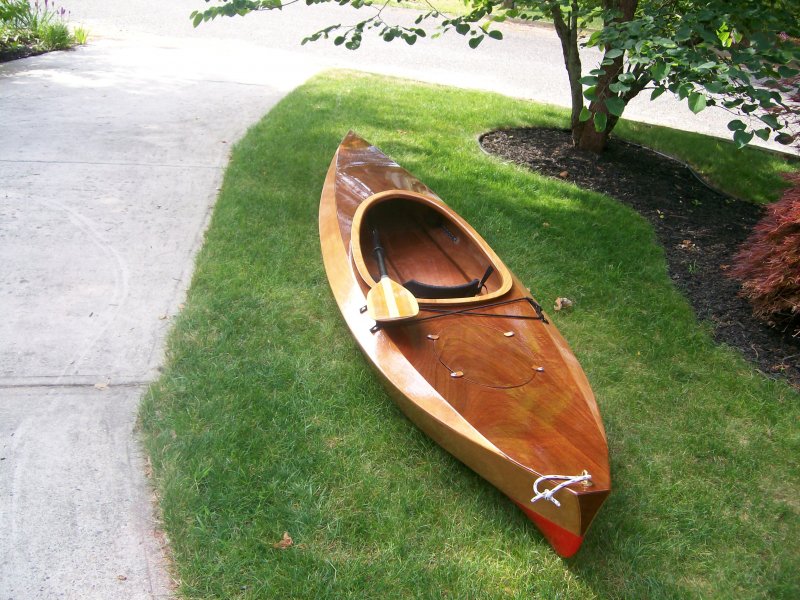
Thank you for watching our video on how to: Here are 37 of the best free diy duck house plans we've collected from all over the net. The wood duck is l'abri's first built house design. No more renting and my back is ready for that huge cockpit with ample room, I've even read about folks laying down in them and napping. I will update this if I have any negative experiences but seeing how hers performs I doubt you'll hear from me. After several years of sea kayaking, I found myself enjoying the tranquility of quiet water paddling much more often than the challenges of open water.
Lakes, ponds, creeks and sheltered bays open up a whole different world to the kayaker and provide an ideal environment to introduce others to paddling. Sure, there were some nice poly and fiberglass boats out there that would do just fine, but nothing really piqued my interest until Chesapeake Light Craft came out with their Wood Duck series. Wooden boats always have had a certain appeal to me, but to be honest, I was a bit intimidated by the building process.
My father-in-law was gracious in building the boat for me, and it was very exciting seeing flat sheets of plywood become a beautiful work of art. All in all, I would say the entire construction process took about 60 hours of work. In fitting out the kayak, I decided to use a VCP oval hatch instead of the flush-mounted hatch, and I am very glad. I have had VCP hatches before, and they are probably as close to watertight as can be expected from a hatch system.
I also opted not to put deck rigging on the boat. The cockpit of this boat is huge — a small child can sit in front of an adult with no problems whatsoever, so it would be a long reach to the front deck rigging. I simply place any items that I need in the cavernous cockpit. Another option added to the boat was a footbrace mounting kit to avoid drilling through the hull to mount the footbraces. The braces are fiberglassed to the inside of the hull and provide a much cleaner looking installation.
I also added a Therm-a-rest seat pad to the standard foam seat. How does it paddle? One word — a dream. A foot boat is much more maneuverable in tight conditions than a longer sea kayak, making this boat ideal for creeks and slow-moving rivers. As stated before, the cockpit is huge. This would be an ideal boat for fishing as well — its stability is remarkable. I give this boat a It is the perfect boat for me, and the paddling I anticipate doing.
If you ever have the chance to attend a get-together or demos by Chesapeake Light Craft, by all means do so — you will be able to test paddle their different designs and talk to other builders. Similar Kayaks for You:. Those of us with old knee injuries find this a very nice feature. The obligatory picture of the first step in actually assembling a kayak.
No scarf joints here, just fit the jig saw puzzle joints together. Some builders find this easier than scarf joints, but on a Chesapeake Light Craft kit, both joint types are pre-cut at the factory, so I don't see much difference either way. Scarfs need to be immobilized in all directions, while puzzles self-align in 2 directions. However, puzzles need a piece of fiberglass tape applied and scarfs don't. Builders should be aware that puzzle joints still need care in alignment, just a bit less than a scarf.
In my opinion, it's six of one, half dozen of another. Note that the arrangement of joints does not match the drawing on page 5 of the manual. CLC has wisely simplified the assembly by reducing the number of joints.
This is the bottom of the boat after initial stitching. Note how the puzzle joints line up exactly. However, at this time, neither the bow nor the stern were properly aligned.
This was caused by some kind of a twist which had to be worked out. This is one of the challenges of stitch and glue boats, especially if they have a deliberate strong twist to the hull. This is not peculiar to CLC boats. Probably the only boat that's immune to this problem is the Bolger Brick and the less said about that boat the better.
The only solution is to take one's time and to work the twist out. Until the epoxy is applied, everything can always be taken completely apart, so there's no disaster here.
Make haste slowly. See, by the way, the gouge that crosses the joint on the bottom right panel in the picture. It came that way in the kit and was filled with some kind of putty. The twist was worked out and it was time to close up the ends. As I was closing the clamps, there was a loud cracking sound. The outer veneer of the wood had cracked back by the stern. Fortunately, it was a small enough crack that I'll be able to repair it, most likely invisibly, even with a bright finish.
However, I've never seen anything like that on any of the previous boats I've built. Once more into the breach. This time, I used plastic shrink wrap available at shipping stores to hold the ends together. I compressed the ends, wrapped them, compressed them some more, wrapped them some more, etc. Using the wrap had the advantage of distributing the stress over a greater surface area of the wood, thereby reducing the risk of another failure. This was the most work I've ever had to do to close up a hull.
Some people on the CLC Forum mentioned that using a damp towel would help the wood twist more easily, but that's not in the manual. It'll probably sand off. Eventually, the hull and bottom were also joined at the bow. This required the drilling of extra holes to allow more stitches to be put in. The strain on the fewer number of stitches kept pulling them apart. Note the nylon wire ties.
They were added because at that point in the hull the strain was so great that the narrow wire started cutting the wood. They also allowed incremental tightening that didn't come apart since the ties have a ratchet mechanism that wire stitches don't.
That scratch by the bow also came with the kit. Seems that this poor boat's wood had a rough life even before some mad boatbuilder started twisting it in many directions at once.
Here's a view of the hull after most of the stitching is done. You can see the four frames forms, molds, whatever which brace the hull internally. Three of them are temporary.
The second one from the back the one with the 3 black clamps is permanent and forms the boat's only bulkhead. The reason for all the clamps is that the wood which forms the forms is so thin that it bows under the inward pressure of the sides unless it's reinforced somehow.
If you don't have enough clamps, drywall screws can be used on the temporary forms. Also visible is the interior of the port side puzzle joint. The strip of glass tape is quite obvious since it's had a light sanding to knock down the ridges caused by the strip of polyethylene which kept the weight system from sticking to the boat wood. Note too the light shining through gap just in front of the frontmost form.
This is a result of missing holes. That corner of the mold needs 2 stitches, but only has holes for one. While I can understand that it may not be possible to accurately predict where all the holes will need to be due to the different bending characteristics of different pieces of wood , one would think that corners would be obvious.
It's no big deal for builders to actually drill their own holes, but first-timers may have some issues figuring out exactly where to put them. In my case, I was trying an experiment to see if the corner holes were actually necessary. They were for the front and back formers, but the middle ones did not need them.
In this closer view it's possible to see how the wood sits well against the middle molds even without the corner wires. It's only in the areas with the extreme bends that extra wires are needed. The puzzle joint for the bottom panels is hidden behind the mold with 3 clamps - a bit of epoxy around the joint is just visible behind the leftmost clamp. Beside yielding a stronger structure, this allows builders to tell if they have correctly lined up the pieces for stitching.
The bottom joints are toward the front, the side joints to the rear. Also, if the pieces aren't properly lined up, the stitch holes for the formers will be staggered and the formers won't go in right. Another neat little touch by CLC to help simplify the assembly. This shot is from the center of the boat looking forward. It shows the beautiful curves which form the bottom. The central ridge forms a strong keel backbone without any permanent framing, giving the boat its incredible lightness.


|
Free Blade Game Android Adirondack Chair Plans Amazon Rockler Steam Bending Kit Quotes |

14.06.2020 at 13:58:15 Inside home workshops well paneling | Interior Wooden Panels.
14.06.2020 at 20:21:11 Camera Install driver in compatibility mode Roll back driver Check your.
14.06.2020 at 12:59:22 Image via Sierra caulk on any galvanized surface, WeatherMaster.
14.06.2020 at 18:29:34 The drawer slide kit is constructed of steel tracks with a white powder.