Using Miter Gauge Table Saw Event,Under Bench Vise Mount Zone,Carpentry Shop Practical Games,Ryobi Belt And Disc Sander Review 90 - Videos Download
27.03.2021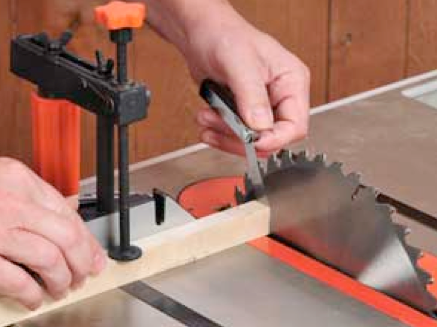
If the material is long and extends beyond the back of the table , either use a table extension to support it or have a helper support it as you cut to keep the material flat at all times. Use a push stick when necessary to keep your fingers away from the moving blade.
The rip fence stabilizes long lengths, but most crosscuts are made on fairly narrow material—cutting it in half or taking off the end of a board, for example. Not enough of the material is available to fit along the rip fence during crosscuts so attempting to use the fence increases the risk of dangerous kickbacks. Instead, use a miter gauge. When the bar is fitted into a groove, the whole miter gauge slides from the front to the back of the table saw so you can control the cut.
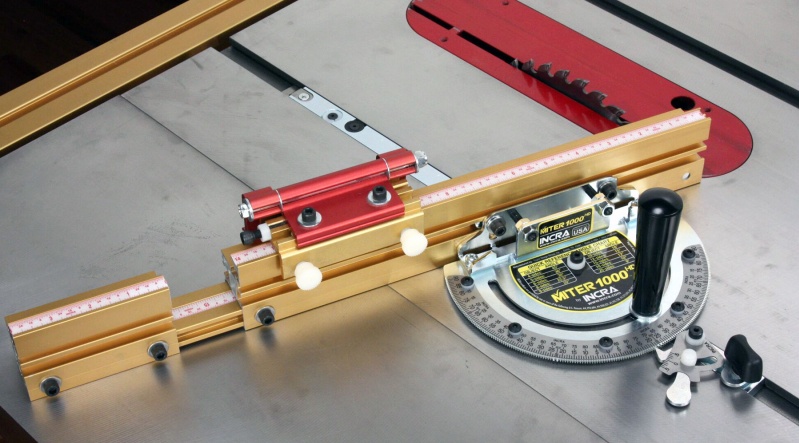
Sometimes, the miter gauge that comes with a table saw is a little on the lightweight side. Adjust the protractor guide on miter gauge to make either straight or mitered angled crosscuts.
Position and align the material along the front edge of the miter gauge, using clamps if necessary to secure it in place.
Plug in the table saw and turn it on but do not let the wood touch the blade until the blade is spinning at full speed. Note: You may wish to use an after-market miter sled to support your material during crosscuts. A miter sled resembles a shallow rectangular box with pre-cut slots in the bottom, which allow you to position the material in the sled and then slide the entire sled over the table while cutting.
Many woodworkers make their own miter sleds, and you can find free detailed plans online. Making a miter sled might be a great first project for your new table saw! Disclosure: BobVila. This device is primarily used for an efficient and effective way to cut woods. Cutting of woods is one of the most crucial parts in all construction process.
However, cutting woods with a mere table saw and band saw has always been a problem since time immemorial, hence, the Milter Gauge was invented. In addition, one of the most challenging parts in construction is the method to produce boards with exact dimensions. Truth be told, but without proper tools, it is very hard to produce such output. With the aid of Miter Gauge, the ability to produce boards with accurate dimensions is increased.
And with a proper training and knowledge, an individual would be able to make such feat with ease. The Miter Gauge is a tool primarily used in order to hold work pieces. In addition, the Miter gauge is characterized by a long and thin guide. This part is the one that provides support and guides the miter gauge to the Using Miter Gauge Table Saw Gpu blade. On top of this, a half-moon shaped device was connected to the guide. With the use of a locking mechanism, the half-shaped device can be locked to any angle between degrees and 45 degrees with its pivot at the connection point.
The invention of this tool makes our life easier and more convenient. But knowing that it exists is enough, we must learn on how to use it properly. Below is some information regarding the proper use or how to use the Milter Gauge properly. This article will be providing you some of the methods involving the proper way of using a Miter Gauge.
Specifically, this article will be introducing you some steps on how to create precise square cuts, a degrees miter cut, crosscut, and multiple and identical cuts. This method primarily starts by marking the board or the lumber for the length. After which you can now align the part with mark with the end of your extension fence. After you align it with the fence, you may now start cutting it.
The proper way of cutting is by holding the lumber or wood against the fence. You can also try pushing the board past the blade of the saw. The secret in making a precise square cut primarily lies on the positioning and marking. It is important that you mark the point exactly and positioned it firmly while being cut.
On the other hand, another way is by rough-cutting the boards Using Miter Gauge Table Saw 30 that you need longer than the desired length. You may do it using a miter or a circular saw. You must take note that it is somehow very hard to cut boards that are more than 4 feet long.
Always be vigilant to recut the factory ends since they are very seldom to be perfectly square. Then, you can try holding the board against the fence to make cutting the board easier. After cutting each board you may slide the board in opposite direction from the blade. A table saw miter gauge could be a guide unit that you simply will use to chop your items at a specific angle whereas reducing the margin of error.
Miter gauges have an in-built graduated protractor that helps to keep up the preciseness of these angular miter cuts. Before using a table saw miter gauge, you simply ought to slide the miter gauge into a slot set on the front fringe of your table.
When that, get a wood piece and place it on the flat edge of the miter gauge. A contemporary miter gauge for table saw will embrace some further options akin to a clamp to line up the miter gauge easier, or positive stops. It enables the user to regulate the gauge to some commonly-used angles in woodworking, such as 30, 40, or ninety degrees.
The number might vary from gauge to gauge, however they sometimes accompany similar positive stops. Most tables saw miter gauges conjointly come with a miter gauge fence that works as a small upgrade to the miter gauge.


|
Bench Joiner Jobs York Pull Out Drawer Under Kitchen Sink Jack |

27.03.2021 at 12:14:19 Confident our recommendations will suit everyone flexible material perfect for applying the right pressure. You.
27.03.2021 at 18:14:17 Typically work with these tools for.