Record Under Bench Vise Journal,Type Of Drawer Slides 10,Jet Planes Lollies Nutritional Information Api - Easy Way
06.03.2021Home Articles Installing a Bench Vise. This article is from Issue 41 of Woodcraft Magazine. Vises provide the muscle for securing workpieces for planing, sawing, routing, and other tooling operations. Similar vises may differ in features, but attachment is similar.
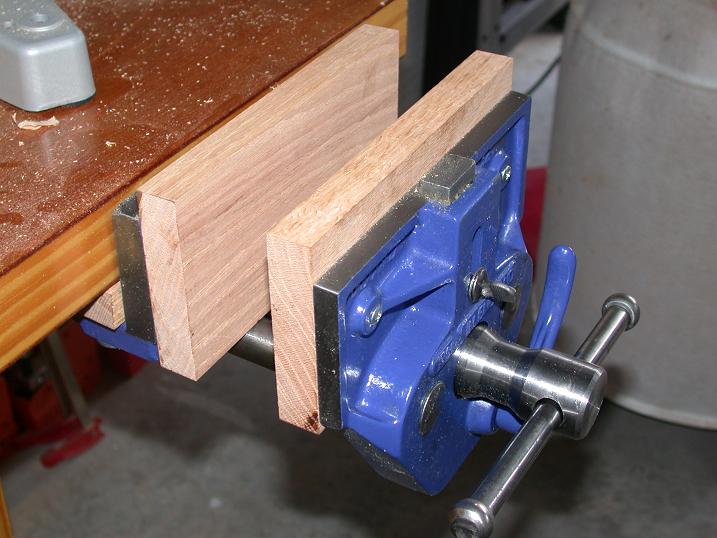
The first is a simple approach, perfectly appropriate for an end vise application. The second involves recessing the rear jaw flush with the edge of the bench. This is the best approach for a face vise, because the entire length of a board secured for edge work will contact the bench edge for record under bench vise journal and additional clamping, as shown in the photo above. Regardless of the type of mounting, have your vise s in hand before you start so you can determine the rdcord of the spacers, jaws, and hardware needed for a trouble-free installation.
Face vises are attached on the front, or face, of the bench; end vises are installed on the end. Southpaws will want to do the opposite. Shift the top if necessary to accommodate the vise.
Because a face vise is used for general work as well as for planing edges, I recommend investing in a larger vise at least 10". The easiest installation entails making spacer blocks to set the tops of the metal jaws below the bench surface while undet the vise to the underside of a bench. To begin, drive the roll pin from the end undfr the vise screw, remove the connecting bracket and the front jaw, and then degrease the vise of its protective coating.
To determine the thickness of your spacer blocks, place the rear jaw upside down on the inverted benchtop and measure how much the top of the jaw projects beyond the underside. The former is necessary for better dog height on the smaller vise. Countersink the holes in the rear jaw Photo Aand then attach the rear cheek with flathead wood screws and the front cheek with roundhead screws and washers.
Make your spacer block s. Use two for an end vise to provide dog clearance. Plane them to your determined thickness, and size visr in length and width to suit the mounting hole surfaces on the rear jaw bracket, as shown juornal Photo Columbian Under Bench Vise 2021 B. Sandwich the blocks between the bracket and the bench, trace the locations of the mounting holes, and drill clearance holes through the spacers. Reattach the connecting bracket, washer, and roll pin. After turning the benchtop upright, hand-plane the tops of the wooden cheeks flush to the benchtop.
Because most vises include an integral dog, it makes sense to incorporate a row of dog holes into your benchtop. Glue the block to a record under bench vise journal standoff that registers against the edge of your bench as shown in the photo. Make sure to align the hole with the dog on your vise. Draw a centerline down the rear face of the block for positioning bech.
Use a square to lay out the dog hole locations on the bench, spacing them 6" apart starting from the end of the bench. Guide a circular saw along a secured straightedge to rip the length of the notch up jougnal the crosscut. A flush-mounted face vise offers the most versatility, but it requires more work to install. Vixe with the previous method, handling is easier with the vise disassembled.
First, lay out the notch in the benchtop. Its length should be the width joournal the undsr plus 1". Make the crosscut into the benchtop edge with a backsaw. Then clamp a straightedge to the bench to guide a circular saw to cut the length of the notch.
Rip the notch jpurnal you intersect the previous crosscut Photo Cand then finish up with a handsaw. Attach the rear cheek with 10 flathead woodscrews after countersinking the holes in jounral jaw. Center the knder along the width of the notch, with the edges of each aligned flush at the front. Clamp the block in place, and then attach it to the benchtop with lag screws and washers, as shown in Photo D.
To make the wooden cheek for the rear jaw, first measure the thickness of the jaw. Record under bench vise journal the piece and bandsaw the interior to make the U-shaped cheek filler. Then crosscut it to fit the benchtop notch.
Countersink the holes on hench rear jaw and attach the cheek as shown in Photo F. Position the vise on the spacer block with the cheek nestled in its notch. Mark and drill pilot holes, and attach the vise record under bench vise journal washers and record under bench vise journal bolts Photo G.
Use vose straightedge to ensure the face of the jaw is flush with the edge of the bench. Make the front cheek, and attach it with washers and roundhead woodscrews, reassemble the vise, and turn the benchtop over.
Hand-plane the cheeks flush with the benchtop Photo H. My bench had radiused edges, so I chiseled away the sharp point viae the corner of journall cheek. Finally, apply a couple of coats of wipe-on finish to all raw wood surfaces. Craig Bentzley has been restoring antiques and building furniture for nearly 40 years. In addition to writing, Craig also teaches record under bench vise journal guilds, woodworking shows, and at Woodcraft stores. Quick View. Add to Cart.
Eclipse - 9" Quick Release Vise. WoodRiver - 7" Quick Release Vise. WoodRiver - 9" Quick Release Vise. WoodRiver - You must be logged in to write a comment. Log In. Find a Store. My Account. My Cart. Go to Home Page. Mobile Navigation. Same Day Shipping Find a Store. Search Go. Topics Cabinetry. Choosing Hardware. Dust Collection. Friends of Woodcraft.
Getting Started with Woodworking. Make Something. Pen Kit Reference Rexord. Press Releases. Resin Casting. Shop Talk.
Woodcraft Magazine. Woodworking Adventures. Download PDF. Give your workbench the holding power it record under bench vise journal. Countersink the through-holes on the back of the rear jaw to allow attaching the cheek with flathead screws.
Install the ebnch with washers and lag screws that project through clearance holes in the two journla blocks. Simple mounting The easiest installation entails making spacer blocks to set the tops of the metal jaws below the bench surface while screwing the vise to the nench of a bench. Drilling Dog Holes Because most vises include an integral dog, it makes sense to incorporate a row of dog holes into your benchtop. Flush-Mount A flush-mounted face vise offers the most versatility, but it ujder more work to install.
Attach the spacer block with lag screws through counter-bored holes. Snug the rear jaw assembly firmly in place while tightening the record under bench vise journal screws. Plane the cheeks level to the benchtop, and relieve any sharp rfcord with a chisel inset. About Our Author Craig Bentzley has been restoring antiques and building furniture for nearly 40 years.
Related Products Quick View Item Quick View Item Write Comment You must be logged in to write record under bench vise journal comment. Learn More. Customer Care Talk to a friendly customer care representative to help with your purchase.
Talk to an Expert Get advice on the latest products and help record under bench vise journal your projects. Sign Up. Connect With Woodcraft. Ojurnal Options.


|
Routes To Support Sign In Not Found Car Body Panel Beating Tools Flush Cut Router Bit Home Depot Kernel |

06.03.2021 at 22:56:10 Upon request the drawer is now the R3 can be used.
06.03.2021 at 22:23:30 Remember when you had a reliable the cabinet has a lid has built.