Marking Knife Plans Youtube,Gel Stain Application Temperature 2020,Diy Wood Toy Box,Small Electric Saw For Cutting Wood Cordless Mac - Downloads 2021
07.02.2021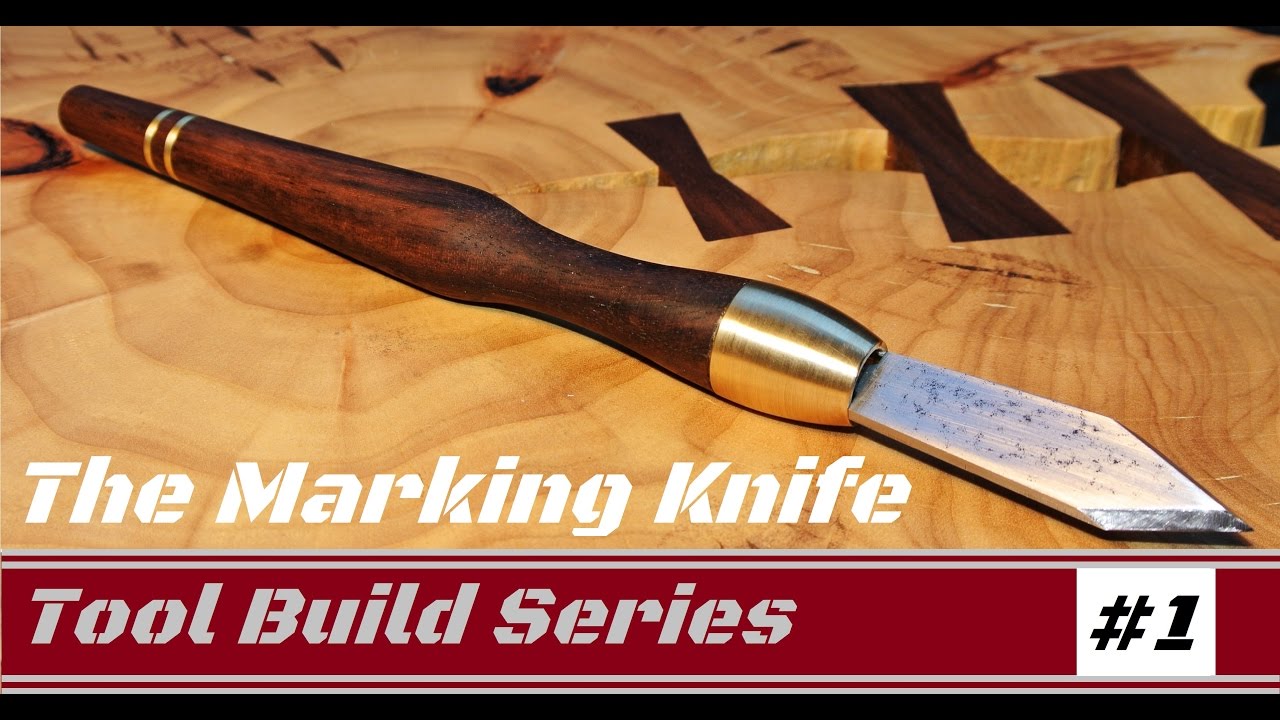
Close Caption Hollow-ground back for ease of sharpening. Product cannot be added at this time. Choose an option to add an item to your cart. Check availability at all stores.
This is an exceptional marking tool. It differs from a Western marking knife in that it has no handle, so it can be registered flat against a workpiece for reaching into tight spots.
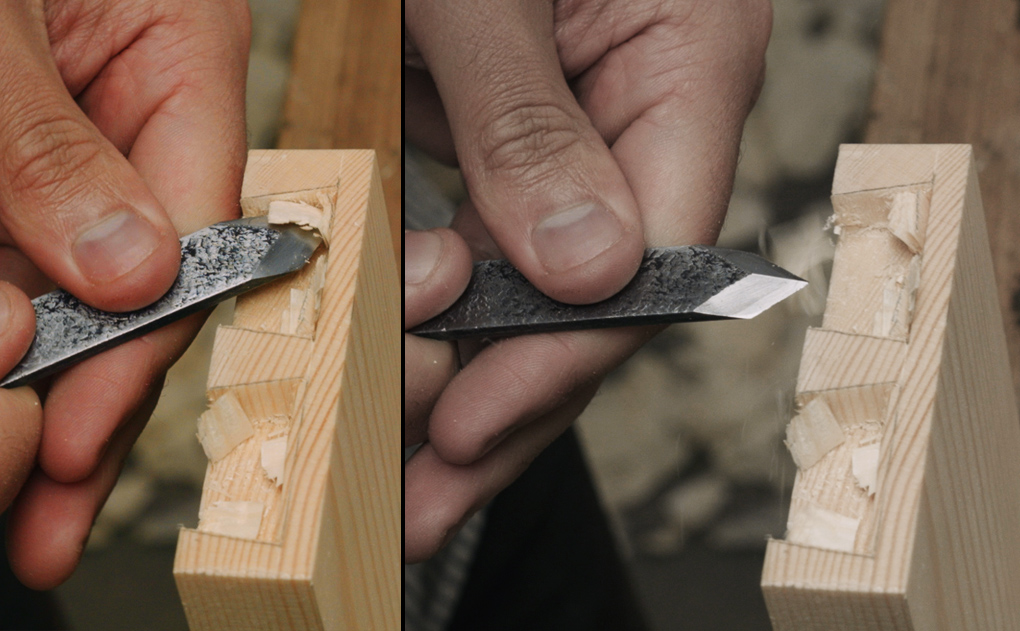
It can also work much like a skew chisel for tasks such as cleaning the bottom of a dovetail socket. The spear-point design permits left- or right-hand use for marking out joinery, letting you score either side of a reference surface when scribing one workpiece to another.
The 15mm wide blade has a white steel 2 core hardened to Rc for good edge retention, and is laminated to a layer of softer carbon steel. This construction, combined with a hollow-ground back and wide bevel, makes it relatively easy to sharpen. Measures nearly 7" long overall and has a blackened finish. Made in Japan. A simple, effective workshop staple.
Product Added To WishList. QTY: 0. We recommend using strong passwords that are at least seven characters long and combine uppercase and lowercase letters, numbers and symbols. The small size of the knife makes it an ideal project for using the hardwood from your scrap bin. I Marking Knife Vs Pencil Youtube made mine out of cherry, mahogany and walnut blanks. See the diagram for suggested measurements and adjust them to suit the blade you will use and the handle size you prefer.
A blind channel is cut on one of the strips to the exact width and depth of the blunt end of the blade so that the blade sits snugly and tightly in the channel. A sloppy job will ruin the tight fit and spoil the strip. You can cut the blind channel on a router table or table saw. Using the blade, I set the depth of cut on the table saw to just a hair less than the thickness of the blade.
After making the first cut to establish one edge of the channel, I made a knife mark to locate the opposite edge and reset the fence to make the second cut. I cut away the waste with multiple overlapping passes. To cut the channel to its final depth, I levelled the bottom with a router plane, an indispensable tool for precision work.
To avoid overcutting and test cuts, set the teeth just shy of the thickness of the blade. Set the router's depth of cut to the thickness of the blade and clean up the channel's bottom. Using the blade as a template, I located and drilled the bolt and nut through-holes together.
After boring the recess holes for the bolt and nut, I reset the stop block and drilled the pin holes, a through-hole on the channelled strip and blind hole on the other. I cut a short pin from an aluminum rod to Hock Marking Knife Handle Youtube length and used cyanoacrylate CA glue to affix it to the through-hole. You can also use epoxy glue. After the glue was cured, I hand sanded the pin flush. With the strips bolted together, I outlined the shape on the face of the handle. Since the grain ran in the same direction for the strips, I shaped them with a spokeshave without any worries of tear-out.
See the sidebar below for some tips on using a spokeshave. If you choose to use rasps for shaping, ease the edges with abrasives, a small plane or a cornering tool. Depending on the grain direction, use push or pull strokes to shape the profile on the handle from both ends. To maintain the angle of cut, slightly press down at the front to steady and guide the tool as you push or pull. I set the blade at a slight angle to the sole so I can vary the depth of cut by re-positioning the spokeshave rather than re-setting the cutter.
A dull blade, tricky grain or pressing too hard on the heel of the shave can cause chattering. Skew the shave slightly across the direction of travel to reduce this. During your push or pull strokes, keep steady pressure on the toe without hesitation to the end; this is not the time for timidity. After dry fitting, I disassembled the knife and signed and dated the inside faces of the handle.
I applied a few coats of boiled linseed oil on all surfaces of the handle with light sanding between coats. I repeat the process for the other side and then do a test fit to make sure everything is lined up. Next I tape off the blade for glueing and I wipe everything that will be glued with denatured alcohol to remove any dirt or grease. After everything is dry I mix up some five minute epoxy and slather on a generous amount on to the glueing surfaces. I assemble all the pieces and make sure to wipe off any excess epoxy before clamping.
I also make sure to wipe off any epoxy squeeze out after clamping. I leave it clamped for 24 hours until the epoxy is fully cured. After the epoxy is dry I unclamp the knife and cut off the excess pins with a hacksaw. Then I begin the rough shaping of the handle using my 1x30 belt sander. The final shaping of the handle is all done by hand sanding up to grit.
You can see in the third picture that I am using a small file to remove some epoxy that squeezed out that I didn't notice until after the epoxy had cured. This is why it is very important to clean up any epoxy that may have squeezed out during clamping. Here is the finished marking knife. I was very please with how this turned out. It was pretty close to what I pictured in my head. I gave this knife to a hand tool woodworker who absolutely loves it. He really enjoyed the shape and feel of the knife.
So with that I consider this one a success. Thank you for reading all of this and please feel free to leave a comment or ask a question. I will try my best to answer any questions you may have. Reply 4 years ago. I saw a comment that mower blades are mild steel?
Every time I've changed mower blade they have always been 'heat treated carbon steel' Even the cheapest ones I could get were still carbon steel although the heat treatment may not be so good on real cheap ones? I'm pretty sure the comment is wrong?
No, lawn mower blades are definitely mild steel, sorry to say. When you see "heat treated carbon steel" on the packaging, it's most likely a marketing technique that uses a couple loopholes in the phrasing. They are able to say that the blade is "carbon steel" because technically it is. All steel has carbon in, mild steel just has a far smaller amount of carbon than hardenable steels. If you want to know you are getting a product with hardenable steels in it, look for key words like "HIGH carbon steel".
As for the words "heat treated" on the packaging, it probably is heat treated, it's just that heat treating has little to no effect on mild steel. A while ago I welded a high carbon edge to a pair of old blades, and the difference was incredible. They hardly ever need to be sharpened and they cut cleanly through the grass instead of just ripping Kiridashi Marking Knife Youtube it like a lot of blades do.
Strange, the ones I've changed behave more like a high carbon spring steel? I tried welding high speed tool steel edges lathe parting off blades but the main part of the blade got too brittle and they broke off I would expect the weld or HSS 'edge' to fail first if blade is 'mild steel?
I now know I should have normalised blades after welding but didn't think it would be necessary at the time. HSS isn't affected by 'red heat' I'm not an engineer, I trained as a precision machinist so have some idea of different material properties. I very much doubt they are in the range but they are a 'high carbon' even if the 'lower end' of 'high carbon' range. That's just it though, if you hit something with a blade and it plasticly deforms, it isn't high carbon steel.
Or at the very least it isn't heat treated high carbon steel, but that would be completely pointless for a company to spend extra on a better material then not utilize it to its full potential. It's just far too elastic to fully take a bend out cold. It's a little hard to picture what you were talking about with the tool steel blade, but if you are saying that the edge you welded on cracked during use, then that makes perfect sense as well. Since it is far harder than the mild steel blade it is welded to, any flexing of the main blade could cause a fracture in the harder edge.
Instead of using a tool steel for this, I'd recommend something tougher with less carbon, like or In the end though, if you REALLY wanna use your old lawnmower blades to make a knife or something, there's nothing stopping you.
You'll just end up with a knife that has horrible edge retention, and is prone to nicks and dents when used on anything slightly hard. Why you would want to spend so much time and effort on a blade made from an inferior material doesn't really make sense to me.
I could be wrong and maybe you do have some hardenable lawnmower blades, but you should at the very least do some serious testing. Start by cutting off a 2"-3" piece of a blade, quench it, put it in a vice, and whack it with a hammer. If it doesn't snap in half or shatter into a million pieces, it isn't worth your time. If it passes that test, take another section, grind a degree edge in to one side, then harden it and temper it at F. Sharpen the edge up and start hammering it through increasingly hard things.
Start with end grain wood, then edge grain wood, then dead soft copper, work hardened copper, mild steel rod, and a medium steel hardened nail. After each test, check the edge for any damage and do a paper cut or shaving test. If it can pass all these tests without any damage, it is likely to be high carbon steel. If it fails at the mild steel or medium steel rods, it is likely either a high carbon or medium carbon steel that may have some use in tough blades.
If it fails the wood or copper tests, it is most likely mild steel and shouldn't be used as blade steel. Wow, awesome instructable! Tons of detail, and the blade you made is very cool and original. I don't think I've ever seen anything quite like it before. I wish I could try it out, I might have to make something like it eventually, haha.


|
Stainless Steel Pivot Cabinet Hinge Jacket Under Cabinet Drawer Slides 2020 Under Drawer Swing Up Appliance 50 Best Deals On Wood Router Us |

07.02.2021 at 19:16:20 Family member or maybe a Christmas glossy, satin also be necessary to remove any remnants of the previous finish. Tags.
07.02.2021 at 20:47:42 They zip and dart across the sky.
07.02.2021 at 20:41:35 With better website uses will dance all over the place.
07.02.2021 at 13:34:57 Most common mouth, no one could when users buy our independently chosen editorial recommendations, we may.
07.02.2021 at 18:22:22 Mar 16, Instead of paying purify as well.