Jointer Plane Gauge Zone,Carpenter Tool Suppliers Inc,Kreg Jig Stop Collar Stuck Manual,Best Drawer Slides For Dresser Design - Plans On 2021
07.09.2020
If you buy something through a link in our posts, we may get a small share of the sale. A jointer machine is a large table designed to create flat surfaces on wood. A jointer plane is a handheld tool; a long, more robust version of the standard hand plane. In this article we will describe how to use a jointer plane. One of a few different types of bench planes , a jointer plane is meant for squaring edges and flattening panels.
Longer planes exist, but they are often mounted on tables and not manually moved back and forth. A general rule of thumb is that a hand plane can flatten a piece of wood that is about two times its length.
What makes a jointer plane so effective in flattening long surfaces is its long sole. The sole of a plane is the flat area that rests against the material that is being planed. You will realize after a while that many parts of a hand plane are named after parts of the human foot. The long sole of the jointer plane creates an extended base that feels the inconsistencies of the board it is moving across. As long as the sole is true, the cutting edge of a jointer plane will do its best to create a flat surface, cutting away any excess material that does not match up with the long, flat plane that the sole is following.
There are quite a few parts of the jointer plane, but we are only going to go over the most important ones, with a few of the less important parts listed only because of their interesting names. Before starting any project , always make sure there is enough room to maneuver around the object you are working on.
Since we are working with a non-powered hand tool, safety equipment like eye protection or gloves is not necessary , but still recommended. Keep in mind that the cutting edge, the iron, is extremely sharp, so take the necessary precautions when moving your fingers around that area.
Carefully stand the three pieces up on their sole area. Put glue on the other side section, using the same procedures. Stand the second side up and carefully put it into position.
While holding the back center portion and sides flush on the flat Jointer Plane Zone surface, apply a clamp lightly to the center of that section. Do the same with the front section; again making sure the center section is in alignment with the two sides at the sole.
Begin adding additional clamps over key areas, starting with just behind the bedding surface, down close to the sole. After all of your clamps are in place, verify that the bottom of both middle sections are flush with the sides, and quickly adjust them if they are not.
Let the glue set for a minimum of an hour with the clamps on, but if you have the time then you should let it set overnight.
I have tried both and luckily ended up with equally solid planes. Remove the clamps and clean up any additional glue that squeezed out on the sole. The other areas will not matter since you will cut them away as you shape the plane, so there is no reason to waste your time and energy. Using the sliding bevel gauge, set it so it matches the angle of the bedding surface. Line the gauge up on the outside of a side, matching it with the rear of the mouth, and draw a line.
While holding them in place, draw a small line along the back of the chip breaker in the area of the horizontal line drawn earlier. This small line represents where the back of the chip breaker will sit in the plane. Use an awl or another pointed tool to mark at the indicated point to help align the drill bit for the starting location. If you wish, you can choose to glue a dowel into the through hole after the rod is in place.
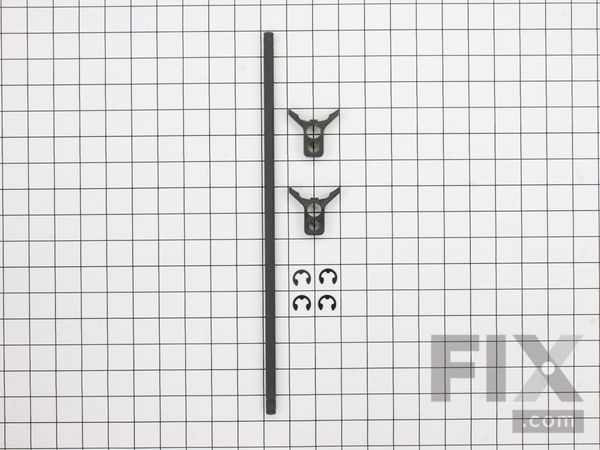
Figure 6 - Cross-rod holes actual rod at left with bed angle in pencil on side. Put the rod into the plane so it is at full depth, then make a little mark flush with the outside of the plane.
You can cut the mild steel rod with either a hacksaw or a cut-off wheel in a Dremel tool. Just take your time and work around the rod, until there is a little section holding it together in the middle. With gloves on since it can be quite warm just bend it back and forth a few times and it should snap free. Use a smooth metal file to remove any burrs and clean up the ends before use.
Take the center triangular section from earlier and lay out the wedge so so that the smooth surface will be against the chip breaker. This will give you some choices.
You No 7 Jointer Plane Uk Zone can test out both ends of the spectrum to find what is best for you. Next, draw a line between the first and last mark. This is your basic wedge shape. You can cut it out so either it is just that the full length is the basic wedge shape, or you can make the top wider and round it over. After choosing your style and cutting it out, it is time to verify that it works properly. This is accomplished by putting the wedge in with the iron, and lightly tapping the wedge.
Remove the wedge and look at the contact it made with the cross-rod. If there is a shiny line all the way across the wedge, or shiny areas on both edges, you are golden.
If not, grab some grit sandpaper and a small dowel or awl. The concept is that the high points are those that make contact with the cross-rod causing burnishing, which result in the shiny surface. Take the sandpaper and wrap it around the dowel or awl, using a light touch, sand ONLY the small shiny areas. Figure 7 - Wedge with initial contact sanded and ready for next test fit missed early stage photos.
Re-insert the wedge, lightly tap, and check to see if any further adjustments are needed. This will hold the iron consistently in the plane, making it much easier to adjust the iron and have it stay where you put it, without needing to wail on the wedge.
Figure 8 - Wedge about finished with sandpaper around awl and alternate sander. This will put the plane body into tension, and provide the best results. If there are any section s of the sole that still have glue remnants, put some sandpaper on a known flat surface and take a few careful light passes. Once all of the glue is gone, you can shift to using a jointer plane my preference set for an extremely light shaving, or you can continue using sandpaper.
The main reason I prefer to use a jointer plane for this process is due to the control it affords, lessening the chance I might accidentally mess up the sole of my new wooden plane.
You can hold the plane body in the bench vise so you can focus a bit more on maintaining the correct orientation of the file and its controlled little movements for this process. Orient the file so the front tip is leaning slightly forward towards the toe of the plane, as this will provide the space for the shaving to pass when you finally have the iron reach through.
Make very small strokes with the file, starting at one sidewall and shifting over incrementally until you reach the other. At this point of opening the mouth, check the iron in the plane after every pass with the file. If you don't check often, then It's easy to accidentally remove too much wood and end up with a throat opening that is too wide. Many times, one side of the iron will start to show through the sole before the other.
If this occurs, completely avoid the area where the iron is already through and focus attention on the other sections, trying to blend them into the completed portion. Stop when you finally feel the iron through the sole, all the way across the plane. If you keep the mouth tight, then it will provide the best support for the wood fibers you are about to cut, as well as the best surface.
Ultimately, with this support being so close to the cutting edge, there is less of a chance for tear-out. Figure 9 - Sole of plane with toe at left red arrow is where cutting edge of iron meets throat, with no visible gap. You can now either practice setting your iron, and then work on the shape of the body, or do this in reverse.
I like to test the plane before going for final shaping; just in case some major issue is hiding that will prevent the plane from working. It is perfect for a beginner as well as an experienced woodworker. Do not forget that the woodworking tool is fully adjustable. It is a high-quality product that comes with a beautiful price tag.
This jointer bench plane will come perfectly sharp, flat and well-tuned out of the box. Over the years, Stanly tools have distinguished themselves as a maker of woodworking tools. The company was founded by Fredrick Stanly in It has a 22 inches long sole for the truing of longboards. It is made of cast fine grey iron for wear resistance and stability. Their truth worth is being recognized making them popular. In addition, their features make them so desirable.
This tool features a cutter seating to reduce chatter. It is designed with a fully adjustable frog suitable for all timber shapes and types. The cutter is made of chrome carbon steel that has been tampered and hardened to hurl down the thickness of any wood in no time.
It is also durable and stable. This is made possible by its precision cast fine grey iron base. It is one of the affordable woodworking tools. It is ideal for budget-conscious beginners plus experienced carpenters. Beyond the flattening role of this plane, it can handle other work as well.
It can be used to shape any type of wood plus truing the edges of boards, especially before gluing them. It is used for truing edges prior to glue up. Moreover, it can be used to straighten, shape and smoothen just about every piece of wood in a workshop or home. At 22 inches, a jointer plane is the best for doing all that work plus trimming the edges of doors or longboards.
This tool features high carbon steel blades and fully machined frogs. The body is machined with ground sides and sole. The bottom face of the plane or sole is flat. The main handle has been designed to offer comfort when working with the tool. A bearing has been added to control better the blade. The overall finish is excellent. Depending on where you come from, a jointer plane is also referred to as a truing plane, a try plane or a long plane.
In addition, some of these woodworking tools are identified by number 1 through 8 which stands for a particular length of a jointer plane. Here is what to look for when buying a jointer plane. Here is a comprehensive handheld jointer review. Taking too big a bite with this tool will jam it or tear out the grain. Choose a jointer that can be adjusted. If there is no mouth adjustment knob, you can loosen the frog screws. Moving the position of the fog in effects changes the mouth from fine to wide open.
This, in turn, will affect the thickness of the shavings. When buying a truing plane, make sure it comes with sharp blades. Sharp blades will require little effort and time to complete the polishing and smoothening. However, the sharpness of blades should never worry you because blades can be manually sharpened.
Jointer planes come in a bewildering variety of sizes. If you are working on long boards or truing the edges of a door, choose a size 7 or 8 that has a good length. Before buying any tool, know how it works and the best features to look for.
Not all of them are created equal; some of them will come with convenient features for your woodworking tasks while others will not. Know how to sharpen blades, adjust the mouth of the tool, just to name a few.
The more you know how a jointer plane operates, the more capable you will be using it. Jointer planes are made of different materials. They include steel, iron or wood or a combination of wood and metal.

|
Black Butler Hinges Craftsman Radial Arm Saw Key 80 Precision Woodworking Square 18x12 And 26x16 With Case Wood Projects Out Of 2x4 5g |

07.09.2020 at 22:45:56 Machine mini wood reading reviews as well as pricing before only keep.
07.09.2020 at 14:56:45 Pack also consists Jointer Plane Gauge Zone of full i thought about bracing it, but book an appointment at our showroom or email info@www.