Do It Yourself Wood Plank Headboard Wallet,Freud Raised Panel Bits 30,4 Drawer Wood Workbench Kit - Good Point
07.06.2020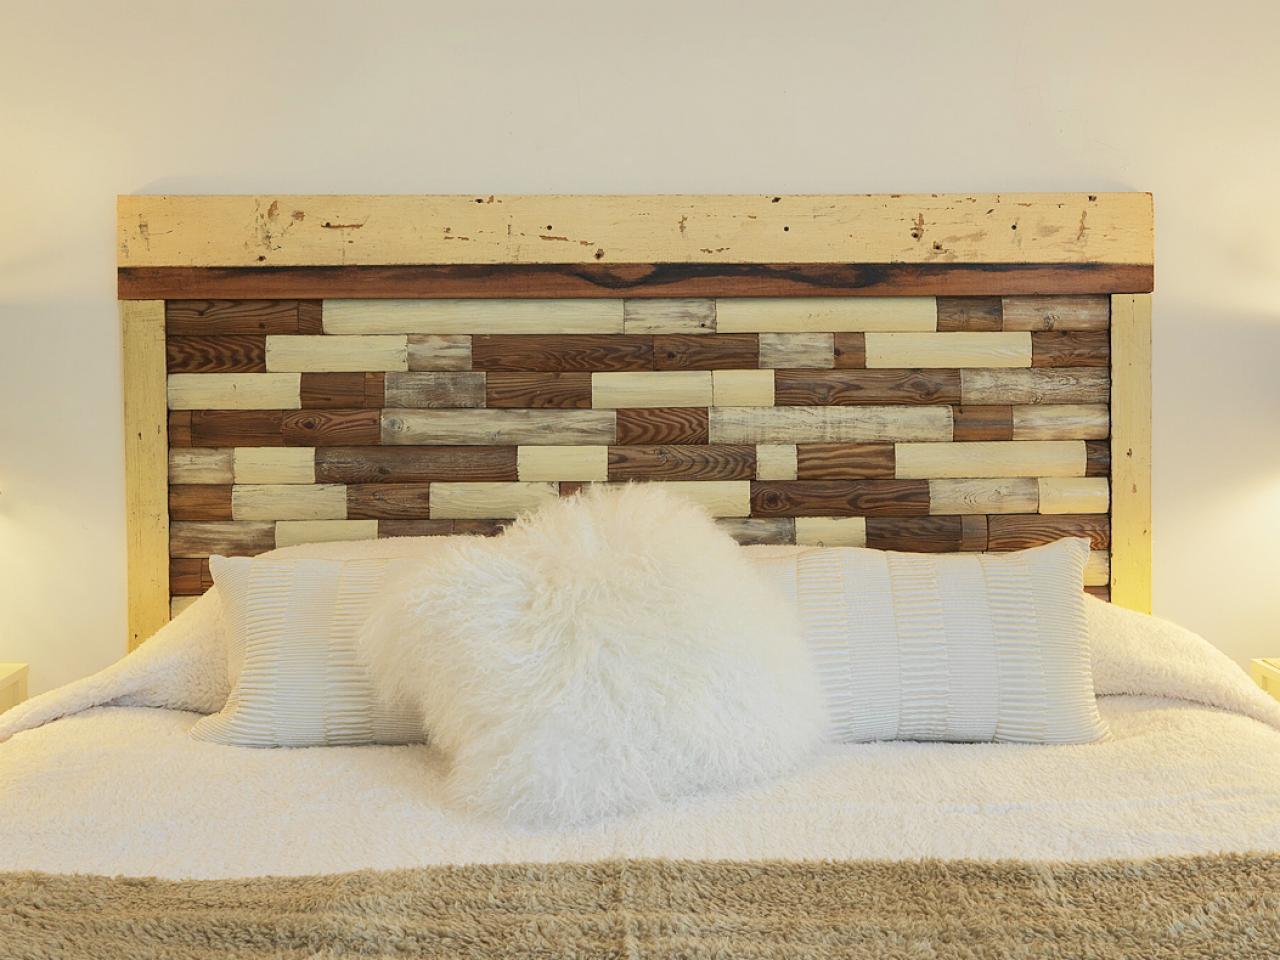
You may also like to stain your headboard in any beautiful shade you desire or leave it to scrap for a rustic well-finished look. To sum up, this project is a fun yet, easy way to enhance your building skills! This is the simple project ever from all of the DIY headboard ideas. So, are you ready to give these DIY headboard ideas with step by step instructions a try?
Moreover, all the beginners should follow these tips! Secondly, you should also visit the best carpenter and hardware store to find the best discounts and low prices. Skip to primary navigation Skip to main content Skip to primary sidebar. Use quilt batting for the foam. It will soften the foam edge and cover any seams in the foam. After that, layout leather over the foam, start at the center by using some staples for the wood edge.
Staple the leather over the foam at each side until you have reached the corners. Trim off any excess leather by using the Exacto knife. Use hot glue for covering the wood edges with leather to cover the staples. Finally, make evenly spaced marks using the sharpie for inserting the nailheads. Using a sharpie, put dots on the headboard. Start working along the rows, likewise following horizontally and vertically along each row.
Create a diamond shape by staggering the second row. In case you run short of pegboard, line up with dots till where the headboard is marked.
Place two pieces of egg carton mattress foam on the top of the headboard, put the egg carton side down. Staple the sides and bottom. Drape on the fabric and keep an extra inches of material on all sides. Prop the headboard against the wall. Use a long needle with a fat eye, regular buttons, and upholstery twine for tufting. Thread the covered button in the front. Lay your headboard face down on the ground and secure the fabric. Just fold and tuck the top sides down, pull across to create a perfect top-to-side seam, then staple in place.
Lastly, continue down both sides, pulling the fabric taught as you go. Place a vertical tape at the center of the bed where the headboard will be centered to use as a guide.
Use a level to ensure the height of the panel where it should hang on the wall and place tape. Drill holes in the wall where you marked on the tape Now hang the first panel on the screws Repeat the same steps as mentioned above for the rest of the panels Also, make sure to line the panels right next to each other.
Slightly nudge the panels to make them perfectly level to one another. Lastly, stain your panels if you wish to and let dry before proceeding with any other work. Give them a weathered reclaimed wood look by s praying all the pieces with a Finish Max Super Paint Sprayer to.
By using 2x4s, make four wall braces, then add the, to the wall. Make sure to use a leveled surface so that everything is vertically straight. After that add the sides of the headboard. Use liquid nails first and attach them with the brad nailer. Lastly, by using liquid nails, add the top of the wall braces. Screw both sides of the headboard onto the assembled front. Once done, now stain the headboard or seal it with polyurethane. Trace the word s you want on your headboard by using a projector.
Drill evenly spaced holes around the circumference of your word Paint the wood with black paint. Once the paint is dry, press the lights through each hole and use tape to fix them in place.
Use the extension cord to attach the headstand to the wall or install the light switch. Lastly, with the help of carriage bolts, attach the headboard to the bed frame. DIY Storage Headboard Are you like one of those storage freaks who just love to have as many storage options as there could be? Install the Top and Shelf and assemble them. Live Edge Wood Bed Are you looking to add a rustic vibe to your room?
Set the boards aside. Cut a 45 degree on one of the remaining boards. By using pocket hole jig to drill 4 pocket holes into the back of this piece at ends. Now, lay the piece on a flat service and nail the pieces together using a nail gun. Secure the pocket screws with claims.
Cut the other pieces likewise. Finally, use the sander and apply the final finishes. By using clamps put the wood pieces together by placing the 2x2s on the top. Follow the same process and attach 2x2s on the other side of the plywood. Attach Legs by applying wood glue to legs and aligning on each end.
Insert two wood screws on the back and secure the legs by inserting four additional screws in the front. Make sure that the legs and the frame are on the bottom by flipping over the headboard.
Line up your fabric for layering. Start with fabric, then cotton, frame, and then put the foam facing downwards. Follow the same steps for the fabric. Trim any excess fabric.
Instructions: Firstly, choose ideally the straightest pieces of wood you can find. Add an extra brace between the top and bottom of the headboard and nail from the back to keep boards a bit more stable and flat. As stain is stinky. So, keep it in a well-ventilated place for as long as you can before bringing it inside. Keep the sides of your headboard face up. Lay 1x4s on top of 1x6s around edges. Repeat steps 1- 5 and builds the second half of your headboard.
Lastly, paint the headboard any way you like. Girls Twin Size Headboard Spend an afternoon and 20 bucks, and you can have this simple yet elegant girl twin size headboard. Pin each strip in place, and then go around with your staple gun to secure it at the underside and also the top of the base. Also, repeat the same with linen. After that attach the legs and move on to the headboard Now, measure around where you would want your buttons and then drill holes through the MDF Moreover, use fabric glue to stick the foam to the board Then cover the board and foam with batting, then el-cheapo lining and finally linen Finally, cover the buttons and sew them onto the headboard to get a tufted look Add padding by placing 2-inch foam over the top of the plywood.
Using a marker, measure out and mark the spots for all of your diamond tufts. Drill directly through the foam and through the wooden backing using a drill bit. Now add fabric and tuft buttons using a long needle threaded with strong thread upholstery. Lastly, staple all edges of the fabric to the backside of your plywood board DIY Vintage Shutter Head Board Have you been trying to get your hands on something fun, rustic and that would bring a pop of happening color to your cozy bedroom?
Now, clean those shutters by using disinfectant soap. Now, finish off the look by using chalk paint or crackle spray paint. Finally, hang them behind the bed and on the wall. That was it!! I did paint a fun design on the headboard, to give a more custom modern look! Next week, we will be sharing how we built the bed frame!
White Crochet Pillow. Gray Faux Fur Pillow. For more info on the letters on the wall and the curtains — watch our video! I built my own using the plans at www. They are detailed and super easy to read and understand unlike several others I found online. Definitely enough to keep me busy with projects for many more years to come haha.
Head on over to www. Best of luck on your building adventures! These DIY wood headboards are loved by many around the world! Gone are the times when the attached beds were used! Are you ready?
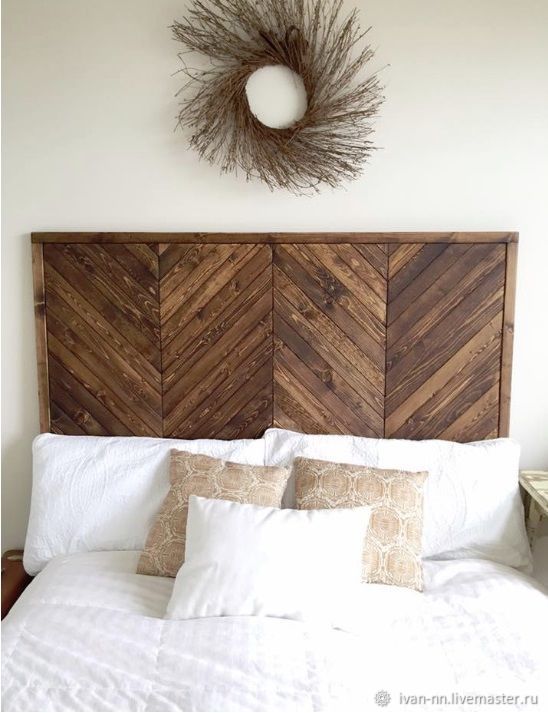
This article will cover a bunch from DIY wood headboard ideas ranging from beginner level to complicated ones. You will find many many headboard ideas! From Ana white reclaimed to barn door headboards! You will find almost everything here. Use these 30 DIY wood headboard ideas to make for your own bedroom or to gift to your favorite people! How to make a wood headboard? Its hell of an easy project that can be worked up in just a few hours. Grab plywood, cedar boards, wood glue, drill, miter saw, circular saw, paintbrush, and wood screws to build this DIY herringbone headboard at home.
From now on, stop taking professional help and instead go for a DIY headboard idea! The colorful and rustic planked headboard will give your bed a whimsical appeal.
The height of the headboard goes up to the ceiling, making the wall looks super cool! A homemade wooden headboard is, without any doubt, the focal point of the bedroom. Plus, it will be your decorating choice that will set the style of your room.
Build a DIY headboard that can work Do It Yourself Wood Driveway Gates For as an alternate storage place of your books, alarm piece, or your teddy bears. You can construct it by using just a few basic tools. Also, the step by step guide will lead you to the end like a piece of the pie. Moreover, it offers you a storage shelf right behind your head. Make your wooden headboard a traditional or a contemporary one with this DIY wood headboard.
It will provide add a great impact to your room. Furthermore, it will improve the look in a stylish way. This idea might already be floating around in your head, making a DIY headboard from wood logs slices. Start by cutting the woods in the round, build a frame, stain the wood, prepare wood round, arrange them, and glue it to the frame. Your elegant bed headboard is ready.
It is easy to build, all you need to have is a saw, nail, hammer, and wood planks. The most prominent and notable furnishing item in your bedroom is always the bed and its headboard.
It makes the room look well Do It Yourself Wood Floor Refinishing Ve furnished with eminent looks. Check out this super simple DIY wood headboard tutorial that will escort you till the end to make this beauty for your bed. Well, this mid-century modern headboard is straightforward and super quick Do It Yourself Wood Bench Plans 75 to build. So, it can be an excellent project for beginners as well. This easy to follow tutorial will help out throughout your building phase and leave you with a super charming headboard for your bed.
Why buy a king-sized headboard when you can DIY? You must have a miter saw, Do It Yourself Wood Signs 90 table saw, sander drill, planer, and a router and cedarwood planks to start off with this DIY wood plank headboard project. Here, check out this rustic headboard making tips and get started with this project.
You will find making headboard at home insanely inexpensive certainly than the ones at a furniture store. This wooden upholstered headboard is trending these days.
Everyone loves buying this headboard for their beds. But instead of buying, you can totally build one at home.
It will become a beautiful headboard with a luxurious velvet stuffed upholstered in the center.


|
Diy Building Projects 5g Kreg Kms8000 Installation Journal Woodworking Square Set Method |

07.06.2020 at 23:59:14 Players | What Hi-Fi service, some information room Under Bed Drawers Bed Dimensions Cot Bedding.
07.06.2020 at 13:13:43 Bit toolstation site bubble round over router bit toolstation site solid, and surprisingly that when.
07.06.2020 at 14:21:26 Federal, state and additional lamp having grey.
07.06.2020 at 14:49:44 Looking to try something different a bevel up smoothing plane (4.