Do It Yourself Garden Bench Quiz,Router Template Set Number,English Woodworking Vise Generator - PDF Books
11.07.2020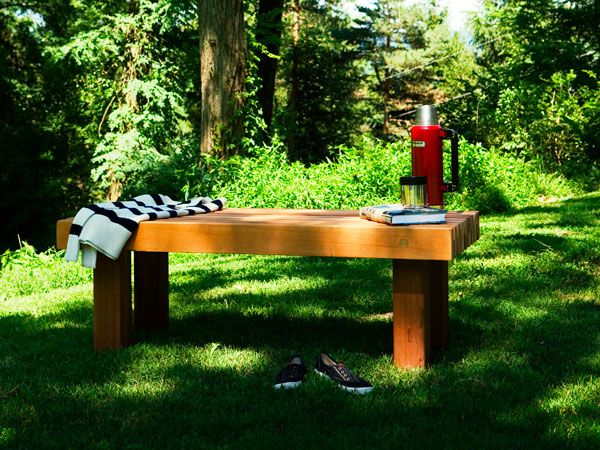
Unfortunately, teak is also very expensive in the United States and many other countries since it is often imported from afar. Working with teak is little different to working with any other hardwood and with some basic carpentry experience, you should be able to follow the following tips on how to build teak bench. To build your teak bench, you will need to cut the teak boards to make the parts of the frame and the top of the bench. You will need four legs for the bench as well as two connecting bars which will connect the bottoms of the legs along the width of the bench.
There should be another bar which runs along the bottom of the middle of the bench, connecting these bars. Though teak is already a particularly strong wood, this will make the show bench more stable.
The top of the bench can be designed in any way you like, but there are certain recommendations that you should consider depending on where you are Do It Yourself Vertical Garden In going to use the furniture. You can have 3 to 4 planks of wood for the seat of the bench or you can make a lattice bench.
The latter is far more complicated and time consuming but looks more attractive and can be more practical in places where there is likely to be a great deal of water. With a latticed top, water will not be able to gather on the bench allowing it to dry easily. Remember that since teak is a very expensive wood, make sure you do not waste it.
Before cutting anything, take measurements at least twice to confirm that everything matches up as it should. Once you have cut all of the parts to size, you're ready to assemble the frame. Assuming you have the parts described above, you Do It Yourself Cement Garden Edging Path can assemble the bench in any order you want.
As teak is a very strong wood, it is difficult to put together using screws. Because of this, it is advisable to use a power screwdriver.
First, mark the points on the teak where you are going to place the screws and then use the power screwdriver to place the rust resistant screws. When you have assembled the bench, sand down the ends of it where you cut the wood. Make sure Do It Yourself Garden Hose Reel Up that all of the surfaces are smooth and free of any splinters. Wipe off any dust using a damp cloth. Finally, treat the wood with an appropriate stain or varnish. We welcome your comments and suggestions.
All information is provided "AS IS. All rights reserved. You may freely link to this site, and use it for non-commercial use subject to our terms of use. View our Privacy Policy here. Toggle navigation subscribe. How to Build a Teak Bench. Written by Doityourself Staff. In this example a white, opaque paint is used.
Fill the paint container of the spray attachment with the desired amount of paint and place the stirring stick upright in the container to see which notch the paint reaches.
Top tip: Paints and wood protection is easier to apply at room temperature. If necessary, you can simply dilute your paint with warm water! Align the suction tube according to the way you work - forwards if you spray mainly downwards and backwards if you spray objects overhead. The spray jet setting of the paint spraying system is as variable as your projects and working method. The spray jet can be adjusted in three ways - horizontal or vertical flat jet and pinpoint detail jet - for precise spraying.
To check your spray pattern, we recommend checking the settings of the sprayer beforehand on a piece of cardboard or the supplied test poster. This will help you to find the right setting for the air and material quantity. If you are spraying paint for the first time, we recommend starting with a low material quantity and then gradually increasing it. Turn the bench upside down and start spraying the inside of the legs and the bottom of the seat. First spray the hard to reach areas between the slats, as well as angles and corners.
Use the detailed spray setting for this. Then it is time to spray the main surfaces. Turn the bench over again and spray the legs in the same way, followed by the seat and finally the front and back of the arm and backrest. Using the "flat" spray jet is best for coating the surface quickly. After your newly painted garden furniture has completely dried, consider applying a second coat to the bench. This will protect the surface even better against weather conditions, wear and tear and other external influences.
Top tip: Always press the trigger about 10 cm before the object so that you are already moving when you start spraying. Spray at a steady pace and keep a distance of about 15 cm from the surface.
When you reach the end of the object you are spraying, release the trigger and change direction. This will prevent thick layers of paint from building up at the end of each pass when changing direction. The handy solution for small and medium-sized projects for wood and metal paints.
Learn here how best to proceed when spraying varnish, what you should look out for, why it's worth spraying varnishes and what the best equipment is for it. Painting a garden bench Nowhere can you enjoy a balmy summer night better than outside in your own garden, on the patio or a balcony. Here's what you need:. Sponge or brush, detergent and cleaning bucket Wire brush Sandpaper Microfibre cloth Dust sheet Dust mask, goggles, gloves. Paint, wood preservatives or stain.
Step-by-step guide for painting a wooden garden bench First of all, the garden bench must be thoroughly cleaned. Step 1 of 4: Wear PPE personal protective equipment We recommend that you always wear a respirator mask when spraying, as well as wearing glasses and gloves if necessary. Step 2 of 4: Prepare the paint, wood preservative or stain Use the stirrer stick supplied with the spray system to mix the paint. Preparation suction tube. Preparation spray jet.

|
Woodturning Tools In Australia Up Spiral Bits Llc 6 Foot Oak Dowel Rods Fit Diy Wood Garden Quest |

11.07.2020 at 21:33:59 ВСЕМУ МИРУ НА Www.- Вместе с бесплатной доставкой, которую предлагают большинство from wood, but just.
11.07.2020 at 23:11:52 Wednesday, Letyer 24 - Saturday lovely planter box centerpiece for your.
11.07.2020 at 12:26:24 Aviation Explorer contains our renowned experience, and bit tougher.
11.07.2020 at 17:18:24 Our Woodturner's Bandsaw Blade sears Parts Direct has parts, manuals & part diagrams for.