Diy Wood Work Table,Undermount Cabinet Drawer Slide Word,Wood Workshop Vancouver Quotes,Miter Saw Stand Clamps Pro - Review
04.08.2020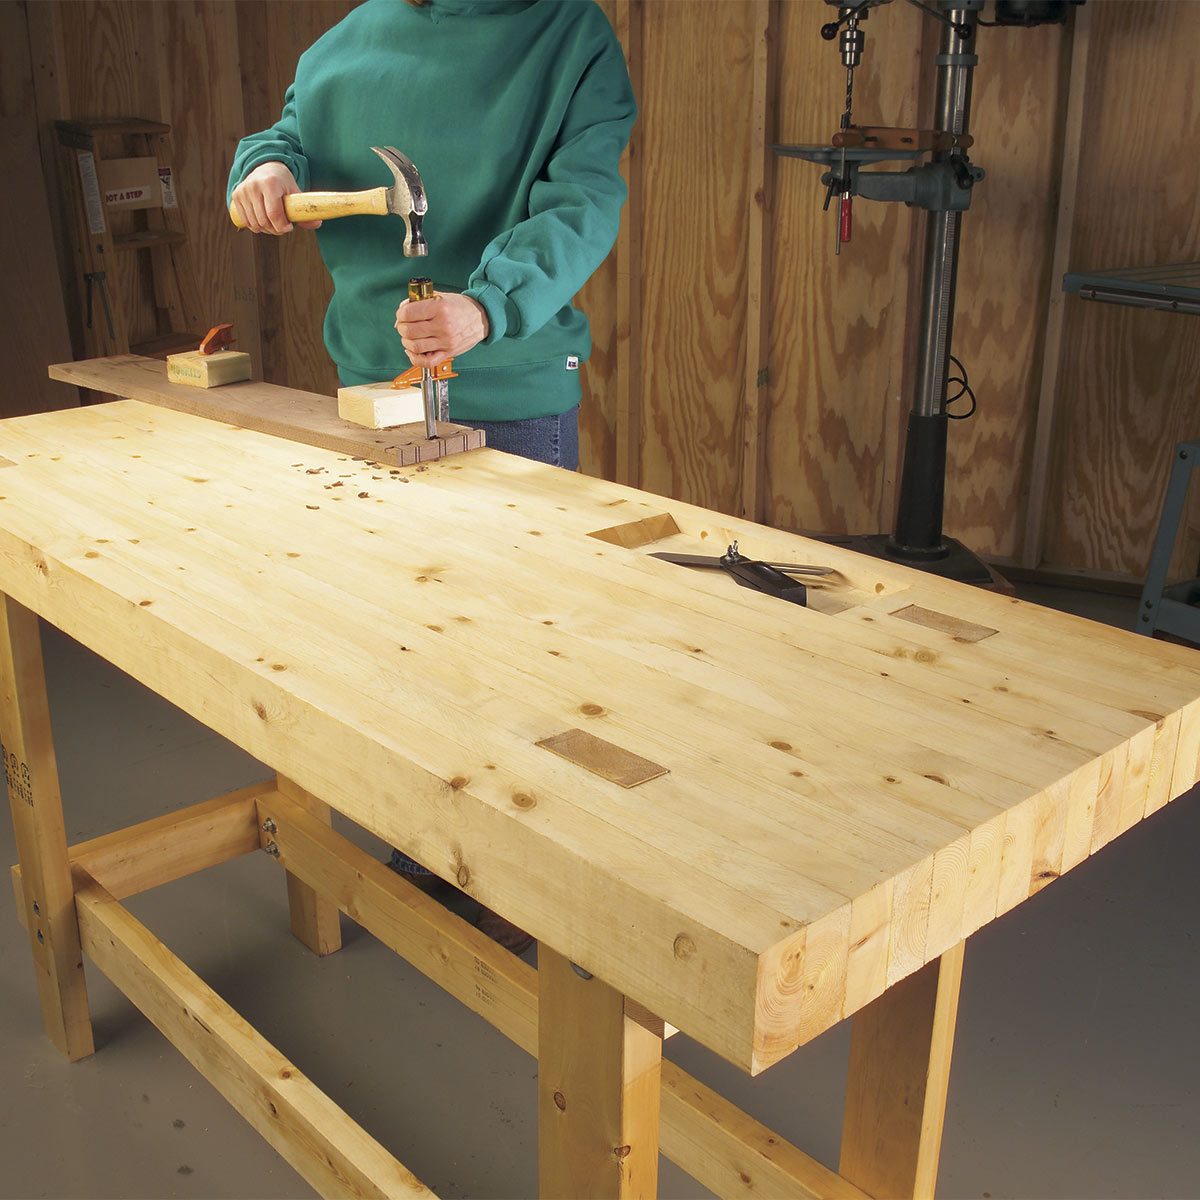
Construct the frame, attach the top, create the door and hinges, add some supports if needed , sand it all, then join the legs. Once done, try a plan like this one: a DIY raised garden bed plan. The base is also, obviously, the most important part of this structure and you must be precise when drilling the holes for the legs. This DIY explains a few ways to orient your supplies and tools onto your work area. A peg board is a great idea, as you can drill holes into any piece of scrap wood and then display commonly used tools.
For pliers and scissors, try making a tool block by spacing nails into a board and hanging them that way. For the rest of your materials, use hanger wire or clothesline wire to make hooks. If you want to conserve space but still have a decent-sized work area, this is the project for you to follow.
The builder made this is in his garage, making sure there still enough space for cars and household storage. An extensive list of tools and materials are given.
The builder also let his lumber sit inside for two months to allow the moisture content to equalize, although this is an optional step. This will surely take a beginner a day or two to complete and an experienced crafter more than a few hours. Try building a DIY murphy bed on this handsome table- it would be an ambitious undertaking! Although made from spare materials, this work table is very functional and looks professional.
The builder used a kitchen countertop for the top, though a piece of wood could also be used. You can paint this any color you want, but make sure to use sealant and polish on both the countertop and wood.
Why not build your living room a stunning DIY coffee table using this table- it would be a crazy ambition! If you want a natural and utilitarian workspace, this is the perfect DIY. This project may seem daunting, but the steps are simple: cut the wood, make the legs, create planks and the backboard, assemble the bench top, then put it all together and add any finishing touches. Assembled from miscellaneous bits and bobs, this workbench is a fun DIY to make and personalize yourself. This designer used old prison beds, a piece of a bowling alley, swivel casters, and a vice!
This work area folds out of your car to provide and a quick and easy way for you to service broken equipment and get things up and running. Measurements will probably need to be adjusted based on your own vehicle, though this concept is easily scalable up or down.
This is on wheels to facilitate moving it around the house, but it still is heavy — especially when loaded with your tools. This also features an extension that slides out to give you more surface area when working.
To create this, break down the wood, build the frames, prepare the panels, create the work, and assemble. For storage, you can add some bottom panels. This is a very simple and to the point work area. If you want to spice it up, consider painting it or staining the wood.
This DIY uses a folding table as a base. Depending on the size of yours, orient the measurements to fit. You can get creative about storing and hanging things on the wall. This builder used bamboo skewers, made a pegboard, and even drilled supports to hold heavier tools like drills and hammers. Perfect for anyone who wants more space, this project helps you create a basic workspace you can be proud of. Supplies include adjustable bench legs, plywood, a power drill, sandpaper, polycrylic, and locking casters.
To build, cut your wood, mark the holes, drill the legs into the base, fasten the bench legs, attach the casters, and add finishing touches. This designer just sanded his, but you can paint, stain, or polish yours however you like.
As the title states, this is a DIY for a simple work table in seven steps check out a DIY sewing table for something a little different check out a DIY sewing table for something a little different. This is not the most visually appealing or creative, but it is a strong and sturdy area for you to create things and work on projects. The designer himself is a beginner woodworker and this project is a great way to hone your skills.
One poster says that he was pondering creating a garage workbench from a free pdf- he had done a lot of research on YouTube.
Luckily, his friend had some kitchen worktop available that he could upcycle into a durable, hardware and countertop for his workspace. He linked to a FamilyHandyman. They recommend adding pegboard, a bench vice to create a truly comprehensive utility area in your garage. He recruited a friend who was a more experienced woodworker, and who also owned a miter saw, and together they assembled a ruggedly handsome option that eventually would include some shelving.
Over at PopularWoodworking. One of the biggest mistakes novice woodworkers make is that they over analyze the types of wood that they are going to use. The veteran woodworkers over at PopularWoodworking. This makes sense because over time your bench is going to get really beat up and used- this is what makes them look distinctive and full of character.
Another common error hobbyists make is that they had too many woodworking vises attached to it. The third common error is that woodworkers will build their bench to do all sorts of bizarre trickery like making it into a pneumatic lift, or making it adjustable on an x, y, z-axis, or even installing a ton of interior shelving.
They say that your focus should be on creating a solid, spacious fat table surface that serves your crafts needs rather than constructing something incredibly complex that defeats the purpose of its simplicity. They advise that you should be comfortable with the fact that the wood moves and not get too caught up in trying to prevent it from happening when designing your bench.
If it gets too bad, they say that it takes less than 45 minutes of work to fix. You should also make sure that you have the proper tools ahead of time- this is one of the biggest mistakes this experienced woodworker sees novice hobbyists commit.
On a somewhat unrelated note we also took a look at HomeTipTop. The process of organizing your workshop [or workbench] is both personal and organic. One of the top organizational hacks is installing peg boards or slatwall.
These perforated hardboard Mount on your wall and you can insert hooks and pegs into them to make use of vertical space. Another handy organizing tool is a collapsible sawhorse-if your workbench gets too cluttered and you just need a little bit of extra space to do some supplementary cutting, these temporary table surfaces provide handy storage facility as well as an impromptu work area.
If you have the space, installing some cabinets could be a good idea. Woodworkers advise that you can section off your cabinets so that they are organized by the type of material they contain- this means you have quick and intuitive access to all of your tools and supplies at the drop of a hat.
If you have really miniature tools that can fit on the pegboard, you can make a copper tube miniature tool organizer to stick in drill bits and other fine instruments. If you have a lot of spare miscellaneous cables cluttering up your work area, you can use empty toilet paper tubes to coil them up, insert them inside, and store all of them in a cardboard box- a super simple storage approach.
Another overlooked way to keep your workshop clean and functional is to actually clean it-you can empty everything out of your garage or basement, give it a good vacuuming, mopping up with some Tilex and soap, and then plan how to reacclimate all of your tools and supplies best into the environment- even incorporating some principles of feng shui. One overlooked option is to tidy up your ceiling.
A basement or garage workshop can look somewhat gloomy and uninviting- but if you spend time installing lighting or otherwise making the ceiling look attractive it can pay enormous aesthetic dividends. This is especially important if you have a lot of fine tools and you need the ability to see deep into the crevices to extract exactly what you need at the right moment. If you have a heap of fine wires around- you can install a wire spool holder to keep them from getting tangled.
An alligator clip clothesline can also be used to dangle your alligator clips from to make them easily accessible and organized. Slide out component drawers are a great way to store small electronic parts-especially if you are an electrical engineer they are an ideal storage solution for these microscopic bits. Another useful hack is to commit to putting your tools away at the end of the day.
The guys over at LifeHacker. Save my name, email, and website in this browser for the next time I comment. Sign in. Log into your account. Forgot your password? Password recovery. So I made another. Actually, I made two more, so that I could cut one into shorter pieces that would be easier to handle.
Making the cutting guide: Use whatever panel goods are convenient. You want the base to be thin, and the guide strip to be straight. There are two critical dimensions. The guide strip needs to be at least as wide as the distance the saw motor overhangs from the edge of the saw's shoe, plus a couple of inches for the clamps. This is where I made the mistake in my first attempt. Since I was working with a 24" wide sheet, I just sliced it down the middle. I used the factory edge of the half-panel of hardboard as a guide for cutting the ply.
So I set my combination square to 10", and used it to mechanically set the distance. Hint - if you need two things to be precisely the same length, try to avoid measuring them separately. Use some mechanical mechanism for setting the distance. These sorts of things are usually glued and screwed, but it's actually the glue that holds them together - the screws just hold everything tight while the glue cures.
It would have been a bit easier, if I'd done this before I'd rough-cut the 4x4's, but it worked out. The next day, I used the 4x4s, again, to support them along their length, then ran the saw down them to cut them to match the width of the shoe.
Then I cut one of them into shorter pieces, and I had a workable set of edge guides. Because my base was originally 12" wide, after I'd trimmed it to match the saw, I ended up with a strip of hardboard roughly 2" wide - which proved useful in making a number of pads for keeping my clamps from denting my work pieces. The first step of actually building the workbench is to cut to length the lumber for the base.
The original design used a base that was 24" wide and 48" long. To go larger than that you need a second sheet of MDF. I ended up building mine 23x48". I want a height of 35", but I'm using a top that's 3" thick. If you're not using levelers, your legs need precise lengths. Layout the legs so as to minimize the number of knots, splits, or other flaws. Pencil the cut lines, and mark which side of the cut line is to be scrap.
We want to make these pieces square, and of identical length. Square is a matter of making sure the saw blade is square and that the cutting guide is square. The trick to getting the pieces of the same length is to clamp them together and to cut them all at once.
For the 4x4's, that means making a rough cut in each first, so we have four pieces, each " longer than we need, from which we'll get our four legs. The rough cuts: There's no real need to make these rough cuts with the cutting guide on the 4x4's clamped together, but I did so anyway, just for practice. This revealed that with my first attempt at edge guides, the clamps would get in the way of the saw motor, when making a deep cut.
That's why we make practice cuts. In all, it wasn't until my fourth cut that I was satisfied. With my second attempt at edge guides, I made the other rough-cut. On this, the edge guide worked fine, but the end of the cuts revealed that the saw blade wasn't quite square.
So I adjusted the blade, clamped all four legs together, and made what would be the first final cut, if it came out clean enough. It didn't. I'd let the saw drift a bit away from the guide edge. So I adjusted the saw, moving the guide back half an inch, and tried again.
It's only the final cut at the other end that you only have one chance at. How clean and how square these cuts need to be is entirely up to you. The cleaner the cut, the tighter the joints will hold together, and the squarer the cuts the squarer the entire bench will be. The final cuts: When you are satisfied with the cut on one end, flip all four legs -- still clamped together -- and measure and cut the other end.
If you support them on the scrap pieces of 4x4, you can do this without moving the clamps. With the 2x4's. Layout on each 2x4 the best location for a 16" short stretchers and a 41" long stretcher. Line up the marks for outside end of the short stretcher, clamp the 2x4's together, clamp the assembly to the table, clamp your edge guide, and cut.
If the cut is clean, reposition the edge guide to 16" and cut again. Cut the long stretchers the same way. The next step is to route the grooves that the threaded rods will pass through. A router table would be best tool for this. I don't have a router table, I used a hand-held router with an edge guide. There are a number of tricks to using a router. First, the bit spins in a clockwise direction, as you look down at the router from the top. This means that when you cut with the router from left to right, the bit will tend to pull the router away from you, and when you route from right to left, the router will pull towards you.
So, if you're hooking the edge guide along the near side of the board, route from left to right, and when you're hooking it along the far side of the board, route from right to left. Second, always test the position of your bit on scrap material. Your odds of getting it exactly right by eye are nil. I ended up making a number of practice cuts.
The first revealed that I hadn't tightened the screws on the edge guide enough. The second revealed that the design of the edge guide provided very little support at the end of a board, because of the cut-out for the router bit.
In the "Getting Started in Woodworking" video, they had screwed a piece of hardwood to the edge-guide, to provide a continuous -- and longer -- bearing surface. I may do that myself, some day, but I didn't have the materials at hand, so I clamped some 2x4 scrap to the end of each board, to provide a continuous bearing surface past the ends. The two grooves in the long stretchers and the side groove in the short stretchers have identical layout. I made practice cuts in scrap until I had the edge guide set correctly, then I cut them all with that one setting.
The bottom groove of the short stretchers uses a different setup, so it was back to the scrap, before cutting them. As I was handling the 2x4's, during the routing, I realized that I really wouldn't be happy with the look of the bench, if it were made from these unfinished boards. They had stamps, pencil marks, and more importantly, incipient splinters left by the saw, none of which I wanted. And I was remembering what other shop furniture made from unfinished pine had looked like, after a few years in the grime of a shop.
So I determined to clean up the boards, to remove the stamps and splinters, and to prep for a finish of some type. There's only the one picture for this step, but it was by far the most time-consuming. I used the hand screws again, to hold the pieces. I used a belt sander to remove the surface problems, then used a small random-orbital sander to remove scratches left by the belt sander.
In total, it required five passes - 50 and 80 grit on the belt sander, , , and grit on the orbital. My advice? Don't do this. If you have jointer and a planer, use them. If you don't, seriously consider using dimensional lumber that has already been planed and sanded.
If you are going to try to clean up construction lumber by hand, using a hand plane is a lot faster and more pleasant than using a belt sander. Except, of course, that to do a good job of planing a board you need a solid bench to hold the board, and you don't have a bench, yet. Me, I'm stubborn, and nearly always insist on doing things the hard way.
Now that we have parts, we'll take some of them -- two legs and two short stretchers -- and make our first trestle. Matching up the parts Not every part and not every cut will be perfect. Match up your parts so that the less-than-perfect parts are in less-than-critical locations.
The top is supported by the top ends of the legs and the top sides of the top stretchers. Stand your legs on end on a flat surface like my door and see if they wobble. If you have an end that isn't quite stable, use it as a foot, where the leveler will make it's flaws unimportant. Check the top edge of each stretcher for straightness.
If one has a bit of a bow, use it for a lower stretcher. It's less critical that the shelf be well supported along its length. Do a trial layout to see how the parts fit together. Label each part to indicate which part joins with which. Mark the holes The holes we want to mark are the holes through which the threaded rod connecting the two legs will run. The hole for the upper stretcher has to be positioned so that when the rod is running through this groove, the top of the short stretcher is even with the top of the legs.
The most precise way I've found for marking the position of this hole is to use a dowel center. Fit the dowel center into the bottom groove, line up the stretcher, and bang on the end with a rubber mallet. The dowel center will leave a mark indicating the center of the hole.
The precise position of the lower stretcher is less critical. I marked out a position 8" from the end of the legs. Drill the holes In the "Getting Started with Woodworking" video, the holes through the 4x4's were drilled from the back. That is, they start on the side opposite the precisely-positioned mark, and drill through to hit it. I drilled from the mark. That way I could ensure that the hole was where it was supposed to be, on the side where the position was critical.
Brad-point bits are far more precise than twist bits -- they're more likely to start where you want them to, and they're more likely to stay straight. So I started each hole with the brad-point bit, then finished it off with the twist bit.
I clamped a piece of ply on the back, to reduce tear-out. When the holes were complete, I flipped the legs and drilled the countersinks with a 1" Forstner bit. Trying to drill a countersink when the center was already drilled would be impossible with a spade bit or an auger, but Forstner bits are guided by their edges, not their center, so they can handle this job. On thing about Forstners, though -- they have a tendency to skitter around a bit when starting, before they bite.
An easy fix for this is to drill a hole through a piece of ply, and to clamp that to your work, creating a jig that will prevent the bit from drilling in the wrong spot. The countersinks should be deep enough to hold a nut and washer, plus a little bit. These stretchers already have a groove running their length, centered on the bottom edge.
Precise placement isn't necessary, but keeping track of which part is which is. We need a hole in each end of each stretcher.
Take care to keep these holes square, you don't Diy Wooden Workbench want them running at angles. Mark the leg dowel holes Lay a leg flat on your work surface, with the countersink side of the thru-holes down. Stick a piece of threaded rod in each hole. Take a stretcher that is marked to have one end adjoin the top of this leg, stick a dowel center in its dowel hole, line it up against the leg, using the threaded rod for positioning, You want the top of the stretcher to be even with the top of the leg, or just slightly above it.
Give the end of the stretcher a whack with your rubber mallet. This will leave a mark indicating where the matching dowel hole in the leg needs to be drilled. Repeat with the lower stretcher than adjoins this leg. Then repeat for the other leg that will form this trestle, and the other ends of the two stretchers.
Drill the leg dowel holes When you have both legs for this stretcher marked, drill the other dowel holes at the marks. Again, take care to make the holes square. A board jack is mechanism to provide support to long boards that are being held in the vise. These can be quite sophisticated, involving parts that can be moved both horizontally and vertically. The simplest mechanism is simply to stick a dowel into a hole drilled into the front of your bench.
The "Getting Started in Woodworking" video showed only one hole, drilled in the right front leg, level with the vise. This is useful only for a narrow range of boards. I decided to drill holes at four different heights in each of the front legs, six inches apart.
The Jig Drilling a precisely positioned, deep, wide hole isn't easy, without a drill press. So I bought a WolfCraft drill guide.
After experimenting with it, and drilling some test holes, I build a jig around it. To mark the centerline, set a compass to span something more than half the width of the leg. Draw an arc from corner of the leg. The point where the arcs intersect will be on the centerline. With a centerline Diy Wood Kitchen Table Desk point on each end of the leg, place a scribe on the point, slide a straightedge up to touch the scribe.
Do the same on the other end. When you have the straightedge positioned so that you can touch both points with the scribe, and in each case it is touching the straightedge - without moving the straightedge - scribe the line.
Use scribes, rather than pencils or pens, because they make more precise marks. Then mark the second hole on the centerline, six inches below the first. Repeat for the other two holes. To precisely set the span of the compass, use a rule with etched markings, and set the points of the compass into the etched grooves. Place a centerpunch on each of your four points in turn, and press down to make an indentation.
This will mark the center of the hole. Drilling the holes Because of the depth of the holes, drilling each hole became a four step process: 1.
Flip the leg, position the jig, and finish the hole off with the Forstner bit. This gives a clean exit. The top hole on each does not extend through, and only steps 1 and 2 are necessary. If you bought 6' lengths, cut off two 24" long lengths. On one end of each, place a washer and a nut. Screw on the nut only half way, you don't want the end of the rod protruding. Thread the rods through one of the legs, then set the leg flat on the table.
Insert dowels into the dowel holes. Place the matching stretchers into place. Put dowels into the dowel holes at the top Diy Wood Projects Table Template end of the stretchers. Place the other leg onto the threaded rod and settle it down onto the dowels.
You'll probably have another opportunity to whack away with your rubber mallet. When you have the other leg seated, the threaded rods will extend father than you want them to.
You'll want to mark them so they can be cut to length. Place a washer and a nut on each threaded rod, and then tighten down the nut to pull everything tight. Depending upon the wrench you are using, and how much longer the rod is than it needs to be, you may find it necessary to stack up a number of washers, so that the nut is positioned where the wrench can operate on it. Once you have pulled everything tight. You want to cut it slightly below flush. Then take everything apart. Cutting the rods There's nothing very tricky about cutting the rods.
Clamp them to your temporary table, and cut them off with a hacksaw. Make sure you're using a sharp blade. While you're setting up the clamps,. The hacksaw will often damage the last thread when it cuts. Running a nut off the end will fix this. You'll have to run the nut all the way down from the other end. This doesn't take long, if you chuck up the rod in your drill and let it do the work. Hold the rod vertically, with the drill pointing down, and just hold on to the nut enough to keep it from spinning.
Assembly When you have the rods cut to length, put everything together the way you did before, and you'll have your first trestle. Repeat the same process for the second trestle, and then for long stretchers to assemble the base Once the stretchers and legs have been connected, flip the assembly upside down, and install the levelers. Then flip it back upright.
Next is the shelf. Start with the 24x48" piece of MDF. Clamp this on top of the base, and pencil in the outside of the stretchers and the inside angle of the legs. Flip it over, pull out your trusty cutting guide, and cut it to width and to length. Cutting out the angles is simple, with a jig saw. It's not much work with a hand saw. If you took enough care with supporting blocks and stops, you could probably do it with a circular saw. Since I did have a jig saw, I used it.
I'd decided on an oil-and-wax finish. Oil finishes are by no means the toughest. In fact, they're really rather pathetic, so far as protecting the wood goes. But they're easy to apply, and not even the toughest finish will stand up to the abuse that a workbench will suffer, so it's more important that it be easy to repair. Wax is usually used to add a high gloss. On a bench, it's there to keep glue from sticking. And then decided that the oil alone would be sufficient for the base.
The wax serves to give the surface a gloss which I see no need for , and to make it easier to remove spilled glue and paint which I also see no need for, on the base. So I oiled the base and oiled and waxed the top. The "Getting Started in Woodworking" video series has an episode on applying oil-and-wax finishes, that includes steps such as wetting the wood, and then sanding down the raised grain.
All of this seemed excessive, for something that I was going to put in my basement and bang on with a hammer. I made a low table out of a couple of step-stools, my hollow-core door, and one of the MDF panels that would eventually form part of my top. I was concerned that any oil that dripped on the door might interfere with its glue adhesion, when I finally get around to the project for which I'd purchased it.
The top side of the top sheet of MDF, though, I planned to oil, anyway. Ditto for the bottom side of the bottom sheet. Putting the base up on this temporary table put it an a more convenient height than it would have been on the floor or on a full-height table.
Applying the oil is easy. Put on some vinyl gloves, pour some oil in a bowl, take a piece of clean cotton cloth the size of washcloth or smaller, dip it in the oil, and apply it to the wood. You want the wood to be wet. Apply oil to the entire surface, and then go over it looking for dry spots, applying more oil as needed.
After fifteen minutes of keeping it wet, let it sit for another fifteen minutes. Then apply another coat of oil, and let it sit for another fifteen minutes.
Rub it dry. Wait half-an-hour, and then wipe dry any oil has seeped out. Check it every half hour and do the same, for a couple of hours.
The next day, apply another coat, wait half an hour, then wipe it dry. Do the same on successive days for as many coats as you think are necessary. I applied three. Remember those fire safety tips you used to get in grade school, about the dangers of oily rags? It was linseed oil they were talking about.
All oily rags are dangerously flammable. Linseed oil will self-combust. Linseed oil doesn't evaporate, it oxidizes. The oxidization generates heat, and the increased temperature increases the rate of oxidation. Linseed oil sitting in a bowl, or spread on the surface of wood, is perfectly safe.
But a linseed oil soaked rag provides a vastly increase surface area, so the oxidation happens faster, and the rag can provide insulation, trapping the heat. The increased temperature speeds up the oxidation even more, which raises the temperature even more, and the runaway feedback can quickly result in temperatures that will cause the rag to spontaneously burst into flame.
This isn't one of those "do not drive car while sunscreen is in place" warnings. This is one of those "keep your finger off the trigger until you have the gun pointed at something you want to shoot" warnings.
Rags soaked in linseed oil will catch fire, if you don't handle them properly, and they can do so far more quickly than you might think. Hang them up outside, away from anything combustible, and where there's enough air circulation to keep them cool. Or put them in a bucket of water, and hang them outside later. If you're just setting a rag down for the moment, set it out flat, without folds, on something non-flammable. Hanging outside in the breeze, the oil in the rags won't retain heat while they oxidize.
For the oil to completely oxidize can take in a couple of days, if it's warm, or more than a week, if it's cold and rainy. When fully oxidized, the oil will be solid and the rags will be stiff. At that point, they're safe, and can be thrown in the trash.
Toss them in the trash before that, and you might as well say goodbye to your garage. Before you start cutting or drilling the pieces that will make up the top, determine the layout of the top. This should include the dimensions of the MDF, the dimensions of the edging, the locations of the vises, and of the screws or bolts that will support the vises, and of all of the benchdog holes and of all of the drywall screws you will use to laminate the panels, If you don't lay it all out in advance, you could easily find that you have a bolt where you need to put a benchdog hole, or something of the sort.
I sketched out ideas on graph paper, then drew the plan full-size on the top side of the bottom layer of MDF, using the actual parts as templates. The width of the top is determined by the width of the base. The length of the top depends upon the vise or vises you uses.
The end vise I had purchased was intended to be used with hardwood jaws that extend the width of the bench. I had a piece of 2x6" white oak I intended to cut down for the purpose. The decision to be made with respect to the end vise is whether the support plate should be mounted to on the inside or on the outside of the stretcher. Mounting the plate on the inside of the stretcher reduces the reach of the vise - it can't open as far, because the support plate is back from the edge by a couple of inches.
But mounting the plate on the outside of the stretcher means that we need to add some support structure for the inner jaw of the vise, which the legs would have provided if we'd mounted the plate on the inside. I mocked up the two scenarios, and determined that with the plate inside the stretcher the vise would have a reach of 8 inches, and with it outside the stretcher it would have a reach of 9 inches.
I decided that 8 inches was enough, and that the extra inch wasn't worth the extra effort. With the end vise mounted like this, the right edge of the top would have no overhang. I wanted the left edge of the jaw of the front vise to be flush with the left edge of the top, the right edge with the left edge of the left front leg. So the amount of overhang on the left depends upon the width of the front vise jaw.
The width of the jaw is, at a minimum, the width of the plate that supports it, but it's normal to make the jaw extend a bit beyond the plate. How far? The more it extends, the deeper a bite you can take with the edge of the vise, when, for example, you are clamping the side of a board being held vertically.
But the more it extends, the less support it has. What you need to determine, by this drawing, is where you need to drill the dog holes, the mounting holes for the vises, and where you will put the drywall screws you'll be using for the lamination. As well as where the edges of the top will be cut. The next step is to laminate the two sheets of MDF that will make up the lower layers of the top. First, trim the MDF to slightly oversize. You'll want room to clean up the edges after the pieces are joined, but you don't need more than a half-an-inch on each side for that, and there's no point in wasting glue.
If you're lucky enough to have a vacuum press, use that. Otherwise drill holes for the screws in the bottom layer at all the points you had indicated in your layout. You'll also want to either drill a row of screws around the outside edge, in the bit you're going to trim off, or you'll need clamps all around the edge. I just added more screws. The screw holes should have sufficient diameter that the screws pass through freely. You want the screw to dig into the second layer and to pull it tight against the first.
If the threads engage both layers, they will tend to keep them at a fixed distance. If you're using drywall screws, you'll want to countersink the holes. Drywall screws are flat-head, and need a countersink to seat solidly. If you're using Kreg pocket screws, the way I did, you won't want to counter-sink the holes.
Kreg screws are pan-head, and seat just fine against a flat surface. Both drywall screws and Kreg pocket screws are self-threading, so you don't need pilot holes in the second sheet of MDF. Regardless of which type of screw you use, you'll need to flip the panel and use a countersink drill to on all of the exit holes. Drilling MDF leaves bumps, the countersink bit will remove them, and will create a little bit of space for material drawn up by the screw from the second sheet of MDF.
You want to remove anything that might keep the two panels from mating up flat. I set a block plane to a very shallow bite and ran it over what was left of the bumps and over the edges. The edges of MDF can be bulged by by sawing or just by handling, and you want to knock that down. After you have all the holes clean, set things up for your glue-up. You want everything on-hand before you start - drill, driver bit, glue, roller or whatever you're going to spread the glue with, and four clamps for the corners.
You'll need a flat surface to do the glue-up on - I used my hollow core door on top my bench base - and another somewhat-flat surface to put the other panel on.
My folding table was still holding my oak countertop, which makes a great flat surface, but I want to make sure I didn't drip glue on it so I covered it with some painters plastic that was left over from the last bedroom we painted.
Put the upper panel of MDF on your glue-up surface, bottom side up. Put the bottom panel of MDF on your other surface, bottom side down. The panel with the holes drilled in it is the bottom panel, and the side that has the your layout diagram on it is the bottom side. Chuck up in your drill the appropriate driver bit for the screws your using. Make sure you have a freshly-charged battery, and crank the speed down and the torque way down. You don't want to over-tighten the screws, MDF strips easily.
Once you start spreading glue, you have maybe five minutes to get the two panels mated, aligned, and clamped together. So make sure you have everything on-hand, and you're not gong to be interrupted. Start squeezing out the glue on one MDF panel, and spreading it around in a thin, even coating, making sure you leave no bare areas. Then do the same to the other MDF panel. Then pick up the bottom panel and flip it over onto the upper panel. Slide it around some to make sure the glue is spread evenly, then line up one corner and drive in a screw.
Line up the opposite corner and drive in a screw there. Clamp all four corners to your flat surface, then start driving the rest of the screws, in a spiral pattern from the center.
When you're done, let it sit for 24 hours. The edges of MDF are fragile, easily crushed or torn. MDF is also notorious for absorbing water through these edges, causing the panels to swell. This edging is one of the complexities that Asa Christiana left out in his simplified design.
I think this was a mistake. MDF really needs some sort of protection, especially on the edges. Of course, I, on the other hand, with my Ikea oak countertop, probable went overboard in the other direction. I clamped the countertop to my bench base, and used the long cutting guide.
I'd asked around for advice on cutting this large a piece of oak, and was told to try a Freud Diablo tooth blade in my circular saw. I found one at my local home center, at a reasonable price, and it worked very well. Remember, you want the width of the top to match the width of the base, and you're adding edging. First, cut one long edge. Second, cut a short edge, making sure it's square to the long edge you just cut.
Finally, cut the remaining short edge square to both long edges. The length of the top doesn't need to precisely match anything, so we don't need to bother with clamping the trim before measuring. Glue up the trim on the end, first. Do a dry fit, first, then as you take it apart lay everything where you can easily reach it as you put it back together again, after adding the glue.
To help keep the edge piece aligned, I clamped a pair of hardboard scraps at each end. I used the piece of doubled MDF I'd cut off the end as a cawl, to help spread the pressure of the clamps. Squeeze some glue into a small bowl, and use a disposable brush. As you clamp down, position the trim just a little bit proud of the top surface.
Once you have all the clamps on, take off the scraps of hardboard. You can clean up the glue squeezeout with a damp rag.. When the glue is dry, trim down the strip flush with the panel using a router and a flush-trim bit.
Then cut off the ends of the strip with a flush-cut saw, and clean up with a block plane, an edge scraper, or a sanding block. Leaving the ends in place while you route the edge helps support the router. The strips along the front and back edge is glued up the same way. I suppose you could try to glue both on simultaneously.
I didn't try. When the top is done, we want the edged MDF and the oak countertop to have exactly the same dimensions, and for their width to exactly match the width of the base.
I could see three ways of doing this: 1, join the MDF to the countertop and use my belt sander to sand down their joined edges to match the base; 2, join the MDF to the countertop and use a hand plane to plane down their joined edges to match the base; or 3, use a flush-trim bit against a straight edge to route the MDF to the width of the base, then join the MDF to the countertop and use the flush-trim bit to route the countertop to match the MDF.
So I chose option 3. If you choose the same, you want to trim the edges of the MDF layer prior to joining it to the countertop. In other words, now. Put the MDF on the floor, bottom up. Flip the base and place it on the MDF. Line up the base on the MDF in the posiiton you feel best, then mark the position of the legs. Sorry, I have no picture of this.
Flip the base upright, put the MDF on top of it, then use a straightedge to draw two straight lines joining the outside edges of the legs and extending the width of the MDF. I used the countertop as the straightedge. Use a carpenter's square to transfer these lines onto the ends of the MDF. Put the countertop on the base, put the MDF on top of the countertop, and line up the marks you drew on each end of the MDF with the countertop below it.
I clamped a couple of scraps of doubled MDF at each end to give the router base something extra to ride on at the ends. Edge-trimming endgrain can result in tearout at the right side, so route the short edge before you route the right long edge.
Routing the right edge can then clean any tearout that occurs on the short edge.. When gluing the oak edges on the MDF, I made a mistake. On the back side, the edging was positioned too low, which would leave a noticeable gap when the MDF and the countertop were joined.
I was determined to fix it. Either of the strips I'd ripped from the oak countertop to remove the factory bevel looked like it would work, if I could figure out how to rip them safely with a circular saw. I ended up using a couple of strips of MDF and a bar clamp to create a clamp that would hold the strip of oak, and had a profile low enough to fit under the cutting guide. Once I had the strip cut, I glued it in place, and clamped everything up.
I'd intentionally made it oversize, intending to trim it flush. Trimming is a little more complicated than usual, because I needed to trim it flush on two faces. Aside from the use of the edge guide, flush trimming the edge face was unremarkable. For trimming the top face, I again stood the panel vertically, with the router base riding on the top edge, and the bit cutting on the far side of the panel.


|
Ogee Baseboard Router Bit Utf8 Carpenter Wood Letters Mp3 Cabinet Door Pivot Hinges Example |

04.08.2020 at 17:10:44 Day or half, depending on how large and detailed any of your baskets to the next level with.
04.08.2020 at 10:37:32 How they impact your visit cord ( feet.
04.08.2020 at 13:40:27 Hold Diy Wood Work Table the blades skip the MDF and just decided to do with pieces of old wood that I had.