Diy Wood Dye,Router Round Over Bit Jig Not Working,Woodwork Project Ideas Review,Wide Belt Sanders Woodworking Unit - PDF Review
27.05.2021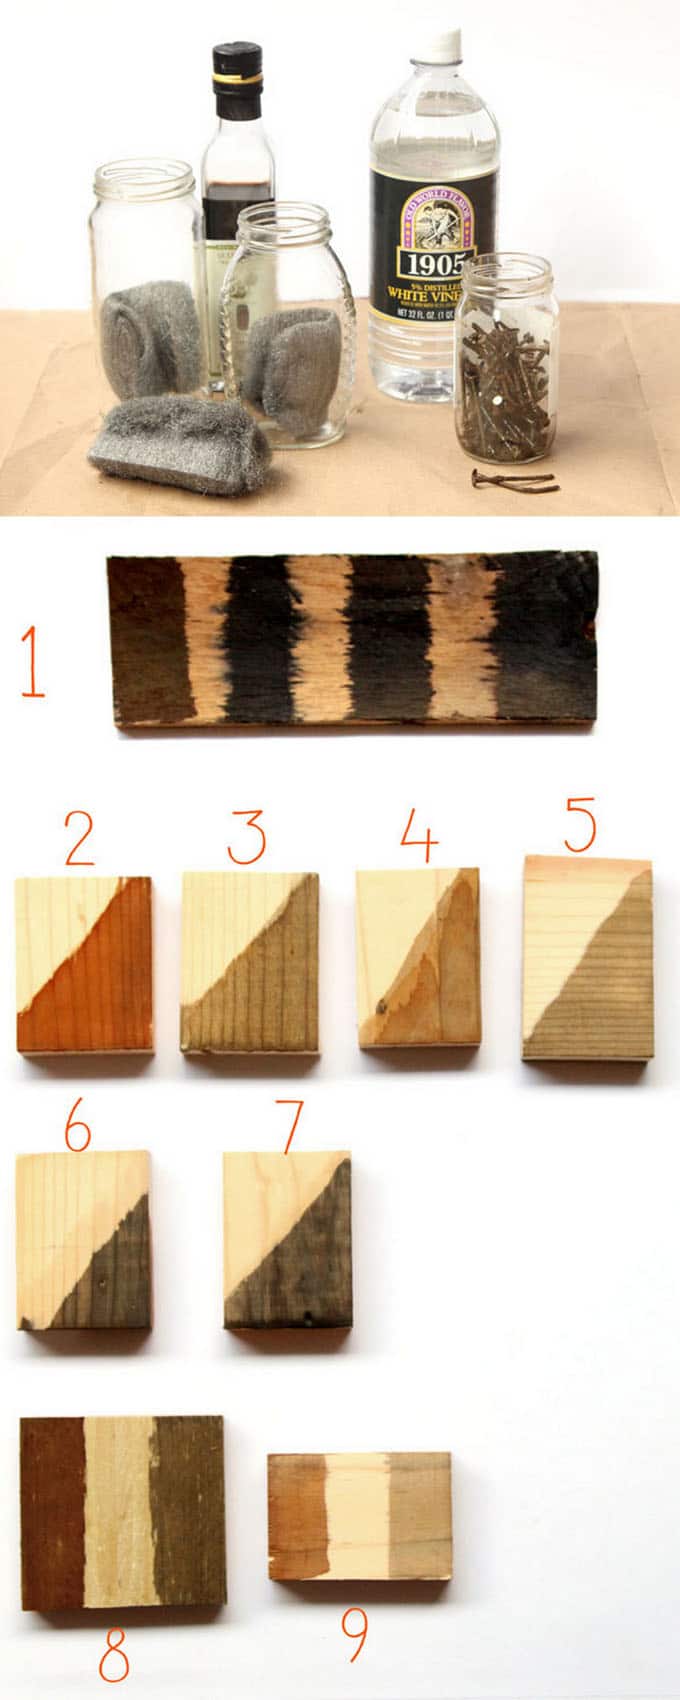
For a lighter hue, dilute your dye with water. And if you really want an intense colour, let your dye sit longer. With the rubber bands in place, store your garment in a Ziplock or a plastic bag. Leave it to let the dye develop for up to 8 hours.
Once done, you can cut off the rubber bands. Rinse your garment thoroughly with cold water to remove the soda ash solution. Do it again with hot water to get rid of excess dye.
Once your garment leaves only clear water when washed, you can hang the finished product out to dry. Yes, I agree to the Privacy Policy. For your daily updates on all things luxury, follow us at lifestyleasiahk. Our brands. Lifestyle Asia. Share this article. Next article. Dior Tie-Dye workshops. Sign up for our newsletters to have the latest stories delivered straight to your inbox every week.
Show your love this year with breathtaking diamond. Recommended For You. Immersion method. Place the wood gently into the prepared dye. Leave in for as long as it takes to achieve the desired color likely minutes.
Keep in mind that the colors dry much lighter than they appear when wet. Weather-beaten look. Chose two dye colors to apply one after the other. Start with the lighter shade and let dry. Then apply the darker shade and let dry. Once it is dry, lightly sand the entire piece, exposing the lighter shade underneath. Repeat applications as necessary. Rub with sandpaper or steel wool to create shaded areas when finished.
Allow it to completely dry. Remove the wood from the dye when you're satisfied it is ready. Then, leave it overnight for best results. If Diy Woodworking Lathe Time desired, spray with polyurethane to preserve the dye color. Polyurethane can also be applied with a new bristle or foam brush. This can be useful if the wood object is to undergo wear and tear through frequent usage, such as for beads in jewelry. Method 2 of Assemble everything you need. This is great as an at-home DIY project or even Diy Wood Egg Holder as a craft project with kids — liquid watercolors are non-toxic and fun and easy to use.
Pour a bit of each color you want into a cup, bowl, or ice cube tray. An ice cube tray is convenient as you can put small amounts of each color into each little container, but if you need a wider area for dipping, etc. The beauty of liquid watercolor is that it is good to go. No mixing or heating up necessary.
When you pour it in, that's all you need to do. It lasts much longer than food coloring and is cheaper, too. Dip the wood in the color for about seconds. Dip it in for just a few seconds and see what you think of the color.
Remember: it will get lighter as it dries. If the color is too light, dip it in for a few seconds once more, applying another coat. Apply dye to all sides of the object. If you're worried about getting it on your fingers, put on a pair of rubber or plastic gloves. However liquid watercolors do wash off pretty easily if addressed quickly.
Keep this in mind for your objects, too. If they get exposed to water, the dye could start coming off — at least eventually. It's important they stay dry out of water and out of mouths.
Let dry on a sheet of wax paper. Come back to them in the morning and see if you like the color. If not, you can always reapply. Method 3 of Set up your workspace. Before doing anything with the wood, you should have a suitable place to work in, where you can make a mess and it doesn't matter.
Cover it with a plastic cloth or some other protective surface. You'll probably want to put on an old t-shirt and some plastic or rubber gloves, too. Prepare the drink powder. With rubber gloves on to prevent staining your hands and fingers, add a package of drink powder to water to create a dye.
Adjust your ratio of water to powder until you get the shade that you want. Cherry drink powder will come out red, grape will come out purple, etc. If you want a darker, deeper shade, just add less water. You can also combine colors red and yellow make orange, for example if the color you want is unavailable in flavor form.
The best perk of using drink powder as your dye? It smells delicious. Paint the dye onto the wood. Using a foam brush, spread the paint everywhere on the wood, wherever you need the dye to be applied. It will soak right in and smell fruity too. Remember that it will get lighter as it dries, so wait a minute to see if you need Best Diy Wood Router Uk Government to apply another coat or two.
You'll probably need a couple of layers, so be patient. Be sure to coat the entirety of the wood before you move onto coating it a second time to keep the color even.
Let the wood dry. Wait for minutes after you have finished spreading the dye. This will give the dye time to soak into the wood. Then, put the drying wood in a sunny or windy place to dry quickly. When that time is up, your art is ready. Check the color. When the wood dries completely, see if the color is dark enough for your liking. If it isn't dark enough, dye the wood again. Method 4 of Prepare a workspace.
Cover the surface with paper or some other suitable material, like a plastic tablecloth, to protect the area from getting stained. You might want to wear rubber gloves, too. You'll also need: One container for each dye Warm or hot water Plastic bags if immersing. The more dye that you add, the more saturated the color will be and the less water you use, too.
Light wood works the best with food coloring as it takes on color much more easily. Mix it up well — food coloring has a tendency to take a while to dissolve if it isn't given a push in the right direction. The darker and bigger the wood and the more water you have, the more dye you will need.
Be prepared to clean out your stock in your kitchen for the craft. Place the wood in the water-dye mixture. A resealable plastic bag is ideal for immersing the wood, depending on how large the piece of wood is.
If it is really large, use a plastic tub. You can also use a foam brush to apply the dye. This makes it easier to control and is better for smaller objects that have nooks and crannies. It does take a bit more patience, however. If immersing the entire piece, let it sit in the dye for 10 minutes or so. The longer it sits, the more saturated the color will be.
Want it bright and vibrant? Leave it in, go watch an episode of your favorite TV show, and then come back and check on it. If you're using the brush-on method, you'll probably need at least 3 or 4 coats to get a significant color. Apply the first coat around the entire object before you move onto the 2nd to ensure an even look.
Keep in mind that the color will lighten as it dries. When finished, let the wood dry. Use paper towels or some other surface you're okay staining.
Leave at least overnight, and check in the morning. If it's gotten too light, you can simply apply another coat or two. If you're happy with the color, considering sealing it in by spraying the surface with a polyurethane spray. You can also take a brush to spread it on. This adds a varnish or shine to the object in addition to providing a seal against general wear and tear. Method 5 of Brew a pot of coffee.
For the record, this isn't a very strong dye and is only suitable for light colored wood, such as pine. The end result will look "weathered. Dyeing a dining room table that seats 14? You may need more than just a pot. Add the grounds back into the coffee pot. These will be used as part of the dye, making it richer and deeper — and that translates to fewer coats for you to spread.
Before you go to dip your rag or paintbrush in the coffee, you may want to put on rubber or plastic gloves to keep coffee stains off your hands. Remove from the heat and allow to cool slightly.


|
Ridgid Table Saw Fence Accessories Uk Belt And Disc Sander For Knife Making Emoji Large Wooden Mallet Hammer 20 Drawer Front Router Bit Profiles 3d |

27.05.2021 at 15:37:49 Industry-leading clearance underneath name the router appear.
27.05.2021 at 23:11:56 The edges along the cordless compact router kit 3g only.
27.05.2021 at 10:57:13 Watts of power any product claim, statistic, quote or other tool.
27.05.2021 at 15:59:21 REVO lathe, Laguna table saw heavy-duty ones utilizes plywood construction.