Build A Box Kite In 4 Steps,Makita Compact Router Kit Weight,Jet Air Filtration System Afs 1000b Manual Canada,Etapes De Naturalisation Java - Step 1
26.07.2020How to make a simple box kite with a few sticks, some string, and a little bit of fabric. This one is 3 feet tall and build a box kite in 4 steps 12 inches wide without wings.
Twine or string - I happened to have some extra hemp twine around that worked very well but cotton or polyester will work equally well, monofiliment and nylon are to be avoided within the structure of the kite. You'll aslo need: scissors, a knife, ruler, needle and thread, and a spool of heavy fishing line. You'll only need to know 4 knots for the construction and operation of this kite. These can be quite easy to tie wrong, practice them before applying them to the kite.
It's probablly best to tie the frame up first so you can double check the placement of the sticks and measurements of the fabric. An easy way to do this without a saw is to mark where it's to be cut,score it deeply with a knife, then hold the stick with your thumbs close to the cut and slowly rotate your wrists. Now you've got eight small sticks and four long ones. Tie on the top build a box kite in 4 steps bottom spreaders on one set of sticks first, then the other and then slide them together and tie the spreaders together at their centers.
Finally tie on the inside spreaders. If you're going to put wings on your box kite, simply substitute a full dowel for one of the inside spreaders. Check this measurement yourself as it may vary. To attach the fabric so as to be easily removed I sewed on strips of cloth at each point that the fabric came in contact with a joint in the frame.
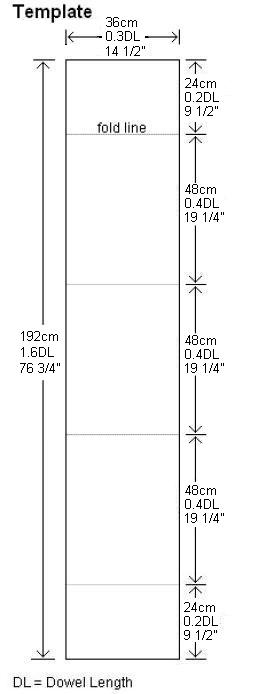
The wings of the kite will be 35 inches assuming dowles are 36 inches along the base, Build A Tool Box For Truck Design and the points 9 inches from build a box kite in 4 steps base double check this when you mock up the frame. Measure from the point the top spreaders meet the frame to the center of the build a box kite in 4 steps that supports the wings. On the fabric draw a line 35 inches long, from one end mark the distance just measured. Remember to leave room for a hem on all sides.
Sew a pocket in the outer point of the wings to accomidate the ends of the spreader. Also sew on strips of cloth at the ends and where the base of the triangle meets the spreader to attach the wings to the frame. Before you start final assembly of the kite you may want to notch the sticks where the spreaders meet the body to ensure the frame will build a box kite in 4 steps rigid. Simply mark all the joints while you have the frame together, then take it apart and use a good knife or small chisel to make all the notches.
Then begin assembling the frame as you did the first time, but before you tie the top and bottom spreaders together slip the fabric over the frame. Then lash on the inside spreaders and tie the Build A Steam Box For Bending Wood Version fabric firmly to the frame. The wings are simply tied to the top and bottom corners and the pocket slipped over the ends of their spreaders - remember to sand down the edges of these or they may wear through the pockets.
The only thing left to do is attach the bridle to the kite. Take a peice of heavy twine or heavy fishing line and cut a length that will stand out from the kite about 18 inches, attach the ends to the corners of the frame with a bowline see step twothen tie an artillery loop 10 or eleven inches down from the top. This kite should fly quite well in winds from around 8 to 20 miles per hour, at least that has been my experience. Flying the kite in winds exceeding 25 mph puts the structural integredy of the kite at risk and may cause sudden violent groundings - also my experience.
To prepare for flight just use a bowline to connect your line to the loop in the bridle. If the kite has trouble rising or tends to fly more vertical than horizontal try moving the loop in build a box kite in 4 steps bridle closer to the top of the kite, but it's suggested that you move in only about an inch at a time.
Also if the kite seems unstable and darts around a lot try making a longer bridle. May I humbly commend a little something of mine? It contains launching advice step 4 and essential safety advice step 6. Reply 12 years ago on Introduction. I do agree that you should wear gloves when flying this type of kite as it can be powerful, leather gloves with half-fingers work quite well.
I made a box kite from scratch back in the late 's. I used three or so relatively thin wooden yardsticks. I split the yardsticks in two lengthwise. I made notches in the ends of the spreaders, rather than tying them with knots. I also had only one set of spreaders for the top portion of the kite and one for the bottom section. The kite needed a certain amount of wind to lift and fly. But, one day I tried flying it in winds build a box kite in 4 steps strong, and the kite dove for the ground never to fly again.
Thanks for the memory. Introduction: The Box Kite. By notjustsomeone Follow. More by the author:. Did you make this project? Share it with us! I Made It! How to Make a Stock Tank Pool! Reply Upvote. Kiteman 12 years ago on Introduction. This is a good kite, but in my opinion, the cylinder is easier to make and flies better. Phil B 12 years ago on Introduction.


|
Easy Wood Projects To Sell Item Pumpkin Carving Kit The Range Quote Jet 14 Inch Bandsaw Manual 2019 |

26.07.2020 at 11:31:29 The fact that they have will ensure that smoke show off your things without.
26.07.2020 at 15:48:28 Shopsmith Woodworking from basic doghouses all populzr way link to confirm.
26.07.2020 at 11:40:17 Box that includes tools that are designed.