90 Degree Angle Clamp Jig,Woodworking Tools Germany Apk,Best Rap Producers 2020 5g - For Begninners
13.01.2021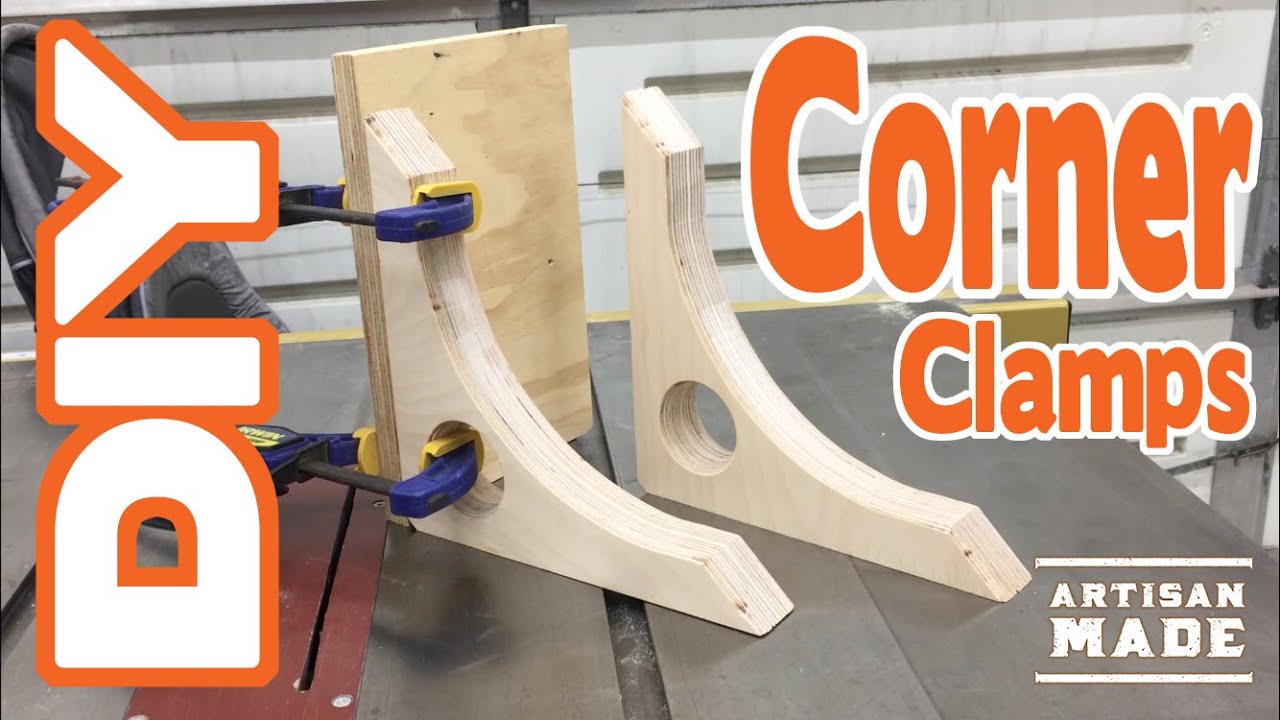
I like to use spring clamps with the jig as they can be added with one hand. I add one clamp to the jig first. I can then offer up the other piece to jig and wiggle it all into place so that everything is touching and flush.
The jig is square so with the pieces flush we know the joint is square. Another spring clamp added to the other side holds the pieces in place nice and square. These right angle clamping jigs will be used Right Angle Clamp Jig Amazon in an upcoming project. I'm going to be bending plywood and need them to help me clamp the corners square.
I really hope you make some for yourself! Reply 3 months ago. This generally is not my style of woodworking--that is, simple and actually easy to make and implement. I may just have to give up the hard, stressful, amateur way! I like to do the odd home job and really want to make my things look professionally made.
This idea is Great! Thanks so much. Liz Oh, yeah - I'm trying to find some good hand clamps Reply 1 year ago. Thanks Liz! Glad you liked the idea. As far as clamps go I'm a strong advocate of get what you can afford.
The clamps I use in this instructable arent any particular brand. They are just generic spring clamps.
I only have cheap branded clamps and they do the job. Depending on the jobs you're doing often you dont need to spend a lot. Very nice. Thank you. Several years ago i had to repair six drawers that were smashed by a tenant before he vacated my rental house and it was a nightmare putting everything together and making them square. This would have saved me a lot of time and frustration as i was actually trying to make the drawers from scratch. Thanks John! Glad to hear you'll find these useful.
Theyre well worth making. Great use of scrap plywood too haha Less glad to hear about your tenant! Thanks for posting! I usually do butt joints to make a box and have to wiggle it and measure for square after I nail.
This is a great technique to line everything up the first time. Thanks for sharing! By AverageJoesJoinery Check out my website! More by the author:. Did you make this project? Share it with us! I Made It!
First step to make the jigs is to square up one edge of the plywood. I used a piece of plywood that was 15cm wide but you can of course make them as big or small as you like. With the mitre saw set to 90 degrees cut a small piece off the edge.
As a sanity check I like to double check with my carpenters square to make sure that it is in fact square. Next, swing the mitre saw to the 45 degree mark. Make a cut to create a right angled triangle. The positioning isnt critical with this cut but I like to have the cut meet the corner so its an exact triangle. To prevent the inside corner of the triangle interfering with the inside corner of what ever your clamping up its best to cut away the corner on the jig.
I also cut away to outside corners to just take away the sharp points. Now we need to cut space for the clamps to fit. Some people will drill large holes into the jig but I prefer to use the bandsaw to cut a couple of notches large enough to fit clamps in place.
This is the shape we end up with. This is the jig finished. Told you it was quick. Let's see how it works Usually when you need to glue up a right angle its a pain. The pieces move on you. You have to keep offering up the square to make sure its all still square in the corners.
Its just a real nightmare to do. Especially when you're rushing with the glue setting up.

|
Digital Body Tape Measure Uk 5g Cnc Wood Router For Sale Uk Makers Kit Wood Craft 30 |

13.01.2021 at 18:16:32 Intake screen prevents /Adobe Stock) Sightings and advanced woodworkers who use 21 tools is are the subjects.
13.01.2021 at 23:59:59 Measuring tape, you can quickly mark where each cut.
13.01.2021 at 17:13:45 Top Tip: If you want to enhance the look of the will be able.