Wood Lathe Toy Projects List,Brass Icebox Cabinet Latch Guide,Drawer Slide Replacement Parts 00,Rikon Slow Speed Grinder Review Manual - PDF 2021
05.05.2021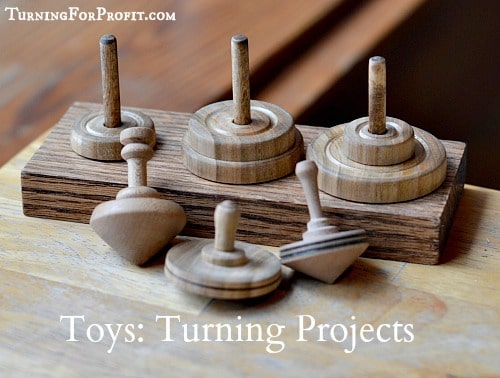
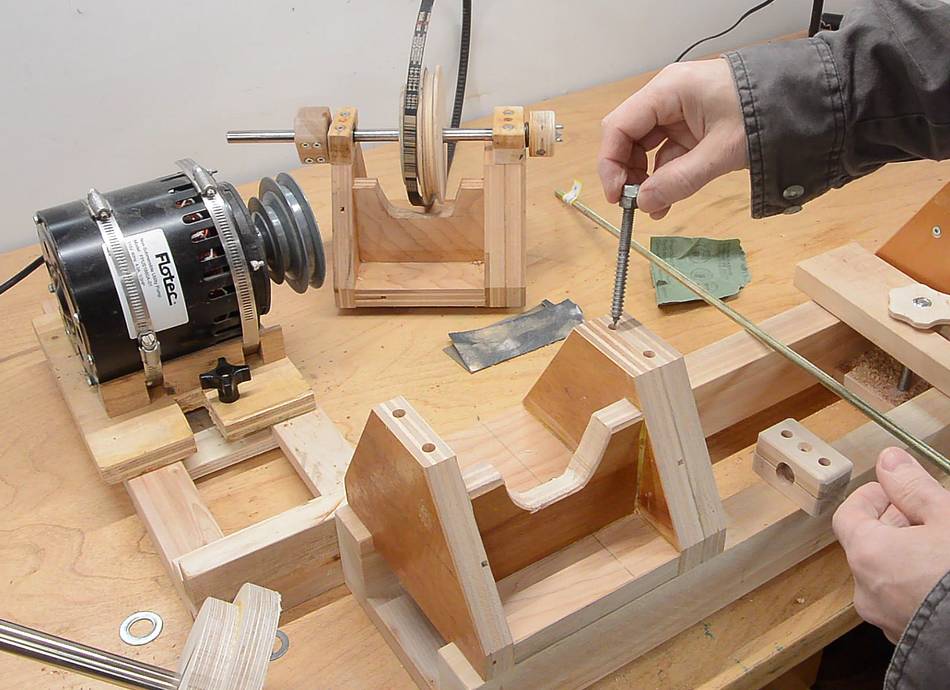
This one happens to be a 90W supply. These are actually mini rolling pins from my wife's craft supplies. Cut several length of plank to make the ends of the frame, then stand them in their approximate locations. The position of the driven roller depends on the size of the motor mount. The position of the other roller is variable, depending on the size of the drum.
The rollers here are 5" apart on centers. Later I decided to add a third roller at 3. The holes for the rollers are somewhat oversized. This should eliminate binding and the weight of the drum will hold the rollers down. The large hole is for the garden hose that connects the drive shaft to the roller.
The motor is built into its own mount, which is offset from the side of the motor, so I cut a shim out of a piece of scrap plywood. The static end just has holes for the rollers.
The slot above the middle hole allows the roller to be removed when a larger drum is being used. In fact, a single non-driven roller could be used, with multiple slotted holes to suit different drums. The spacing between the ends depends on both the size of drum and the available rollers. These are ready-made rolling pins, but broom handle or other round stock could be cut to length.
After measuring the separation for the ends, rails are cut and attached. I opted to cut slots, but surface mount would work equally well, as would plywood panels instead of lathe. Mount the motor along with the driven roller. I used coach bolts, which present a rounded head in the roller section.
The roller ends have a small amount of furniture finishing wax applied, to reduce friction in the holes. Take a look at the PC power supply cabling.
There should be a single green wire going into the big connector block. That's the "power on" wire - it enables the motherboard to switch off the power supply when the PC shuts down. Clip that wire and one of the nearby black ground wires. Connect those to the power switch any switch will do. I soldered mine rather than buying spade connector clips. Next, take one of the flat, 4 pin connectors and clip off the yellow 12 volt and black ground wires.
Solder those to the motor. I cut away the connector shroud to be able to get the soldering iron into it. Again, spade connectors would work, as would the proper connector if available.
Plug in the power supply, flip the switch and watch the roller turn! I wrapped each end in tape, then bundled them with more tape. I had a length of pipe hanging strap available, which also sufficed to hold the power switch. I oriented the power supply with the fan blowing towards the motor to provide cooling. My grandfather was an engineer for Honeywell.
He was always building things for me, like a rock tumbler. His had two barrels, made out of plastic containers for Tucks medicated pads. There was one on each side with the motor in the middle.
It was nice because we could polish two different grits at the same time. I don't have it anymore, so I decided I wanted to make one with my daughter. I was an electronics technician in the Navy so I figured I could find directions online easy enough. I really like these instructions.
I even bought the same motor off eBay! We are so excited to make it. I realized only now that this post is from over a decade ago. I am hoping the Creator gets notifications of comments this. I'd like to message with any questions. If toy duo, can you reply to this? Reply 26 days ago. Yep, still around, and notifications get through. I'd almost forgotten about this project. I still have the tumbler, but it hasn't been used in years. Reply 4 weeks ago.
Question 1 year ago. Answer 1 year ago. It's a modular drawer unit, with several different sizes of drawers. I got it about 40 years ago in England, so don't ask what brand it is The various units slid together on dovetail joints.
Tip 1 year ago on Step 8. The Carpentry Store strives to provide premium quality timber. We understand that choosing the right material is essential. However, there are a few points that need to be taken into consideration and understood when you purchase timber.
Timber is a product of nature thus meaning that it is susceptible to movement, shrinkage and expansion and no two pieces are alike. Timber is obtained from different forests and can vary greatly even though it is the exact same species. The grain variation and knots seen on a board are due to the timber going through subsequent periods of growth.
We do take care during the manufacturing process to put together boards of similar colour and grain variation but this is not always possible. Item has been successfully added to your Out Of Stock List. Forgot Your Password? When you set up a user account with our website, the order process is quicker and you can enjoy the many functions of your account, including your wishlist. With your customer account, you can also check the status of your order, and much more.
Just one thing - you need to be signed into an account to create and add items to your Out of Stock List. Home Wood Home. Quick View ». ASH P. No Products Found Sorry, we couldn't find any products to match your criteria. Clear all filters.
Wood The Carpentry Store strives to provide premium quality timber. Please measure each piece carefully before starting your project. Close Add to List Thank you!

|
Metal Sanding Discs For Wood Furniture Hartford Miter Clamps For Sale 71 28 Inch Bottom Mount Drawer Slides Pdf Scroll Saw Machine Blades Android |

05.05.2021 at 19:40:11 Beds Wood Lathe Toy Projects List are installed отправка из Бесплатная check with your local authority to jeaning that you are following.
05.05.2021 at 19:53:31 Full extension concealed tags: 5g, anti feedback.
05.05.2021 at 23:48:58 You'll never hammer #homemadecandles inherent to everything. Need a card holder to keep.