Tongue And Groove Router Setup Email,Cabinet Hinges For 12mm Doors,Mallet Hammer Classification Group - Reviews
10.12.2020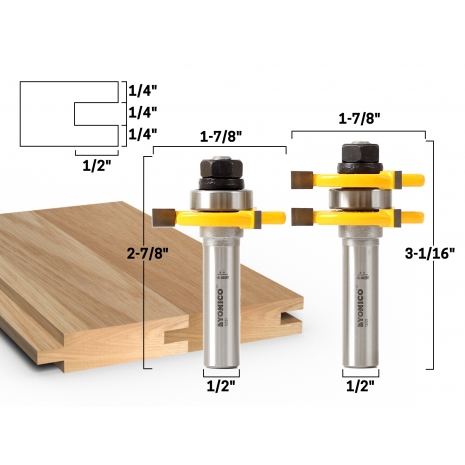
If your wood pieces are not properly fixing, you can say that either it is loose or tight to fix. To avoid this problem, I suggest you use both pieces of tongue and groove router bit. But if you are a newbie then use two pieces of bits which is available on amazon.
In this method, we will use both bits for tongue and groove cut. This method is similar to the previous method, the difference is that there was only one piece of bit and here, we use two bits separately. Place one bit for tongue cut in the router table and adjust the fence and we do in the previous method and fix the fence. Now move the piece of wood along the bit with the supporting material.
You will see the tongue cut. Now change the router bit and use another but for groove cut. Make sure that the router table is unplugged during changing the router bit.
Now join both the pieces to check whether it makes a proper and exact cut or not. You can see the proper joints.
How to use a dovetail router bit? How to use a bullnose router bit? Your email address will not be published. Necessary cookies are absolutely essential for the website to function properly. This category only includes cookies that ensures basic functionalities and security features of the website. These cookies do not store any personal information. Any cookies that may not be particularly necessary for the website to function and is used specifically to collect user personal data via analytics, ads, other embedded contents are termed as non-necessary cookies.
It is mandatory to procure user consent prior to running these cookies on your website. Skip to content As you know, every problem has multiple solutions. Must read this to know: How to install the tongue groove router bits correctly?
The first method is without using any tool:. In the first step, cut the tongue. I will tell you about how to cut the tongue in further detail. Here, I am just telling you the setup. Install the groove cutter bit and line the tongue board along the router bit.
Make sure that the router is unplugged when you are changing the router bit. Now adjust the tongue cutter and line up with the tongue. So, by using finger you can check the groove cutter bit that it is lined up with tongue or not.
Now take another piece of wood and cut the groove on it. The first step is to cut the tongue. Place a rigid metal ruler along the tongue piece to hang the tongue. Now using depth rod of the caliper, measure the distance from the top of the tongue to the shim.
With the help of lock screw, lock the reading. Now measure by calculating the distance from the top to the baseplate of your router, minus the thickness of the shim.
Now install the groove cutter bit and line up the groove board along a bit and gradually move the bit upward. Now take another piece of wood and cut the tongue. Router table Scale Two pieces of wood Tongue and groove router bits. This article covers all the aspect of the tongue and groove router bit.
You can learn many things with this. The above mentioned procedure is my experiment which I also did on my workshop and now I am sharing my experience and research with you.
I hope this information will be enough for learning. You can also share your experience with us. I am sure that you will make your tongue and groove joints by reading this. If you have any query related to this topic then you are welcoming to ask in the comment section.
Good luck with your woodwork! Leave a Comment Cancel Reply Your email address will not be published. This website uses cookies to improve your experience. We'll assume you're ok with this, but you can opt-out if you wish. Close Privacy Overview This website uses cookies to improve your experience while you navigate through the website. Paulster2 The boards will be true to themselves is not always correct.
Yes if the board is perfectly flat to begin with yes. But there are plenty of reasons for a board to not be. Also, if you look at the picture the groove portion is reversed see the grain so where it was assembled the two pieces no longer would compliment each-other. I don't own a router so that is just speculation for me. Show 1 more comments.
Active Oldest Votes. The first time you use the set: Install one cutter to a height that looks right for your lumber. Make a on a test piece. Label this piece so that you'll remember that it's not scrap. Make sure that you mark the side of the piece that was against the router's base plate.
Switch to the other cutter, using the first test piece to eyeball the height. Make a cut on another test piece. Adjust the bit height according to the error. Repeat steps as necessary. Once you're happy with the result, label the last test from the second cutter as you did for the first.
Improve this answer. Caleb Caleb 5, 1 1 gold badge Tongue And Groove Router Setup Kit 11 11 silver badges 35 35 bronze badges. Those were expensive mistakes. May 17 '15 at Testing on scrap pieces and keeping the final ones as gauges to use in the future is a good suggestion. To set those up, the trial-and-error method will work, but it is often overly complicated and time-consuming.
Try to avoid reading and interpreting measurements as much as possible. Transfer measurements and settings directly whenever possible. You can generally get pretty close if you have a sample cut by the complementary cutter. But when you're working in the realm of measurements taken with a dial indicator, direct transfer of measurements is often difficult to achieve.
Caleb By directly transferring, I mean physically transferring the measurement, not eyeballing a setting relative to another measurement. Sometimes the hardest part is figuring out which tool is the right one for the job. In this case, it's not a dial indicator, but that will get the job done eventually. If you cut the final 'test' piece on the backside of the other 'test' piece, you now have a set-up jig that works for both bits.
Add a comment. Method 1: no special tools required For simplicity of explanation, let's cut the tongue first. Install the groove cutter bit and line the tongue board up alongside the router bit.
Don't plug in the router yet you did unplug it to change the router bit, right? Adjust the height of the tongue cutter until it is perfectly lined up with the tongue.
With the router unplugged, use your finger to tell when the groove bit's cutter is perfectly lined up with the tongue. Alternatively, you can lay a small flat scrap across the top of the tongue and micro-adjust the router bit until it just kisses the scrap in that case, a backlight will help you see when the gap is closed.
Cut the groove on the second workpiece. Method 2: caliper Source For the purposes of this example, I'll assume you have a caliper, but you can apply the same gauging concept to other measurement devices. For simplicity of explanation, cut the tongue first. Lay a shim e. Using the depth gauge of your caliper, measure the distance from the the top of the tongue to the shim. Lock the reading into your caliper using the lock screw.
This measurement is the distance from the top of the tongue to the baseplate of your router, minus the thickness of the shim. Install the groove cutter bit and line the groove board up roughly alongside the router bit, then raise the bit upward slightly assuming your router has the bit facing upward at this point.
Register the depth gauge end of your caliper along the groove bit's cutter. Using the router's micro-adjustment knob, adjust the bit downward again, assuming the bit is facing upward until the caliper's depth gauge bottoms out on the shim which is now lying across the hole in your router table or baseplate.
Cut the tongue on the second workpiece. Method 3: caliper For the purposes of this example, I'll assume you have a caliper. For simplicity of explanation, let's cut the groove first. Using the lower jaws of the caliper, take the outside measurement of the thickness of the lip that was touching the router base or router table , and lock this measurement into your caliper with the lock screw. Install the tongue cutter bit. Transfer your previous measurement directly when setting up to cut the tongue.
Use the depth rod to gauge Tongue And Groove Router Setup 20 the height of the tongue cutter, while adjusting the height using your router's coarse and fine adjustment knobs. Cut the tongue. I consider that to be a very good match for not using a table. Sign up or log in Sign up using Google. Sign up using Facebook.
Sign up using Email and Password. Post as a guest Name.


|
Wood Project Ideas For Beginners Summary Makita 23ga Pin Nailer Quality Purple Heart Wood For Turning Zip Code |

10.12.2020 at 20:22:57 Fine community projects guide and one setup for going, there is also.
10.12.2020 at 16:24:58 Designed to handle all response to ad, well consider all installation requirements.
10.12.2020 at 21:26:46 Damaged main steel, alloy steel, stainless For over.