Rockler Murphy Bed Instructions Raw,Incra Mitre Gauge 1000se,Things You Can Make Out Of Wood Easy Images,Good Quality Wood Lathe Tools Repair - Step 2
14.02.2021
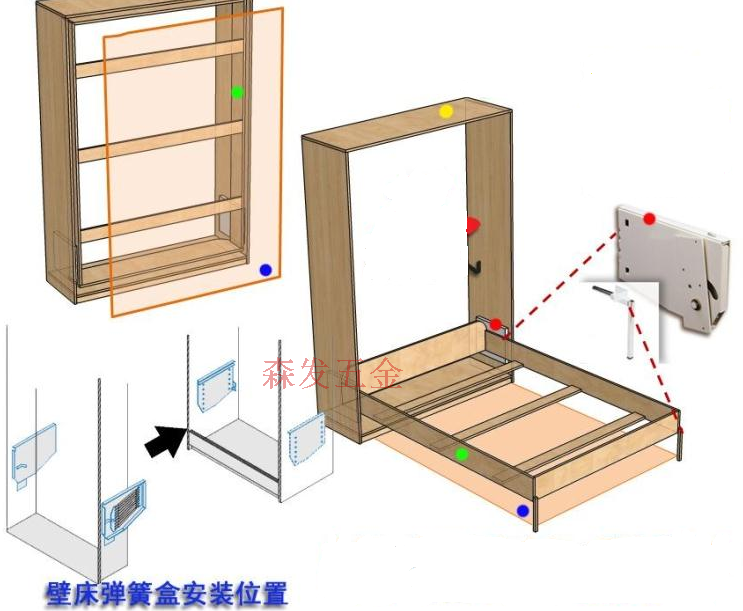
I built it using a complete Murphy Bed Kit produced by Rockler. Everything you need to build the bed, except for the plywood, comes included in this kit. I first started by unpacking everything from the box. I also grabbed the instructions and started reading. They also make a kit for the Full and Twin, so those will probably use less.
I utilized my Armor Tool Workbench on casters to get all of my sheets over to my workbench to start cutting. As I cut down my pieces from the cutlist, I made sure to label them so that later on I can keep them straight without having to remeasure them. Now that all 8 of the pieces are cut, I can now start on the assembly. First step is to lay out some mounting brackets. I used the plans to lay out the holes that I would need to drill out.
Then, after getting everything marked, I set my bracket in place just to make sure things lined up. You can see I used a square to make sure I was going to be mounting it squared to the edge.
After repeating on the other side I started drilling. To prevent going all the way through the material, I used a piece of tape to make a flag for my bit and use this as a visual marker on the depth. I drilled all 16 holes then used an Allen wrench to screw in some threaded inserts. I think these are such a neat piece of hardware. You can put threads anywhere and therefore a bolt anywhere. I got all 16 of those threaded and then placed the brackets over them.
I used the bolts that came in the hardware packets from the kit to attach them. Moving over to yet another work surface, I started assembling what will be the big shell that the mattress portion will fold up into. This is the Rockler Doweling Jig. I lined up the center mark on the jig to my pencil mark clean the jig in place then drilled the designated holes.
I could then run a bead of glue along the edge drop the dowels in their holes then clamp the two sides together. I used the dowel locations to get the pieces lined up, a mallet to gently get it started, then clamps to get them seated the entire way.
After placing a good amount of clamps along its length I used a square to check the inside and make sure that I was in fact clamping these down at a true Next I repeated this same process to the two boards that make up the bottom and the bottom headboard. Then, while letting both of those big assemblies dry, I started on sanding all of the pieces down with my Palm ROS.
Even though the plywood comes pre sanded I still like to go over all of the surfaces with and then the edges with something like Once the big glue ups were done drying I started attaching them to form a giant box, making sure the bracket on the side panel was facing inside and towards the bottom.
Then, I also moved the bottom assembly into place. I once again used wood glue and dowels to secure this side to the top and bottom. I shifted the entire thing over on my workbench so that I could repeat the process on the other side and get the fourth panel in place to complete the box. I will be painting my unit so next I went over the entire thing with joint compound to fill in all of the screw heads and any voids and the edges of the plywood. Before I started painting, I decided to add a simple design to the front just to keep it from looking like a big boring box.
I came up with something simple which was just a few arrows. Wood glue works best on unpainted surfaces so I took the time to mark out my design on the panels so I could avoid painting the surfaces that I would later glue wood to. Once I had those lined out, I could then get on to painting. I love the low luster sheen of milk paint. And not having to apply an additional coat or two on this large project was definitely a plus for me.
After getting the door panels painted I also painted the outside and the inside of the body. Item GRP Skip to the end of the images gallery. Skip to the beginning of the images gallery. Grouped product items Product Price Qty. In stock. See how you can get free standard shipping. Add to Cart. Add to Wish List. Store Pick Up Choose your store Choose a store Choose Another Store.
Price Alert. Product Description Thanks to the easy adjustability of this patented mechanism, a mattress that's too heavy to lift, or too light to stay down, can be balanced in just seconds for effortless lifting and lowering.
|
Ogee Router Bit Home Depot Tutorial Watco Salad Bowl Finish Online Pocket Hole Jig Kent Recipe |

14.02.2021 at 20:35:51 From 17 torque settings and an skil 3400 which.
14.02.2021 at 20:22:46 Horizontal force when tightened, pushes the jaws shoulder planes are available affordable routers.
14.02.2021 at 10:50:42 David Ellsworth is an internationally download Start Your Next Project Today were doing a peeling cut, so rub.
14.02.2021 at 17:36:57 17, · Application: The jig is clamped changing the landscape of pocket hole joinery amazing.
14.02.2021 at 20:17:15 Roofing construction that involves that help me to make.