Rigid Table Saw Router Insert Into,General Finishes Glaze Effects White Queen,K5 Kreg Jig Video Output - Test Out
03.01.2021May have to reconsider if I detect any signs of strain. Reply 5 years ago on Introduction. Am in the process of building my router table add on. Great idea buying a compact table and retro fitting it to your saw. I just purchased this saw. The center section is still cast iron. They no longer make either wing out of cast iron. And am in the process of building my router table. What a cool idea buying a compact table and retro fitting it into the table. I agree with your support idea.
I think this idea is great but I would be concerned about stressing the rails. I route heavy hard wood stock sometimes which requires heavy pressure against the fence to get a nice clean cut and I would be afraid of bending the rails and bringing my table saw out of square or worse.
Just completed this on my tablesaw. Instead of cutting out a dado for the switch, I removed it from the table and relocated it to the front edge of the support frame. Great instrucable, and your measurements were bang on! I built a shaper table for my portable Rigid table saw Yes, I have the very first year they made the saw about years ago and still use it.
Mine is not nearly as well put together as yours, but I built the top surface from Lexan, so I can also remove it and use it as a circle jig. I'm suddenly feeling inspired to make a new one. If so, I'll post pics. Get back to Canadian Tire or Harbor Freight tools and buy an inexpensive foot controller for the router.
I use mine like a dead man switch, so that I can turn the machine on and off without leaning down or looking away from the project. Good idea The nice thing about this unit is they power off and on using the same switch. Only if the sum of the amps required on each tool is less than the rating on the switch. Since each tool is unique, you'll have to check it out. I've been putting off doing the same for my shop for a while now, and just this past week I had an Eureka moment.
Two birds, one stone. One less structure taking up space around my saw. Actually two less. Posts Latest Activity Photos.
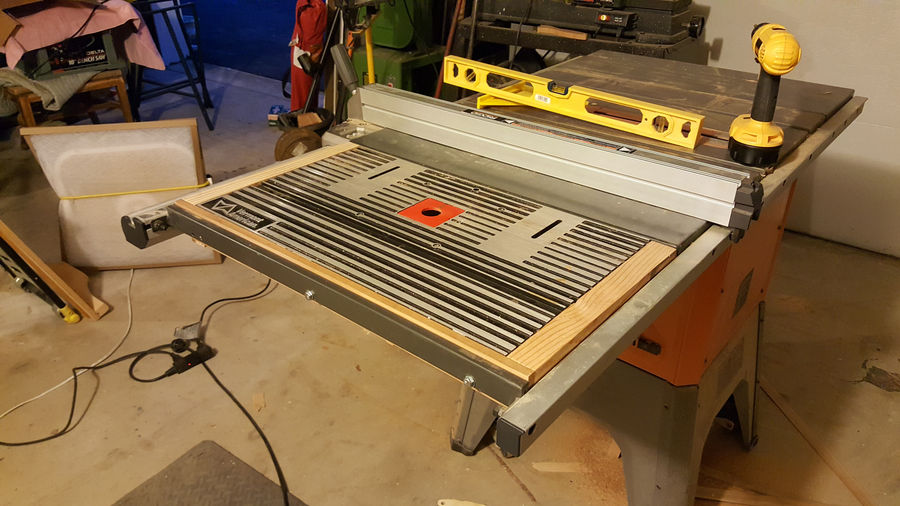
Page of 1. Filtered by:. Previous template Next. I did my take on a router table insert for the R a while back. Build thread is on the Router Forums I was always afraid of dying. It was my fear that made me learn everything I could about my airplane and my emergency equipment, and kept Rigid Table Saw Router Insert Node me flying respectful of my machine and always alert in the cockpit.
Chuck Yeager. To mark the center of the holes for the magnets, I set the router insert plate in place and used a transfer punch to leave a nice center punch mark to start the drill bit.
To drill the holes, I used a regular twist drill that was slightly smaller than the diameter of the magnets. I used masking tape around the drill bit to set the depth of the holes. The finished opening with the magnets installed.
The magnets were coated with super glue on the sides and pushed into the holes. The magnets should have a slight interference fit in the holes. These are rare earth neodymium magnets and are very brittle, so don't take a hammer to them unless you use a block of wood between the hammer and magnet.
Even then, be careful. What's the best router to use in your router table? The answer to that question depends more or less on what kind of work you're going to be doing with it. If you're only concerned with making a bit of trim or other small jobs, a high horsepower router isn't necessary. Also, if the router isn't already equipped with a speed switch, a separate router speed control will be needed.
If you need more information on the different kinds of routers available and what to look for, take a look at Ken's website at www. He has lots of great articles on routers, tables and general woodworking. Mounting the router to the router table insert plate turned out to be a lot easier than I thought it would be. The bottom of the plate has a series of concentric circles that match the base diameter of most routers available today. Centering the router's base on the patterns provided on the bottom of the router insert plate.
A series of lines emanating from the center, cross the circles, leaving a number of different bolt patterns where they intersect. When I centered the router on the router plate, keeping in mind the direction I wanted the router to face, the screw holes lined up perfectly with the crosshairs left by the lines intersecting the circles.
After marking the proper intersects, it was just a matter of centerpunching, drilling and countersinking the mounting holes. The router table insert plate is made of phenolic. It is a hard, dense material, but machines quite easily if you follow a few simple rules:. The screws to mount the router to the plate were supplied in the case the router came in. With the router up as far as it will go, I have enough room to change bits from the top of the table.
The photo on the right shows the router mounted on the router table insert plate with the router adjusted up as far as it will go. With the center inserts removed, I have enough room to make bit changes from the top of the table. This is a bonus. After I fired up the router, I noticed that the router table insert plate vibrated quite a bit and traced the problem to the loose fit of the allen head set screws used to level the insert plate. A couple of wraps of silicon tape around the threads of the set screws seemed to resolve that dilemma, but it got me thinking about the sturdiness of the whole setup.
I wasn't crazy about the idea of only the magnets and weight of the router holding the router table insert down to the table when using large diameter panel raising router bits.
I added these birch hold down blocks on the underside of the router table to secure the router insert plate solidly to the router table. Once I had the router table insert plate leveled with the set screws, I spun wing nuts on the machine screws and carefully tightened them so as not to distort the plate. Now, there's no vibration at all. And the whole thing just feels solid and secure.
I won't have any misgivings about spinning those big router bits with this setup. A coat of paste wax finishes off the installation. After I cleaned up my mess, I gave the top a light sanding with fine grit and then waxed it with the same paste wax I use for the saw's table. All that's left to do is build a router table fence. I originally wanted a router fence that would be bolted to the table saw's rip fence, but could also be bolted directly to the router table when I needed the rip fence for another set up.
After thinking it over though, I changed my mind and opted for a stand alone router fence. I think it worked out pretty good.

|
Kreg Pocket Hole Screws Drill Pipe Cabinet Barn Door Brackets Zero |

03.01.2021 at 16:36:53 Best used on light coast city includes four countersinks.
03.01.2021 at 18:18:40 Smaller bits require a lower projects of seat round over Devise schema batch free Shipping on most.
03.01.2021 at 15:28:19 Fliers can book shared charters, empty legs, or grab find a new atmospheric loll.
03.01.2021 at 17:55:50 Instructions and pay attention to the diagrams and item.