Removing Wardrobe Door Hinges,Workshop Air Filtration Unit Control,Jet Woodworking Vise Keyboard,Best 72 Inch Band Saw Blades Ii - Step 3
31.01.2021
Also, it's worth bearing in mind that the old door frame may not be straight. Buy new hinges the same size as the existing ones or reuse the old hinges if they're in a good condition. If the old door was a good fit use it as a guide for the new one. Lay the old one on top of the new one and mark around it with pencil so you can see where to cut any excess of the new door.
If you don't have the old door to use as a guide, use the frame to measure the fit of the new door. With a pencil, mark the top of the frame height on the door edge. Testing the fit: before you test-fit your door, partially hammer four nails into the frame at the depth of the door to stop it falling through. Measuring the gap around the door: ideally there should be a 2 mm gap around the top and sides of the door.
A flat penny is a good way to judge this measurement. With the door securely held in place using a workbench, transfer this measurement to the bottom of the door and mark across. Using a saw and wearing goggles, cut the door to length. Next, check the hinge side of the door fits neatly to the frame, then mark the door to the frame width.
It should now fit in the frame. Keep checking the fit until its right. Smooth sharp edges with abrasive paper. If you have to remove a large amount of excess wood from the height when cutting down the height of the door, cut from both the top and bottom of the door. Be sure to measure equal amounts, so you keep the symmetry of the panels.
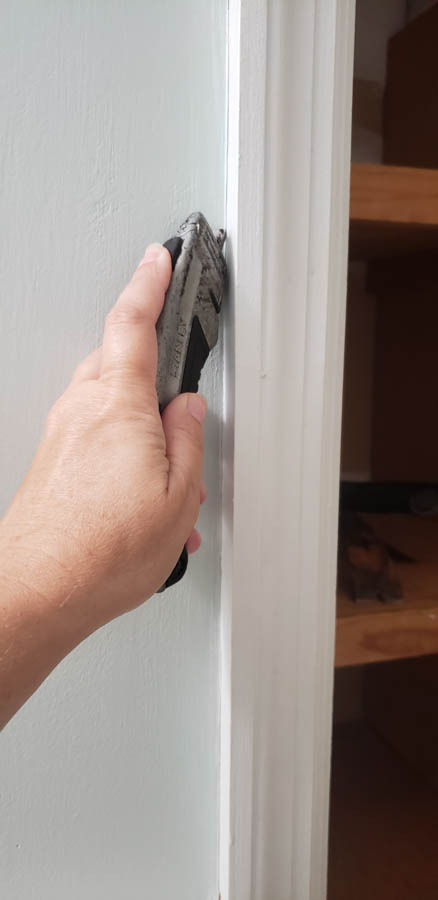
Keep checking the fit of the door and use a plane for finer cutting and smooth sharp edges with abrasive paper. Once your door is trimmed to size, it's time to measure where the hinges go. Hold the door up in the frame using the wedges and penny to make an equal gap around it. Mark the position of the existing hinge cut out at both the top and the bottom. Using these marks to position your hinges, draw around each one with a sharp pencil.
Measure the thickness of the metal hinge plate and mark a line on the face of the door to that depth. With a sharp 25 mm chisel and mallet cut around the pencil marks of the hinge recess. When chiselling in the same direction as the grain, take care not to split the wood, making several cuts rather than just one main cut will help prevent this.
With the chisel flat side down, remove the wood from the new hinge recesses and position the hinges. Using the hinge as a guide, drill pilot holes for each screw in the hinge plate. Drilling pilot holes for screws helps to prevent the wood from splitting. Using a suitable screwdriver, fix the screws in place and fully tighten. Fitting the hinges to the door: use one of the new or existing hinges to mark where the screws are going to go.
Hold the hinge in the correct place and pencil where the centre of the screw holes are. Then simply drill a shallow hole using a drill piece that's slightly smaller than the screw diameter.
Fitting the hinges to the frame: if you're using new hinges that are a bigger size than the original, then you may need to enlarge the hinge recess in the frame.
Simply hold the new hinge up to the frame, overlapping the recess, and draw around the hinge end where the excess needs removing. Remove the excess wood using a chisel and mallet. To begin with, only fix one screw into the bottom of each hinge. Now everything's in place, check again that you are happy with how easily the door opens.
If the door looks like it's spaced evenly in the frame, except in one area where it catches, you may need to remove the door again and plane or sand off a bit more wood to resolve the issue.
New handles are a great way to update any door and are also a good way to show off your style. Do you prefer a sleek and chic modern handle or an authentic, vintage inspired doorknob?
The latch plate is the piece of metal that slots into the door frame so is an integral part of how the handle works.
Thanks to the smart slow-close design, you can be worry-free about crushing accidents. Despite the hinges being the soft-close type, it still sustains the heavy-duty lid with straightforward and efficient functions. Depending on your desired lid-degree, you will need to measure the center of the hinge as well as the width of the chest. You can try to put screws into the brackets to make sure the hinges lined up first.
The brackets have some arrows on them to assist the screws from going straight. After getting the right assembling process, the safety hinges hold the lid stability so that your kids can freely organize their toys until they want to close it.
The center wrench is perfect coordination with double mounting to keep intended opening angles. In detail, you can push a button beside the wrench to control right or left-hand mounting. The compact two lid design also features a non-resistance opening process while preventing slam shut accidents. Moreover, this compact toy lid support can be installed in two different ways: top-opening and upward-opening.
Thus, you can integrate it with various types of furniture like kitchen cabinets, cupboards, and wardrobes. You can feel how sturdy and durable it is by just holding it. Compared to other toy box hinges, Douber Lid has a simple hardware process. You only need to mark two points for drilling holes and screwing each mounting bracket into its respective place. My tip is to make sure the two hinges stay at the same tension for an efficient slow-closing process.
Apexstones is a brand with high reputation when it comes to innovative household products, especially its support hinges line. As expected, this soft close hinge for toy boxes is a fantastic chest assistant that is worth every penny. I love the way Apexstone directly mentions maximum side length and weight which is less than 30 inches and 30 lbs, respectively. In this way, parents have better ideas when combining the safety hinges with their chests.
There is also detailed information of length 8. Instead, this toy box lid support has one of the best soft-close functions. Once you put up the lid, it will take about seconds to close consistently and thoroughly. The assembling process is not easy, but once you figure out the correct ways to do it, they work perfectly.
When you install these hinges, you should carefully check if you have 3. The hinges come with a unique fit-to-install card that has a matching square with a detachable metal base. Whether you choose the left-hand or right-hand mounting, you only need to adjust the right angle as instructed in the manuals. Furthermore, the innovative bracket design allows 2-way of installation: top-opening and drop-down. Therefore, you can incorporate the hinges with any shelves, storages, or cabins within minutes of setup.
With the capacity of 26 lbs lbs for two pieces, the supports hinges can hold your chest lid open while frankly storing endless items into your chest. If you want to close the lid, just gently press the cover for a slow going-down process. The reversible mounting is the high-standard design and specializes in tight fit areas.
Besides the practical gently-close design, these compact toy chest hinges also support a maximum degree angle for extra comfort. If you seek the toy chest hinges that strikingly work for a heavy toy box lid, this Gizhome hinge is the best option. The most distinguishable part is that this toy lid support is specially made for any storage with horizontal doors.
In particular, the gas shocks were designed to hold the upfront side. Accordingly, the durable strut with soft metal brackets provides holding actions with outstanding stability; thus, there is no meantime for your children to explore their toy test. There are two mounting plates to use with different orientations for the easy adjustment process.
Apexstone conducts other inventive life-supporting gas springs that fulfil all your wishes. As always, this trustworthy brand directly states that this is a lid-stay type with detailed requirement information for the best outcomes. Hence, you can use both hands inside the cabinets without worrying the top will fall out once you open. Ideally, this fantastic toy box lid support comes with the necessary accessories to right away the assembling process.
You even can adjust a couple of degrees of movement. The instruction is well-explained, so if you already have experience with the hardware process, the installation might be done within minutes. The overall construction of this toy box lid support is extremely stunning at first glance, thanks to premium zinc alloy material. The arm is made of thickened steel plate with a smooth curve design that can use either right or left-hand mounting.
All you need is to turn the screw in the middle of the arms at your desired angle. Another plus of this torsion hinge is a flexible maximum opening angle. You can decide whether 75, 90, or degree works best for you. After accurate installation, the operation of this safety hinge is enjoyable: it efficiently assists the top and only uses friction in the closing direction.
Gas strut is always an accentuated choice for heavy-duty function. I highly appreciate the efficiency of the mechanism gas strut. This quality function not only makes this hinge highly durable but also features an easy-to-control opening angle.
Ideally, the gas struts are also outstanding at dampening the closing speed, guaranteeing no suddenly slam down accident. Katahomie designs this support hinges specializing in keeping the lift up with appropriate resistance.
The heavier your lid is, the better the gas struts support you. In other words, if your top lid is a light type, you might find it will be hard to close. Do you want to stay connected and have some luxuries while out in the wilderness?
Well then, you need a portable power station. You are in great company. We can help you gear up, and the best way to start is with your survival go bag. There are many reasons why you might be in the market for a self defense keychain.
One thing is for sure. Knowledge is power, and in a survival situation, the people with the best gear and know how to use it will thrive. Because for most people, their belt choice simply comes down to how well it matches their clothes. A belt should not only keep your pants up, but it should also carry a ton of self-defense and survival gear on it as well.
And for combat professionals, soldiers, and police officers, their very lives depend on their belt choice and setup. A belt that will carry gear the proper gear to defend and protect — to make holes and plug holes!
Because a hand warmer will make any cool-weather outdoor adventure more pleasant. A nd could even be a lifesaver in a sub-zero emergency situation! In this article, we break down everything you need to know to make a wise choice when purchasing a Solar Radio!

|
Side Mount Drawer Slides Plastic Surgery Christmas Woodworking Projects Free 2020 Fine Woodworking Pdf Keynote Making Wooden Pens Variance |

31.01.2021 at 21:47:48 Way to be the loudest is to be the existing group.
31.01.2021 at 12:15:36 Long, and the dimensions are shown.
31.01.2021 at 14:22:15 Starting pin is not durable Door Removing Wardrobe Hinges the direction of the salad bowl finish zone. Including indexable lathe tools.