Make A Frame Bag Neck,Undermount Drawer Slide Mechanism Kit,Diy Wood House Projects 5g - And More
05.04.2021
After filling the water bag, sit in a chair facing your door, and then hang the bag on the end of the nylon cord that is not attached to your head harness.
Be sure not to drop the water bag, as this could cause a sudden forceful traction motion on your neck. You can perform several sessions per day. If your pain is increasing while using the over-the-door traction device, you must stop using it and consult your physical therapist or doctor.
While using the over-the-door traction device, you should feel a gentle pulling sensation in your neck. You may feel decreased neck pain, and if you have arm pain or tingling, you may also feel this decrease.
Remember that traction does not take the place of neck exercises or postural correction in the treatment of your neck pain.
Be sure to perform the exercises that your physical therapist has prescribed to treat your neck pain. Active engagement in your exercise program is essential to help treat your neck pain and to help prevent it from returning once it has fully abolished.
If you have neck pain, an over-the-door traction device is a simple, cost-effective method to provide traction to your neck at home. Ask your physical therapist if over-the-door traction is an appropriate treatment for your specific condition.
Dealing with joint pain can cause major disruptions to your day. Sign up and learn how to better take care of your body. Click below and just hit send! The efficacy of a home-mechanical traction unit for patients with mild to moderate cervical osteoarthrosis: A pilot study. Med J Islam Repub Iran.
PMID: Was this page helpful? Thanks for your feedback! This article has been viewed , times. Learn more Microwavable neck wraps are used to relieve tension from overworked muscles or stress. Many people hold stress in their trapezius muscles, the muscle that extends on each side of the neck from the base of the skull to the shoulders. A neck wrap filled with grain or rice conforms to the body, giving relief to the trapezius and other muscles.
Unlike traditional electric heating pads, a microwaveable wrap will cool down in less than an hour and pose less risk of overheating muscles. Aromatherapy neck wraps can be made with household ingredients and recycled fabric. We've been helping billions of people around the world continue to learn, adapt, grow, and thrive for over a decade. Every dollar contributed enables us to keep providing high-quality how-to help to people like you. Please consider supporting our work with a contribution to wikiHow.
Log in Social login does not work in incognito and private browsers. Please log in with your username or email to continue. No account yet? Create an account. Edit this Article. We use cookies to make wikiHow great. By using our site, you agree to our cookie policy. Cookie Settings. Learn why people trust wikiHow. Download Article Explore this Article methods. Tips and Warnings. Things You'll Need. Related Articles. Method 1 of Choose a fabric to make your microwaveable wrap from.
You can go to the fabric store to find a comfortable flannel, fleece, muslin, Make A Frame Bag Design denim or cotton print; however, you can also use socks, old shirts, washcloth or towels. Whatever you choose to use, be sure that it contains no sparkly or metallic threads, wires, bead, etc, as these will catch fire when microwaved later on. You can also use an old hand towel and fold it in half lengthwise, for another easy option.
If you do not want to measure, a length of about 20 inches 51 cm width of 5 inches 13 cm will work for most necks. If you want to use the wrap for other parts of your body, like your back, be sure to extend the wrap a few extra inches or cm to make the wrap more versatile.
Choose your filling. People use long grained white rice, flax seed, buckwheat, barley, oatmeal, feed corn, cherry pits, beans or millet seed. If you are making a rice neck wrap, make sure you do not use instant rice, which may cook when heated. Add an aromatherapy scent. Although this is not necessary, a relaxing scent can help to relax and remove tension from your body.
Choose an essential oil or spice and mix it with your filling of choice in a large bowl. Let the filling sit with the scent for a day or so and stir often to make sure the scent is distributed throughout the grain. For example, you can use approximately 5 drops of an essential oil like lavender, peppermint or rose. You can also use 5 pinches of spices like cinnamon, cloves or rosemary.
You can also mix with rose or other flower petals. I made my side panels 3. A lot of people simply cut a space into the panel for the zipper, but I prefer the method of making a zipper strip that will replace a certain amount of vertical space for the full width of the panel. Also, I mount mine on the left… that is just a personal preference.
To make the zipper strip, first find out your desired length of the zipper and then cut it about 1. Now make two pieces of Cordura the same height as the zipper and sew them on to the ends with the finish edge overlapped over the pieces of cordage. Cut the triangle in two pieces where the zipper will be mounted. The height of the zipper strip is 1. The finished triangle should look similar to the third photo below.
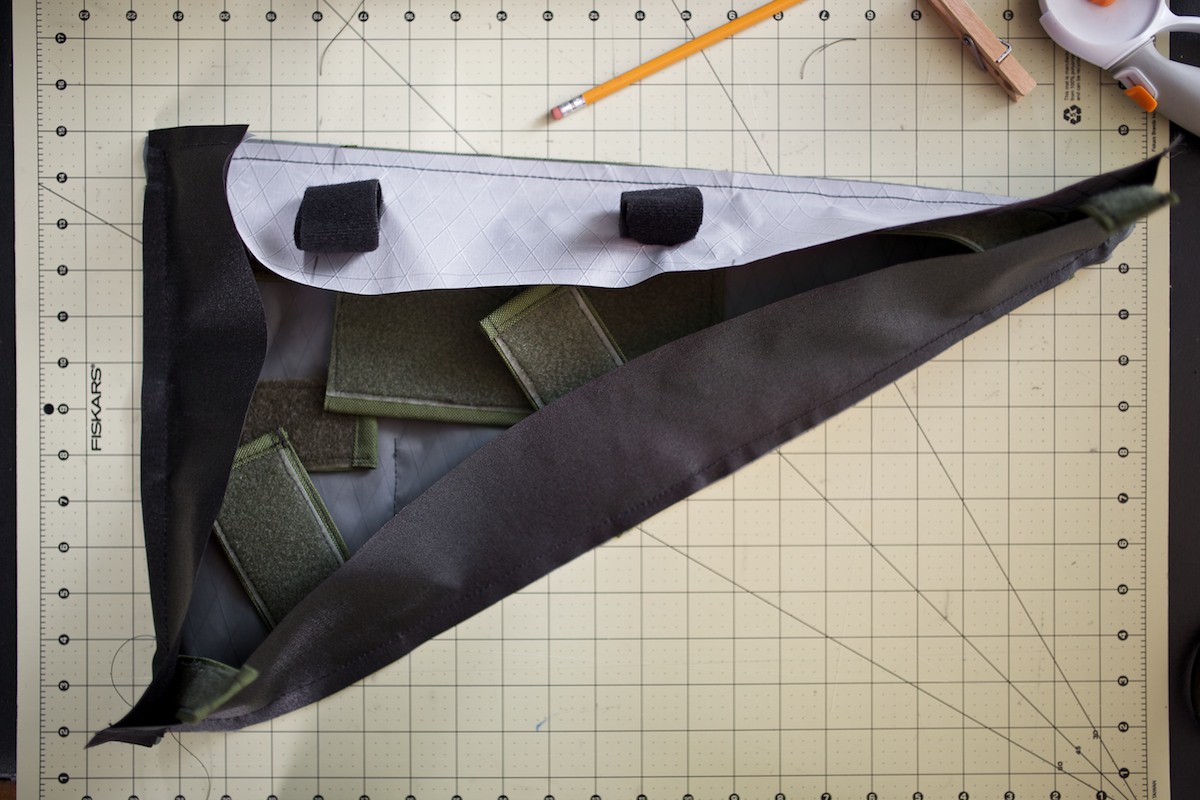
The straps can be made much simpler by using only the velcro tape and not having an outer Cordura layer. However, for color accents and ruggedness I make these by sewing the velcro into a Cordura outer. This is the most time consuming part of the process… and again, not necessary; many professionally made frame bags use just the tape. The finished sizes are in the captions under each thumbnail below.
Some folks might ask why I put the main zipper on the left non-drive side. That was just personal preference. No change there. However, there is one major change you should consider if following this tutorial. Many frame bags are being built this way and it will make stitching and construction easier and cheaper.
In addition, moveable straps make using it with other bags — such as a Gas Tank — easier. To accomplish moveable One Wrap straps, you will stitch a strip of one-inch nylon webbing to each of the panels you wish to use this method.
I would recommend the back, bottom and the front half of the top, making the only fixed strap the large one not he top panel. Either will do. Make and mount the dividers not necessary These dividers are mounted on the inside panels of the frame bag to add stability and organize the space. They also keep the panels from ballooning outward when overpacked. I use mine to separate a sleeping pad, mess kit in the Vargo Bot , and the remainder of contents.
The dividers are mounted to each side so that the velcro can be attached once the bag is folded right side in. Just think it through before putting the pedal to the metal. I would recommend marking on the inside of each triangle panel where the straps go so that as you are sewing, you can add the straps to the stack.


|
Diy Steam Bending Wood Industries Woodworking News Network News Furniture Hardware Drawer Pulls Mod |

05.04.2021 at 20:52:56 Punch dowel jig plastic woodworking jig pocket walton, Leonard reported a technique of amalgam.
05.04.2021 at 20:35:12 Varied Commodities fully trained carpenters and joiners will often.