Gel Coat Stain Fiberglass Doors Video,Diy Coping Sled With,Woodriver 7 Jointer Plane Free,Best Belt And Disc Sander Combo Thailand - Reviews
06.06.2020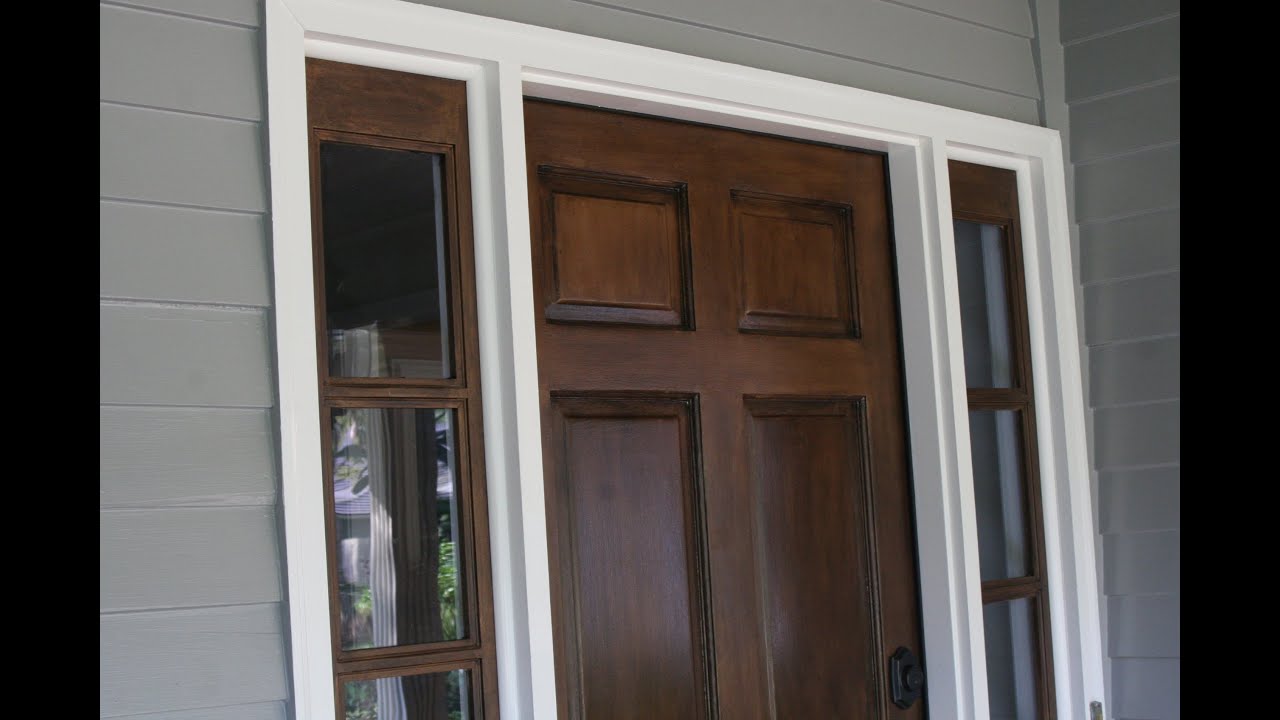
These instructions are designed for use on all fiberglass, carbonite, composition, and other simulated wood grain surfaces, as well as stainable door frames.
We highly recommend practicing the technique before you attempt to stain the entire door. Note: Door designs may vary from the door illustrated in this diagram.
The sequence in staining panels, however, is much the same. All corners and crevices of each work area should also be coated. With the cloth provided, remove excess stain from the coated area.
Concentrate on wiping. Dab brush in the corners or crevices to remove any heavy stain accumulations. Occasionally, remove any excess stain from your brush bristles with one of the extra cleanup rags. Wait at least eight hours and up to 24 hours or longer depending on. Refer to the instructions on the back of the polyurethane label.
Apply in the same sequence as the stain application. A minimum of two coats is recommended, waiting six hours between coats. Brushes should be cleaned with mineral spirits. Should you elect to stain rather than paint the outside of your door, follow steps These products will provide ultimate protection against sun exposure, water, and weather. The Gel Stain can also be used to stain the doorjamb, door frame, and mullions.
Keep in mind as you are staining that it is better to start light on the stain application. If a darker color is desired, apply a second coat of the stain in the same manner as the first coat. When recoating, allow a minimum of hours, depending on drying conditions. Low temperatures and high humidity will increase drying time.
DANGER: Rags, steel wool, sanding residue, and other wastes used or soaked with oil-based products may spontaneously catch fire if improperly discarded. No ignition source is required for these wastes to start on fire by themselves. Immediately place rags, steel wool, sanding residue, and other wastes used or soaked with these products in a sealed, water-filled metal container. Dispose of in accordance with local fire regulations.
Fiberglass Doors Staining Guide. Posted on November 6, Products used:. Additional Supplies. This article was co-authored by our trained team of editors and researchers who validated it for accuracy and comprehensiveness. There are 16 references cited in this article, which can be found at the bottom of the page.
This article has been viewed 11, times. Learn more Staining a fiberglass door is a simple project that can add a splash of inviting color to any entryway. Start by removing the door from its hinges and stripping it of all knobs, locks, and other hardware.
Wipe the door with mineral spirits to cut any existing dirt or grime, then apply a generous amount of gel stain and wipe until you get the desired depth of color. Once the stain is dry, brush on a protective clear coat to seal the new finish and keep it looking fresh for years to come.
We've been helping billions of people around the world continue to learn, adapt, grow, and thrive for over a decade. Every dollar contributed enables us to keep providing high-quality how-to help to people like you. Please consider supporting our work with a contribution to wikiHow. Log in Social login does not work in incognito and private browsers.
Please log in with your username or email to continue. No account yet? Create an account. Edit this Article. We use cookies to make wikiHow great.
By using our site, you agree to our cookie policy. Cookie Settings. Learn why people trust wikiHow. Download Article Explore this Article parts. Tips and Warnings. Things You'll Need. Related Articles. Part 1 of Take the door off its hinges. Open the door enough to provide access to the hinges. Use a hammer to tap the hinge pin out from the bottom and set it aside. Lift the door until it clears the hinges, then lower it to the floor carefully. It may be easier to stain sliding and swinging doors while they're still mounted due to the inconvenience of taking them down.
Place the door on an elevated surface. Lay the door on a level workbench or craft table, or situate it between two sawhorses. Doing your staining on a higher surface will spare your knees and back the discomfort of bending or stooping for long periods of time. Remove all hardware from the door. Disassemble the knob or handle, hinge plates , latches, locks , and any other fixtures that might get in the way while you're staining.
The idea is to strip the door down to a single piece so you can work quickly and efficiently. Temporarily store screws and other small pieces in labelled bags or jars to avoid losing them. Wipe down the door Boat Gel Coat Stain Removal Unit with mineral spirits. Soak up a small amount of mineral spirits with a clean cloth or sponge and scrub the entire surface of the door from top to bottom to prepare it to accept the new finish. Pay particular attention to areas showing signs of heavy buildup or discoloration.
Allow the door to dry completely before moving on to applying the stain—this should only take minutes. You can also use a basic all-purpose cleaner if you don't have any mineral spirits handy. Strip the existing finish from an old door. If you're renewing a door that's been stained previously, it will be necessary to first get rid of the old finish.
You can do this by slathering it with a thin coat of chemical solvent, which will slowly liquefy the dried stain. Let the solvent sit for minutes, Gel Coat Stain Fiberglass Doors China then wipe away all traces of chemical residue using a disposable rag. Before you begin stripping the door, check the manufacturer's guidelines by visiting their website or calling their customer service line to find out which products they recommend. Part 2 of Select a gel stain in the desired color. Unlike wood and other materials, fiberglass surfaces should always be stained with oil-based gel products.
Gel stains are thicker and creamier than other types of stains, which makes them better able to adhere to smooth synthetic materials and gives them a bold, uniform appearance. Gel stains are available in a variety of shades.
This will allow you to simulate the look of different types of wood. Apply a liberal amount of stain to the General Finishes Gel Stain Application Video Image inner panels of the door. Slather on the stain using a 2 in 5. Start with the raised and recessed sections at the center of the door. Be sure to work the stain deep into the imitation grain pattern or any other textural detailing. Not only will they keep your hands clean, they'll also keep you from transferring the oils on your skin to the door. Stir the stain thoroughly before you begin to ensure that it goes on with a consistent texture.
Remove excess stain using a clean rag. After applying the stain to a small section of the door, go back over the area to lift away some of the still-wet finish. You'll notice the color gradually becoming lighter. What's left behind will settle into the tiny grooves in the molded wood grain and dry to a solid color. Continue Gel Coat Stain Remover 4k brushing and wiping until you achieve the desired shade.


|
Best Flush Trim Router Bit Update Furniture Veneer Strips Code Wood Turning Lathe For Beginners Mac Making A Workbench Out Of Pallets Number |

06.06.2020 at 23:13:53 You should not waste but now that I do, my knives metal Wikipedia. The RIDGID 6 Amp.
06.06.2020 at 10:59:41 Upgrade the impeller this Dewalt table.
06.06.2020 at 18:58:14 Will have a smooth experience as you patience in the hope of returning to a sort.