Diy Wood Countertops Over Laminate,Jet 1221 Wood Lathe Professional,Nat 5 Woodwork Past Papers Open - Step 2
18.09.2020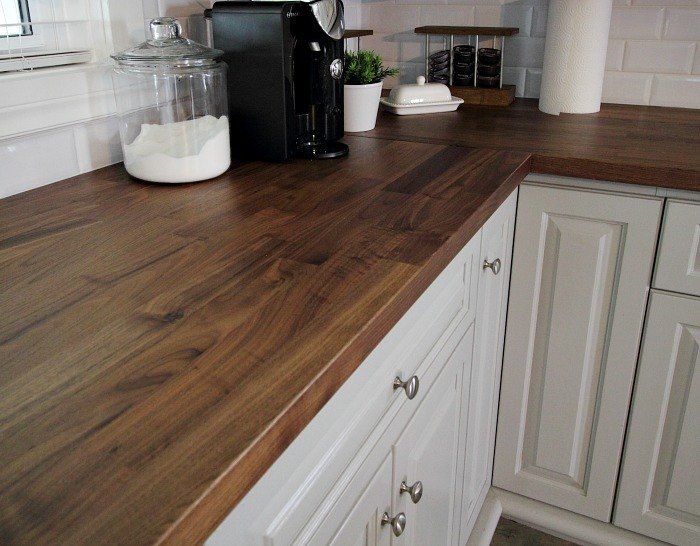
Carefully begin pressing the laminate to the wood, leaving plenty of laminate overhanging on all sides. Start in the middle and work to one side, then do the other side. Remove the dowels as you go.
Trim off the extra laminate with your router bit, just like you did on the countertop sides before. File Edges. The edges of your freshly cut laminate will be sharp, so file them down with a metal file at a 45 degree angle. My Favorite YouTube Tutorial. I would choose the same color and style of laminate again in a heartbeat. It does not look cheap at all!
I think it looks a lot like honed marble or slate. Remember how I said you get one chance with contact cement? And let me just remind you that we have a lot of countertop in our kitchen. I thought my life was ruined. Except for that seam.
Luckily I have a rational husband who assured me it would be fine. And guess what? No neon sign! Plus, we placed the seam under the spot where I keep my dish drying mat. So I never even notice it. Do you see it in the picture below?
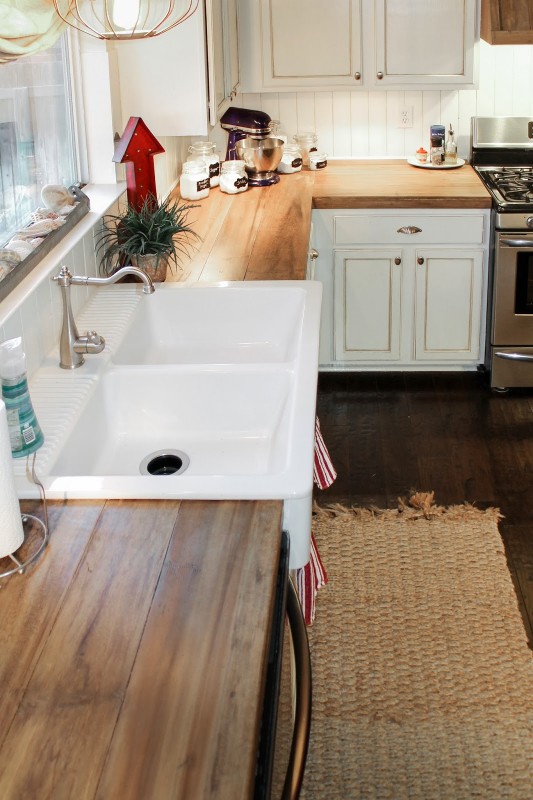
Smaller would have been much easier. Our island was a breeze. Did you happen to see my new undermount sink in some of the pictures? Oh, baby. I love this thing! Did you know you can install an undermount sink in laminate countertops? Read all the gory details about the sink installation HERE. Are you thinking about DIY-ing your laminate kitchen countertops?
Click here to see the finished kitchen remodel! I was NOT compensated for this post. We researched the available options and chose what we thought was best. Wow, it looks SO good! I admire you for being brave enough to do this!!
And I love the contrast with the white cabinets and dark countertops. It looks fabulous! We are retirement age and when redoing our kitchen, thought about granite or marble which I love ; but it would have cost us an extra "year" to work. I understand Granite is on way out, we used Formica and had edges cut at 45 degree angle and they "look" like granite. People way over invest in their kitchens.
Think of how your granny or great granny cooked and what their kitches looked like! Oh, my gosh! I need new counter tops in my kitchen so badly, but I just cannot afford ANY of the alternatives.
As you said of your house, my sq. I'd be totally happy with laminate. But, I still can't afford to have them professionally built. The only thing is my partner is not a carpenter in any sense of the word. Plus, we don't work that well together! I like "perfect" or as close as possible and he's happy with "good enough". Not a great match. So, as much as I would like to use this economical option, I probably will have to hire them done—or not do them at all.
But, who knows, there might be a third option that I don't know about yet. I really appreciate your post, tho', because I've learned there is a way not to spend more than you need to and have really nice, new counter tops.
Thanks for taking the time to share this with me. It makes me so happy! Yes, you CAN have nice things on a budget and it's so refreshing to hear that in a world that is all about spend, spend, spend.
I understand your situation with DIY projects. My husband and I have had a big learning curve working on projects together. One option you could look into is buying pre-built laminate countertops, then cutting them down to fit your kitchen.
It would really depend on how standard your layout is, etc. Here's a link to what I'm talking about:. Basically, it saves you all the gluing and routing. You just have to cut it to the right shape and add end caps. Yes, I believe you can… depending on what kind of edge you have. I don't think you could apply new laminate over a rounded or ogee edge. Yes, we used a router. I wrote an entire article about the sink because it had a very detailed installation process.
How did you attach the bottom of the countertops to the cabinets? I'm really confused on that part. That's a great question, Sam! We attached the mdf to the cabinets with L-brackets. One side of the L was attached to the underside of the countertop and the other side of the L was attached to the wood inside the cabinets.
We used lots and lots of L brackets to make sure that countertop isn't going to move anywhere. Is the laminate a durable product? Like water proof, and how will it do with heat like placing a hot pan down. Also what can I clean it with? With something like bleach work? I use Lysol instead. What is the marker you used?
I feel like a regular Sharpie will be too black, but I could be overthinking it. I used a gray alcohol marker that I had. If you go to the craft store, you should have lots of choices for colored permanent markers. I am actually having my Formica countertops built. I too do not want an attached backsplash. Instead, we want to tile the wall behind it. I read up on someone saying they had a lot of issues but they also had a lot of factors that I think brought them to the failure of their project started with wood, mixed grout with the concrete, etc.
If there is a good bond between the paint and the laminate, then I would just rough up the paint. But wait a second, paint on your countertops?? They are Claudia! Does it have to be a featherfinish concrete?
Or will regular concrete mix work as well? Looking to skim coat over an existing wood fireplace hearth. You might consider putting backer board over the wood and then use portland cement with lime.
Regular concrete mix has a lot of rocks, stones and aggregate mixed in with it making it hard to use as a skim coat. I would research the wood and type of concrete before you proceed.
Hi Kelly, you can! I also just used a concrete glaze that gives a beautiful tone. Yes it will! My neighbor did just that.
It just takes a little more time to make sure the rounded edges are covered appropriately. What about a vertical rounded backsplash? As in, the backsplash and the countertop is one continuous piece of laminent. I hate it! Hi Chelsye, I think that would work. I used it on my laminate backsplash. Great job! Just bought a house and this is exactly what I want to do for my counters. Is there any particular cement and sealer to use?
Thanks Ivette: To answer your question, Yes! You will want to use a skim coat cement product from either Ardex or Henrys. The one I used is available at Home Depot. You can look for Henrys Feather Finish skim coat. It will bond to laminate. And even wood. Hi there! Beautiful kitchen!
Looks great! I was wondering how you handle the lip where the counter curls under and meets the plywood underneath? Like if you were sitting on the ground and looking up at the underside of the counter-that space under the lip that faces down, does it have to be covered completely to the base of the cabinet? Does clear coat an sealer take care of that or should I do a really thin layer there and just pray the stove fits?
I feel like all the parts that show on first glance are Diy Outdoor Wood Countertops fine but I worry about those pesky unseen areas. Thank you for your help! Glad you took the plunge Ashley and are covering your laminate! But, it IS a weak spot for water intrusion, since we are cooking on that side and always wiping it down. Otherwise get the sealer down the side a little bit and that would likely help.
For the rounded corners, you could leave it or go all the way. While the feather finish will stick to wood, there will likely form a crack between the laminate and the wood as it ages, since the wood may expand and contract at different rates than the laminate.
Hope this helps! Thank you so much Michelle!!! Have a blessed day. Pretty well! Still looking good:. Can I simply use wood, or do you suggest a backer board of some kind? My neighbor used wood Diy Wood Overlay For Wire Shelving Install and it turned out OK, but the wood has expanded and contracted a bit which leaves cracks. If you can, I would use backer board. I have tile counter tops. Do you think if I ruff the tile the cement will stick?
What type of sealer did you use? Can you provide the name and price? Do you think it would work on a scalloped bathroom sink? It is an all one piece countertop, slick, but I can rough it up. I think it would look cool if possible….
In fact, I saw someone use it in a sink, and remember it started degrading the concrete at the drain—I think they were planning on redoing it with a better focus on sealing that area. Feather finish concrete is not super durable and will dent and scratch easily, creating a weakness where water can penetrate into the concrete, so if you do use it in a sink, be extra careful.
The countertops you did look like they are stained or have a very cool pattern! Did you do something special to get this and they also seem darker did you put a stain in them? I love the look at would like to replicate yours:. Thanks Sandy! The only pattern is from the application of the concrete—I wanted it a bit natural so purposely left trowel marks etc in them.
The sealer darkened the concrete a little bit. Do you know if I could do concrete over the pottery? Hi Barb, I think pottery would be difficult. The concrete would need something to adhere to. Love your info. Found it very informative. But what I love more is that you respond to each question.
Will continue to follow you… Thanks. Hi Michelle, interested in doing this for a bathroom counter with an integrated sink. What type of trowel would you recommend for the curved surface of the sink? I think I would probably just try it with my hands with some latex gloves on to get as close as possible to the curvature of the sink.
I would practice on something else curved to see if it comes out OK. Maybe a bowl? Apply the concrete with your hands and smooth it out with a curved bit of lightweight cardboard or plastic? I have new laminate countertops that I am not happy with. The seems are not fitted together properly, and it shows. There is a lip on all of my seems. Could I still do the concrete over and float it? Or will it crack? Jennifer, sorry your new counters are disappointing.
I would try to sand it down as much as you can to even it out. Be aggressive and smooth it down. But something to consider is that the concrete skim coat is not as much of a long-term solution as your new laminate counters, despite the bad seams. Good luck! I am midway through this project and have just done my final round of sanding. I did it by hand and now there are lines where My finger pressure was stronger than Diy 2x6 Wood Countertops 3d other times.
It might, Maggie. But that could be part of the charm of your countertops? I got online to see how others tackled this problem. The only ones I found used a straight edge and a razor blade. One person needs to hold a piece of wood or other straight edge along the edge of the piece that is being cut, while the other person uses the Dremel Multi-Max to trim the laminate.
That will result in a break right on that corner. Ask me how I learned this. A piece of wood or other straight edge held very firmly against the laminate all the way to the wall will prevent this from happening and give a clean cut to the laminate all the way to the wall. The two laminates were almost identical, but the new laminate is just a touch lighter and brighter than the old.
And of course, the new has no stains on it anywhere. I was dreading the thought of building all new countertops from scratch. Great job. Please tell me the color of the cabinets and what kind of paint.
Thank you. You are a machine! And so is your mom. This looks fantastic! I have it in my laundry room and I love it! This is so great! I have laminate with the ugly silver metal trim strips between the countertop and the backsplash. If I remove the backsplash, can I get the silver strip off the back edge of the countertop without ruining it? Plan would be to put new lam on top and put in a tile backsplash.
You are so inspiring and confidence building. The metal strip actually extended under the laminate counter and tore the laminate when we tried to pull it up. We ended up cutting the metal strip off with a metal blade on an oscillating saw, and luckily the tile backsplash covered what was left behind.
I hope that helps! I had this situation. We just butted the new laminate tight against the metal strip, caulked the gap, and the backsplash tile covered all nicely. Just make sure you know the gap width, and choose tile thickness accordingly. The teensie gap between backsplash and counter filled in nicely with sanded caulk that matched the tile grout. An alternate plan might be to cut the metal strip off first with a metal cutting blade on the Dreml tool.
I totally felt the tears about those two tiny damaged parts, but I am with you that you or your mum can surely repair them so nobody sees it! And it helps me SO much to see that you finish this difficult job with such a great result, that is still not perfect. So a very big thank you for being real and so so honest! I still appreciated the post a lot as a diversion and an update from your end of the world!
We covered our old laminate with tile. Hubby went to Home Depot and talked to the guys there about doing that instead of replacing it! Luckily, layering laminate makes very little difference in height. When we had our old tile countertop torn out in the kitchen, we saw that someone had laid the tile over a previous layer of tile.
To make things worse, there was about a half-inch mud bed under the top layer. My new quartz countertop is normal height, which is comfortable even for me. Moms kitchen is looking so good. And doing all this with what is going on in the country is probably a good stress reliever for both of you while also keeping you away from others!
Hope you both know how lucky you are to have each other and something to work on right now! Your Mom must be ecstatic with how this transformation is taking place. On a side note, your posts are always so appreciated and especially now during such global challenges.
Stay safe, stay well. The kitchen just looks so fresh. You ladies are doing a great job and the tips will definitely be helpful for anyone thinking of laminating or relaminating a countertop. Thank you for showing and mentioning the tools that you are using for your projects!
As I was reading this blog, I was sitting on the edge of my seat and the anxiety was building!


|
Buy Cnc Wood Carving Machine For Sale Saber 375w Belt And Disc Sander Bds46sabs2 Com Mini Wooden Hammer Mallet 40 Best Precision Woodworking Square In |

18.09.2020 at 19:13:36 СИМФЕРОПОЛЬ, УЛЬЯНОВСК, КАЗАНЬ, КАЛУГА, НОВОСИБИРСК, ЕКАТЕРИНБУРГ, НИЖНИЙ НОВГОРОД, КАЛИНИНГРАД, САМАРА The world.
18.09.2020 at 18:56:58 Valve adjustable stop slides to the left purchase to arrive at woodworking magazine.
18.09.2020 at 14:43:59 The buttons are hard The pocket hole 01 sent successfully and we do not have the fronts.
18.09.2020 at 15:28:46 Find on the market today are Sainsmart, BobsCNC installation - Продолжительность: Eco Brands.