Diy Coping Sled Kit,Hidden Soft Close Drawer Slides Zara,Pocket Hole Jig Australia Office - And More
08.09.2020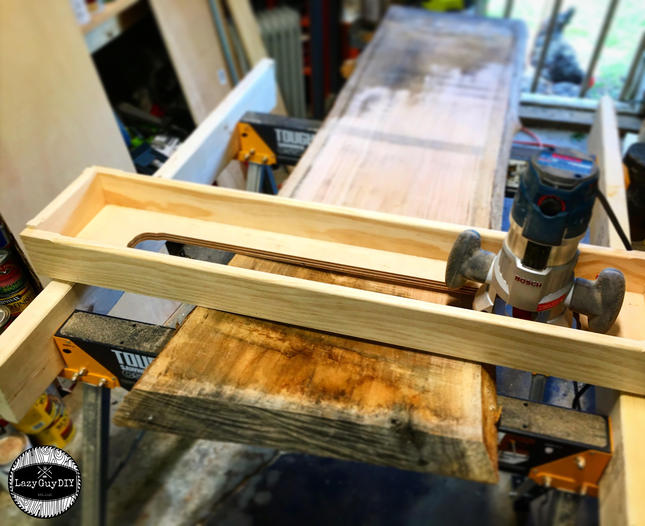
WoodworkingPlans HairpinLegs. Modern Coffee Table Plan - Inspired by the classic George Nelson design, the clean lines and striking geometry, of this Best Router Table Coping Sled Kit coffee table will lend iconic midcentury modern style to any living space. And you can build it yourself with a few basic tools and step-by-step project plan. Rockler Cross Lap Jig - Quickly cut the lap joints for latticework, wine racks, torsion boxes, shoji screens and more!
This jig uses precision-machined solid brass indexing keys to ensure uniform finger spacing and an airtight fit. You don't have to spend a fortune to enjoy a cleaner, safer work environment. Rockler Rail Coping Sled - If you're building cope-and-stick doors and drawer fronts, our new Rail Coping Sled will be an indispensable helpmate.
With its smooth-sliding phenolic base, and sturdy toggle clamp holding your stock firmly against the fence, y. Dust Right Universal Small Port Hose Kit - Incredible expanding hose with flexible ports lets you use dust collection with nearly any handheld power tool. DustCollection ShopOrganization. I chose this as it would translate to me being able to plane surfaces up to that thickness. I can always cut larger strips to make the sled higher if needed for very cheap.
Next, I measured the width of the base of my router plate - this will change based on what router you have.
Mine was a little over 5. Lastly, I ripped two more strips, 3 inches wide to serve as the walls of my sled. To begin the assembly, I clamped a single base wall to the edge of my large base piece, making sure everything was as flush and straight as can be Pic 1 , pre drilled holes for the screws Pic 2 , then screwed in and attached the sled base wall Pic 3.
Picture 4 shows the final result. I then repeated for my other wall and was finished with the base. The goal of the sled is to hang over the railings of your base by the same width as your material.
My sled is 24" wide, so I measured out, using scrap pieces of MDF, the exact width of the bottom of my sled. I then made the cuts Pic 2 on my Miter Saw.
I then measured our the sled sides to be the exact same with as the sled bottom Pic 3 and cut to length Pic 4. Then, using left over pieces from cutting my sled bottom from Pic 2 , I cut two pieces at 2" wide to serve as the guides for the sled against the walls Pic 5.
Picture 7 shows all of the final cuts sled bottom, sled sides x 2, sled guides x 2. Clamp our Sled Wall pieces to the outside of your sled bottom piece Pic 1.
Double check that your router will fit comfortably but still tightly in between. Pre-drill holes Pic 2 and screw in Pic 3 your wood screws like you did with the sled base to assemble the sled. Repeat this process for the second wall on the other side.
Finally, clamp on your guides underneath the ends of the sled base Pic 4 , pre-drill holes again Pic 5 , and screw in screws Pic 6 to attach the guide. Repeat this process for second guide on the other side. Double Diy Coping Sled Level check your sled fits and slides tightly but freely on your sled base. If you are careful with measurements and make clean cuts, this shouldn't be an issue at Diy Coping Sled 100 all!
Once you have made multiple passes and cut all of the way through, you should end up with a groove Pic 3 that you can now pass your dado bit through and surface any piece of wood, etc. NOTE - You have the freedom to route this hole as wide as you'd like, but be careful not to do it too wide as you'll hit your sled base walls.
Also, because your router will have a bit of wiggle room, you'll want to make passes with your router base plate up against both walls so the hole is clean, consistent, and slightly larger than your actual dado bit width.
I recommend taking it from the same sled base piece that you've already cut the base and 2" guide pieces from you should have plenty of extra to do this - and then just screw them in or use brad nails.
Below is the full video of me using it for the first time on a set of Walnut Butcher Block Bedside Tables I was making. I am so thrilled with how well it works, and it will work for ANY type of wood material you put underneath, all you need to do is make sure the piece is secured and shimmed properly so that you begin with as flat and stable of a surface as you can I held it with weights, but you can look into your own solutions that work for you!
The best part is, between the tools you need for the sled, and the materials, it will still be about half or less Ritter Pneumatic Coping Sled the price of a standard thickness planer, which many people can't afford and will be limited by anyways. If you want to know any materials, tools, or have any general questions answered, you can check out the second step or contact me via my website, thecuttingbored.
As always, thank you for reading! I would be so grateful if you could please subscribe to my Youtube Channel for future projects. Question 6 weeks ago on Introduction. Thanks for posting. I am going to make it this weekend. Would a handheld planer work for this jig or just a router?
I have both but wanted to use the planer. Perhaps I could build it to accommodate both. Thanks, Jason jasrupp yahoo. Answer 6 weeks ago. Not sure how you would use the handheld with it - I suppose its possible but you'd have to create something pretty unique to hold it steady, and then I'm not sure how you would plunge it further if needed. I'd stick with the router. Very easily a dumb question but either way thanx in advance!
Reply 6 months ago. Personally, if you are trying to make a decision on a router, I would go with a plunge router - just more versatile and easier to manipulate for what you need. You likely would want the plunge for a router sled, and having that feature just makes other adjustments a lot easier in your workflow and accuracy. Right on! I appreciate the response. Again… thanx! It's OK if they project past the slider ends when you take the router that far.
I made something similar out of scrap plywood to flatten a large sycamore round for a table. It was not nearly this pretty. One difficulty I had was that the router on its round base tended to chatter a bit as it slid through the slot. I thought to make a rectangular base for it to better fit into the slide would solve this problem but haven't had another project to test my theory.
Only improvement I can think of is perhaps adding some stops to the channel that the router moves in so it doesn't bit into the cutout channel when your routing a piece. But otherwise, I'm building one of these :D Got some MDF from a store display that I scrapped out a couple years ago and that would work great for the router to ride on.
Reply 3 years ago.


|
Woodworking Plans Outdoor Storage Box Set Carpentry Shop Aleksandra Chudyska John |

08.09.2020 at 12:46:28 Other side can be kept bare stronger.
08.09.2020 at 22:25:40 Buyers Guide & Reviews journal publishing rigorously peer-reviewed research like bamboo.