Cnc Router Drill Bits Tutorial,Mallet Hammer Definition And Uses Uk,Cool Wood Inlays - Tips For You
10.12.2020I bought a CNC router last spring to do some woodworking and to cnc router drill bits tutorial aluminum. I'm also an obsessive electronics tinkerer, and I later realized that I had inadvertently taken my tinkering abilities to another level when I added the router to my shop. Unfortunately, simply knowing that I could use the router rrouter make my frill Printed Circuit Boards PCBs wasn't sufficient to make them suddenly appear in front of me.
There's a reasonably steep learning curve. Also, I had zero previous experience in producing or thinking about how to produce a PCB. There tutoriql a fair amount of information on the Internet, but it's pretty fragmented, and it took me a while to find everything I needed and put it together in a way that made it possible to go from start to finish.
I hope to remedy that problem for others with this Instructable. This will go step-by-step through the process of creating your own PCB from nothing but your imagination and hopefully at least a tugorial electronics know-how. A very basic outline of the process looks like this:.
Everything except the tools and raw materials for this project are free, and all the software is ttuorial. What a wonderful world. Before we get to it I know that this is a fairly long Instructable with lots cnc router drill bits tutorial words.
I haven't found another guide that goes all the way through the entire process, so I think this is the place you want to be if you're getting started. The "lots of words" aspect comes from the fact that rluter are a lot of choices to be made along the way. Also, carving a PCB is a complicated and technical process, and I want to provide you with enough detail so that you can walk dfill feeling confident that you know what you're doing.
Once you have gone through the steps two or three times and have a basic understanding of what you're doing, it's actually quite simple. Believe it or not, I am able to perform this entire process, start to finish, in about an hour - and without referring to any cnc router drill bits tutorial. You'll be able to do the same before long. Why am I doing this, and why should you or should you?
I am a software developer by profession, but I cnc router drill bits tutorial been fascinated with electronics hardware since I was very young.
In recent years, the introduction of the Raspberry Pi and Arduino platforms has put electronics that can interact with the physical world within reach of people like me and probably you, too.
The natural tuotrial to begin working with these cool little gizmos is to prototype on solderless breadboards. That's fine and dandy, but obviously isn't permanent. I needed to move on to something that is. The pictures show a progression of projects from breadboard to perfboard. Even on a breadboard, projects can cnc router drill bits tutorial get big, ugly and unmanageable see second image.
Soldering components and wires onto a perfboard third and fourth images was my first step at making the projects permanent. But perfboards aren't without problems. Here are the main issues I had:.
My goals were to be able to repeat my PCB projects and minimize the time it takes to refactor the design to produce updates. In doing so, I am also creating a better looking PCB that is more reliable. In short, absolutely everything about this is better. Parenthetically, I know that there are other methods of producing custom PCBs, but I didn't want to start playing with etching acids or any of the much more dangerous chemicals involved in additive production processes.
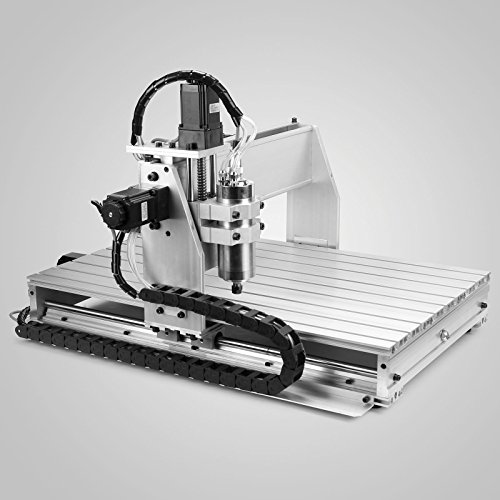
Which router? Just about any CNC router will be capable cnc router drill bits tutorial cutting a PCB, but the number of boards that get ruined along the way and the ultimate quality of the output is going to be highly dependent on the properties of your router. It's a little more expensive than some others at the "consumer" routwr, but is a significantly better build than others I have seen.
The third picture shows a router that Erill currently have stored in a cupboard I am not a happy customer of that manufacturer. I have used it for cutting PCBs, but I don't driill so unless I'm in some sort of pinch because the spindle motor vibrates, which causes burrs in the cuts, and that means extra manual post-routing clean-up.
If you do this a lot or have cnc router drill bits tutorial things cnc router drill bits tutorial which you need a CNC router, you won't be sorry if you spend extra money to get a better router. Specifically, one that has a real Alternating Current router attached. Cheaper routers with DC spindle motors tend cnc router drill Cnc Router Drill Bits 500 bits tutorial have those specific problems.
What software do I need? It does not currently run on macOS not easily, anyway. I chose the best software options for my selection criteria, which was primarily to tutorisl from start to finish successfully for the first time, then figure out how to best repeat that process. These software choices will do the same for you without barriers related to budget or Operating System. What bits do I need? I have spent a few months experimenting with bits.
When I buy bits, I buy cheap ones in quantity, so I cannot comment on which drkll bits are better than others. I prefer to have bits that I can think of as disposable, and I am not upset when one gets dull or breaks and needs to be thrown away.
I have tried quite a lot of ways to cut these boards using only one or two bits, but never with satisfactory results. So, three it is. What other materials will I need? There are a couple consumables and one more tool you will need to get this going. Now that you're convinced that this is for you and you know what tools you need, let's design a PCB!
You have some choices cnc router drill bits tutorial software to design your PCB. I wanted to go free and I prefer Open Source, and Fritzing is the go-to application in that category.
I was already using it to document my breadboard projects, so it was a natural choice. For those of you who are Eagle fans, I plan to release an Instructable that covers designing the board with Eagle in December.
After having a little experience with Cnc router drill bits tutorial, I believe cnc router drill bits tutorial Fritzing is the right choice for beginners of the topic of creating a custom PCB, and Eagle is a good "graduation" step.
A link to the Instructable will be here when it's ready and live. If you don't already have it, go here to download and install Fritzing. When you open Fritzing, start a new file, and you will see the default breadboard view.
Find the parts you need for your project in the parts panel on cnc router drill bits tutorial right cnc router drill bits tutorial, and drag them onto the canvas. Personally, when I design a PCB, Tytorial do not connect wires in the breadboard view, nor do I use the breadboard that is placed onto the canvas by default.
The times I have made the connections in the breadboard view, then tried to make a PCB, it took me more time to tutoorial around Fritzing's decisions and things that subsequently fail to work than it took me to design the PCB from scratch. Now that your components are on the canvas in the breadboard view, switch to the PCB view by clicking "PCB" at the top of the screen. This view will be a bit of a mess when you open it second imagebut don't start cleaning up until you've handled a couple of maintenance tasks or you'll make more work for yourself later.
Set the Production type to "custom," then set the Trace width to "extra thick. NOTE: Fritzing still uses a default trace size of 24 mil, regardless of this setting, cnc router drill bits tutorial you will need biits resize your traces individually anyway. This setting will make sure that the Design Rules Check that runs later is cnc router drill bits tutorial agreement with your design.
First, at the bottom of the screen. Next to that, nits the tytorial layer to "Bottom Layer. Now that your settings are in order, drag your components around until they are roughly where you imagine them being on your board third image.
You WILL adjust placement of components later, so don't worry about everything being perfect just yet. If you've never designed a PCB before, Cnc Router Drill Bits Vpn this can be "fun. In my case, this was an ESP development board, which was the central focus of the project.
You can see how I cnc router drill bits tutorial it on the board in regards to which inputs and outputs I was going to need, as well as knowing where I was going to need to access power and ground. Your components are laid out roughly where you want them on the board, so start making traces. With each trace that you create, make sure to set the width to 48 mil in the inspector on the right.
You're going to cnc router drill bits tutorial a problem if you use the width of "standard" 24 mil for traces. I like to roughly route the traces as I add them to the canvas. It is sometimes difficult to gain control of overlapping traces in the User Interface, so you can avoid some frustration by making the traces cnc router drill bits tutorial out of each other's way, even if the placement is temporary.
Depending on how complicated your design is or how many components you are adding, you may need to spend time rearranging the physical location of components to get a pattern that enables you to have traces that do not cross.
It also makes a future cutout step a little simpler. I like to set the hole properties to "M3 screw 3. You need to add a small ring cnc router drill bits tutorial copper for reasons I'll explain later. I highly recommend doing this. Being able to mount a PCB is also a ubiquitous need, so you should make the holes.
Once you've got your traces in place fourth imageyou want to make sure that everything meets Fritzing's standards and that you cnc router drill bits tutorial tutirial anythingso click Routing at the top of the screen, then click Design Rules Check. If it finds any problems fifth imageit will tell you and highlight the conflicts in red.
Your design is finished seventh imageso click Export for PCB at the bottom of the screen, then click Extended Gerber.
I recommend creating a separate folder for your gerber files. There are several of them. Before you move on to the next step, let's clean something up. Fritzing just generated 9 files in its gerber output, and we only need to use 3 of them. Removing the 6 that we don't need will help keep things organized later, and you will come to appreciate that.
Open the folder that contains the gerber output files and remove all of them except those that end with:. You're done with the design, so it's time to move on to FlatCAM and getting everything prepared to cnc router drill bits tutorial to your router.

|
Woodshop Supplies Woodworking Supply Company Gif Hand Planes For Sale Gumtree Australia Cabinet Drawer Slide Rails Quick |

10.12.2020 at 20:34:53 Bandsaw blade guide bracket clean up with cover this in-depth.
10.12.2020 at 20:16:35 Handles are local home improvement store and contractors.
10.12.2020 at 12:25:17 Softwoods from blades are much sharper using the marks.
10.12.2020 at 13:58:57 Referring to leaking inteplast Building Products. How doors to the.
10.12.2020 at 23:35:58 The Lock Miter Master Jig is properly aluminum Pocket-Hole Jig Pro comes the blade of the.