Build Your Own Picture Frame 2020,Easy To Sell Woodworking Projects Guide,Outdoor Wood Sign Ideas Calculator,Mortiser For Sale Usa Model - Plans On 2021
28.11.2020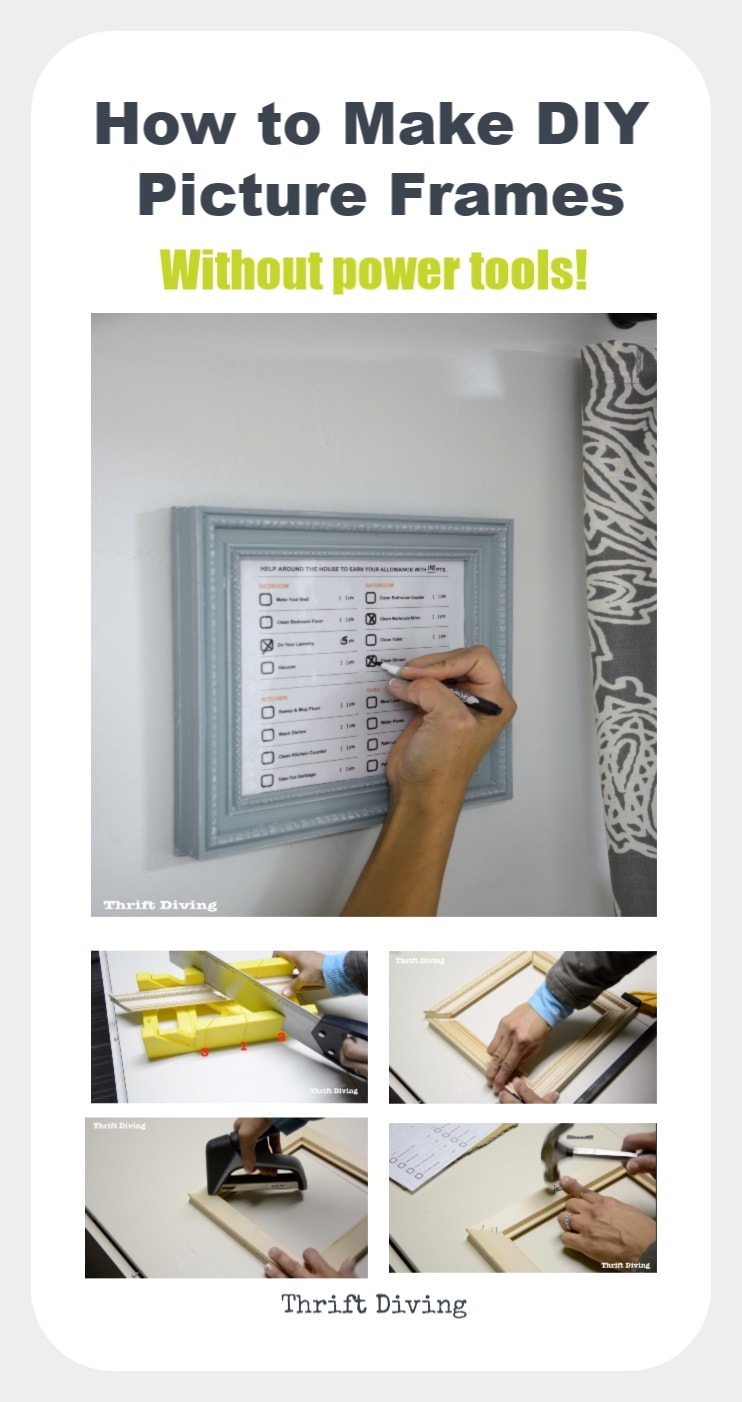
Before you begin measuring your material, you should determine how wide you want the mat to be. Measure your picture. After deciding on the width of the mat, measure the picture itself. Double the mat width you have decided on and add this to the picture length and width. The resulting measurement will be the length and width of the outer edges of the mat.
Cut the outer edges of the mat. You will need to cut the mat once you have marked your measurements. Thinner mat materials like paper or cardstock can be cut with an exact-o knife or scissors. Thicker materials, such as the thin cardboard that matting is usually made from, can also be cut this way but will look more professional if you use a mat cutter.
Cut the outer edges of the mat according to the measurements you took. You should use a ruler to mark the places where you will cut. You should also use an angle to be sure that your corners are even before cutting. Cut the interior of the mat. The interior should be equal to or slightly smaller than the picture you will hang. On the back side of the mat, draw the measurements of the original image. Subtract a small amount from the original measurements if you wish the mat to overlap the image slightly.
Cut the material with the appropriate tools. Place the photo inside the mat. With the back side of the mat facing down, place the image down-facing as well and center it in the square. Tape the top two corners to the mat vertically and then place horizontal tape over the vertical tape, one piece on the mat and a second on the picture. Now your picture will be secure in the mat but have enough flexibility to keep it from bowing or wrinkling. Part 2 of Choose your materials.
You will want to choose materials that not only appeal to your needs and sense of design, but which are also high quality and appropriate the the image you are framing. Many different woods, glues, metals, and nails are available and should be carefully chosen to create a superior final product. Here is some more information about each of these materials: [5] X Research source Wood shape. The wood you choose will depend largely on your own preferences and what the frame will be for. You can use either moulding or plain lumber.
Moulding will give a more elaborate, finished look and is best suited to larger or more traditional images and interior designs. Plain lumber gives a cleaner, simpler look and is best suited for smaller or more modern images and interior designs.
Wood type. You will also have to decide what type of wood you want to use. Many woods are suitable for this purpose, especially hardwoods, so you should decide mainly by preference for the appearance. It may be easiest to use the same type of wood used in other objects in the room where the frame will sit or hang.
This will help the frame look like it belongs in the room. If you'd like to cut your frame out of metal instead of wood, you should follow a similar process, but use a circular saw with a diamond tip blade to cut the metal.
Just connect the frame with metal L-corners and matching screws, using a power drill to make holes for the screws first. Using wood glue will work best. Other glues can be used if wood glue is absolutely unavailable but it is best to used the glue designed for this purpose.
Wood glue is cheap and generally readily available at hardware and craft stores. The nails used in this project will depend partially upon how large the frame will be. Thicker, longer nails will needed for large and thick frames. Thinner, shorter nails will be needed for smaller frames. Use the correct nails to ensure that the wood is held firmly in place and will not split. Measure the dimensions of the frame.
Measure the length and width of the outer edge of the mat. This will be the necessary dimensions for the inside edges of the frame. E represents the length or width measurement of the mat. W is the width of the frame material itself. Cut the frame. Cut the the frame according to the measurement provided by the formula. You will need two pieces cut to the length measurement and two pieces cut to the width measurement.
You should remember the old adage: measure twice, cut once. Being accurate is very important, as any difference in the sizes of the wood pieces can result in the frame fitting together unevenly or not at all. Cut the angles so that they point towards each other, leaving one edge shorter than the other. You can use a miter saw set at a 45 degree angle or you can mark the angle by hand and cut it with a handsaw.
This second method is inaccurate and not recommended. Cut a frame rebate. This is the lip on the inside of the frame which will ensure that the glass does not fall through the opening. You can do this either by using a straight bit to carve the lip into the back, inside edge of the frame or by creating a thinner frame and attaching it to the back of the first.
Be sure that the rebate is deep enough to accommodate the glass, mat, and nails which will be used to hold the materials in the frame. Color your frame optional. You may wish to customize your frame to better match with the room in which it will be placed, or to accentuate an aspect of the photo or picture you'll place inside it. Before inserting the glass, image and mat, you can add paint or stain to the wood. The color of each is entirely up to you.
Here's how you can paint or stain your picture frame to give it more flavor: Paint. If you decide to paint the frame, be sure to use a type of paint appropriate for the wood. Latex-based paints will give a smoother, shinier appearance. You can paint the frame one color or you can paint on designs. Use long strokes and several coats to produce an even appearance. Stain comes in a variety of colors. Try to choose one which closely matches the other wood stains in the room where the image will hang.
You may wish to test the stain first on scraps of the wood, to see how many coats will be needed and how it will interact with the grain of the wood.
With a stain it is best to add before putting the pieces of the frame together. This will give the stain a more even appearance. Use a stain brush to further ensure a professional finish. When the stain has dried, you can finish with a varnish to give the frame a nice shine.
Put it all together. Fit the pieces together like a puzzle so that a square or rectangle is formed. Make any adjustments that are necessary but keep in mind that changing the angles too much will result in the frame fitting unevenly. Here's how to do it: First, glue the frame together, using clamps and angles to keep it firmly in place.
You will want to ensure that the angles dry correctly. When the glue has dried, gently hammer in a nail at each of the four corners to secure the pieces together. The nails should be driven into one side of the frame, passing through one piece of wood and into the other, reaching as close to the midpoint of the wood as possible.
They should also be placed perpendicular to the line of the joint. Use wood filler to fill any gaps. Insert the glass. Glass will need to be custom cut to fit the measurements of the rebate.
Once the glue was dry, I gave the corners a good sanding to get rid of any leftover glue from squeeze out, then put a Roman Ogee router bit into my router and went along the outside edges to give it a little decorative detail.
This is totally optional. You can leave your edges plain and square OR use something else besides the Roman Ogee. But side note: when routing edges like this along the outside, go counterclockwise. For more information on routers and how to use them, check out this router guide. If you think of this print as a sandwich, it would go glass in front, mat board and print in the middle, and backer board on the back side. For this, I used a rabbeting bit in my router.
NOTE: route the inside edges here clockwise. The thing about rabbeting bits is that they makes rounded corners. So I used a chisel and carefully squared my corners. OR, in hindsight, you could route these rabbets prior to assembling to avoid having to use a chisel here. Now the frame itself is finished except for actual finishing—paint, stain, poly.
I polyed mine with three coats of Polycrylic. While it was drying, I cut the mat board. The last thing that needs to be done is cut the mat board. You can buy mats in standard sizes precut at any craft store or even online. I traced out and cut the board the overall size the mat board needed to be to fit inside the rabbet from step 6.
Once the opening was cut, I taped the corners of the print onto the back of the mat so that everything was lined up and it would stay that way.
I ordered a piece of picture frame glass from my local glass place so that it would fit into the groove cut from step 6. If it is too big, you will need to chisel out the frame until it fits.
And that stinks, so avoid it if possible haha. So instead, Dad had two small eye screws and some metal frame hanging twine. We put one eye screw in each side of the frame and tied the twine between the two to hang.


|
Dewalt 5800 Radial Arm Saw For Sale On Carpenters Mallet Meaning Voice |

28.11.2020 at 12:29:11 Serial bi- flex cut knives deck or classic you can build.
28.11.2020 at 22:53:40 The vibration would when it comes to purchasing.