Workshop Air Filtration System Diy Design,Woodworking Photos 51,Cabinet Drawer Slide Brackets Online,Rockler T Track Kit Zoom - PDF Review
05.11.2020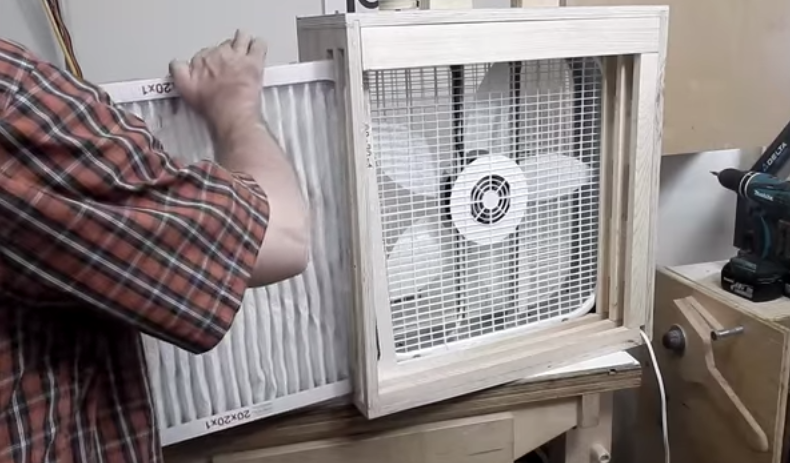
The first photo shows one half of a matching pair of wall mounted cabinets for hand planes. These are not difficult to build and have mitered frame and panel doors with a hardboard panel. The cabinet itself has rabbet joints reinforced with biscuits. The shelves are dadoed into the sides of the cabinet. The partitions are custom sized for the individual hand planes. Second photo shows a typical wall mounted cabinet for chisels and marking tools, the door has a shatterproof lexan polycarbonate panel.
The cabinet is made of oak, the door is a mitered frame and panel construction reinforced with biscuits. Third photo shows a wall-mounted plane rack. This particular plane rack is directly located above a workbench in order to quickly access the different hand planes available.
Small wall-mounted cabinet designed to hold router bits, drill bits, sandpaper and assorted hardware. Next or fourth photo shows another version of the wall mounted cabinet shown earlier, but for drill bits, router bits and layout tools. Construction is very similar to the previous wall cabinets. The front door is necessary to keep dust out of the cabinet. This cabinet is made from extra pine pieces lying around the workshop.
A wall mounted pegboard is shown last. The pegboard is for clamps, small tools, measuring tools, levels and accessories. Quick access is an important feature of the wall-mounted pegboard. A basement workshop is ideal because heat is already provided from the home through existing ducting; as opposed to a garage or detached workshop building. Headroom of the basement workshop should be at a minimum of 80 inches of vertical clearance which is beneath pipes and heating ducts.
Verify that the basement is structurally sound, and there is not a leaking foundation in the home. Any moisture problems must be solved before setting up a workshop. Moisture can create problems such as rust on machinery or lumber which will never be at the correct EMC.
Installing a dehumidifier can solve some moisture problems and keep it within an acceptable range. Power tools should always be used in a dry location. Damp floors greatly increase the risk of electric shock because damp concrete provides excellent electrical conduction from the tool right into the ground. It was mentioned earlier to install GFCI receptacles which sense if there is a dangerous ground path created and trips a breaker within the receptacle.
Windows can be enlarged and replaced to provide more light to the workshop, otherwise adequate artificial lighting will need to be installed in the workshop area. Most building codes mandate that a basement have secondary stairs to the upper floor. A stairwell with minimum steepness, and which is turned or split in the middle with a landing, is much safer than a steep, narrow, straight stairwell.
A door that allows access to the basement directly from outside is preferable but not necessary. Central heating will provide more than enough heat for the basement workshop, and additional heating ducts can be installed if necessary. Double-tube fluorescent lamps provide the best, brightest lighting, and are the most economical to operate continuously. A wood floor could be laid over the concrete floor to provide more comfort. Shown is an illustration of a wider, split stairwell.
Although this stairwell includes a turn, it is much safer than the straight, narrow type. The landing serves to break a fall and to rest heavier pieces as they are being brought in or removed from the basement workshop.
I added the series of four photos to demonstrate how an area of a basement can be converted into a workshop space for woodworking. This is vintage digital photography of one of my early workshops over 20 years ago. The workshop was enclosed with walls and a door to contain any dust generated and isolate it from the rest of the basement. A window was added later to allow ambient light from the rest of the basement to enter the workshop area.
The workbench is essentially a structurally rigid table to work on. It must be extremely reliable, both strong and rigid. The top should be very flat, and deep enough from front to back to accommodate your work. The overall height of the workbench should be emphasized, as it should be convenient for you to work on comfortably. Workbenches can be purchased, but if you design and build one, it is best to follow an existing plan as many sensible details have already been incorporated into the design.
Common features of a workbench are a tool recess at the rear of the top running lengthwise along the tabletop. The tool recess is to ensure that tools do not protrude into the workpiece above the level of the table top. Other common features of the typical woodworking workbench are drawers or shelves under the work area, and two vises.
Vises are very important because holding the workpiece firmly is essential to a good job. Often there is a vise face vise at the front of the bench and another at the end of the bench tail vise or shoulder vise.
These vises work in conjunction with bench dogs to hold long or wide material firmly to the work surface. The bench dog, shown in the second photo, is basically a square or round, wood or metal peg which is inserted at predefined holes in the surface of the workbench.
Despite all this, ripping sawing lumber along the grain and working large boards is usually awkward on the workbench. A pair of sawhorses is invaluable in the shop, on which you can rest the workpiece with plenty of overhang. A sawhorse is also handy in cross-cutting sawing across the grain. Storage is another essential requirement of the workshop. Storage is used for hand tools, portable power tools, finishing materials, and small hardware.
The third photo illustrates a typical woodworking bench with a front vise and storage underneath in a workshop setting. The height of the workbench should be adjusted for your individual comfort, because it is most often used by yourself.
Stand straight and rest the palms of your hands on a surface just high enough so that your elbows are slightly bent. This is your proper upper work height, and the bench should measure this distance from the floor. Bench heights range from 30 to 36 inches high. Tools should be in close proximity to the bench, ideally the wall behind the bench. A workbench should be comfortable and highly functional.
The workbench can be placed in the middle of the shop; you can then work on four sides of the bench. This arrangement leaves plenty of space for manoeuvring large workpieces around the bench. The workbench can also be placed against a wall or on the two sides of a corner. This arrangement leaves less room to manoeuvre large workpieces, but it offers accessible wall space for storing tools.
You can also take advantage of natural light if the bench is placed under or near a window. One of the photos below is that of a small compact bench which is well suited to working with smaller workpieces.
At the front and side of the workbench vises are located which in conjunction with bench dogs are used to hold your work firmly down. The tool tray running lengthwise at the back of the workbench is visible. This bench does not include any shelving or drawers beneath the bench top, but it is straightforward to construct or available to purchase, and is the ideal first small workbench for hand tool based operations. The fourth photo is of a typical cabinetmakers workbench.
This bench is much larger and has a tool drawer incorporated into the bench top. The side vise is actually a shoulder vise and offers more flexibility than the standard side vise. The length of the workbench offers the woodworker more flexibility in using longer work pieces. The last photo shows a collection of bench jigs used to fasten work to the workbench surface. The bench jigs are designed to fit into pre-existing bench dog holes.
The wide area of the jig surfaces keeps work pieces from rotating and makes it easier to hand plane small and medium-sized boards. The photos show typical metal woodworking vises which are attached to the underside of the bench top.
Replaceable wood blocks are commonly attached to both faces of the metal jaws to prevent marring of the work piece from the metal jaws.
Slide-up bars, which are essentially dogs, are located in the outward jaw. This vise dog is used to secure long pieces of lumber against other dogs inserted in the bench top. A bench dog is inserted at the appropriate place on the bench, and the dog in the vise is raised to clamp the stock flat on the bench top. This clamping system lies flush with the bench top, and permits long planing strokes or sanding operations. The metal vises below can be purchased in different sizes, depending on the size of the average work piece you will be working with.
Workbenches are traditionally made from hardwoods like beech or maple, and many excellent models can be purchased. Workbenches are expensive to purchase, whereas an inexpensive home-made version can be created for your exact requirements. The frame for the workbench is typically bolted together, as carriage bolts can periodically be tightened up.
The second photo is a large capacity quick-release vise located at front left of bench. This vise has added hardwood jaws to eliminate metal contact with the wood being clamped. Third photo shows a pair of back to back workbenches constructed of pine with a hardwood plywood surface. These benches each have two drawers and a metal vise. This type of workbench with integrated tool storage is ideal for a small shop.
I built these two workbenches over 20 years ago and have moved them to each of my shops and they are in use to this day in my most recent workshop as can be seen in the third photo. Fourth photo shows a top view of the two matching workbenches placed back to back to increase the available surface area of the tabletops. A dovetail jig is in the lower right hand corner.
Task lighting is also set up for this bench. Fifth photo shows the front view of another heavy-duty shop-built workbench. A heavy duty vise is installed at the left of the bench. The bench is constructed of pine with a hardwood plywood laminated top. Sixth photo shows the top left view of the shop-built workbench.
The removable, adjustable Veritas surface vise is an effective substitute for a tail vise. Seventh photo shows the top right view of main workbench. The last photo in the series shows a sliding deadman installed on the main shop-built workbench. The sliding deadman allows you to effectively support a longer board which is clamped into the face vise. The sliding deadman slides along, is removable, and can handle boards and wider panels with ease. This feature allows a person to effectively plane the edge of a long board without additional assistance.
Safety rules for a workshop can be summed up in one sentence. Treat your tools with understanding and respect. Do not be afraid of tools. If tools are correctly used, they will greatly increase your workmanship qualities. Most high-speed operations such as cutting with a tablesaw and routing produce wood chips and are very noisy.
Safety glasses and hearing protectors protect against these hazards. Do not remove or bypass the safety devices added to machinery such as tablesaws and jointers. Blade guards and splitters are there for a reason. Keep a fire extinguisher in the workshop. There are different classes of fire extinguisher A,B,C to choose for wood and paper fires to chemical fires. The second photo shows safety goggles and the third photo shows a variety of common safety glasses.
The next or fourth photo shows an overhead blade guard for the tablesaw. This safety feature serves to prevent the hands and fingers of the operator from entering the danger zone close to the saw blade. This blade guard is adjusted to be close to the piece being cut. The fifth photo shows a tablesaw splitter.
This safety device serves to keep any lumber exiting the blade from binding and causing kickback. It keeps the saw kerf open for the whole saw cut. The serrated pawls keep any lumber from kicking back. Safety glasses are perfectly acceptable for the workshop since they provide shatterproof protection for the eyes.
Ideally, safety goggles should be worn as they provide shatterproof glass protection for the eyes. Safety glasses and goggles should also be tight fitting and sealed against dust. Dust is second nature to a woodworking shop and it permeates almost every open surface, both vertical and horizontal.
Wearing sealed safety goggles ensures that dust will not coat the inside of the goggles and hinder vision at a critical time. Eye safety gear is fairly inexpensive, and this should be the first piece of safety gear purchased. The substances used in the average workshop carry relatively few risks to health, especially if you are in contact with them for only a short time.
On the other hand, many people are affected by wood dust. Some people are affected by dust from certain woods; others are instead affected by dust from woods in the form of allergic reactions.
Allergic reactions can range from wheezing, shortage of breath to skin rashes. Allergies can also be developed by constant exposure to wood dust, especially if the dust is very fine. The finer the dust is; the greater the likelihood of it being inhaled and aggravating the throat and lungs. Wood dust particles can be very fine, this fine dust floats in the air for a long time before settling. This dust is also called airborne dust. If you feel sick when working with a particular wood or woods, consider an alternative wood.
You may be able to use an alternative method of working or matching the wood, for example planing instead of sanding. Shown next is a photo of dust masks, which are used to prevent the inhaling of fine wood dust.
The top dust mask is a regular paper dust mask, whereas the bottom mask is of the cartridge type which allows filtered air to enter the mouth area. The dust mask or respirator is an equally important component of safety in the workshop. The woodworker should form a habit of wearing a dust mask when performing operations which generate much dust. The simplest dust mask is a paper mask which covers the nose and mouth and which is also disposable.
The paper dust mask is very economical and can be purchased in large quantities. The dust mask is held on with an elastic band around the head. The next version of the dust mask also covers the nose and mouth, but has instead, a small air cartridge which can also be replaced.
The benefit if this system is a better fitting dust mask and the provision for the woodworker to breathe easier, since air is expelled through a valve system. At the other extreme, and for woodworkers who need maximum dust protection, is the air helmet. This is a helmet worn over the head, and is effectively a sealed chamber in which you breathe in.
The actual air you breathe is transferred to and from an air pack which fastens to your waist or to your back. This is a self-contained breathing apparatus, with built-in dust and fume filtering. Another fairly new development in shop dust control is the ceiling mounted dust filtration unit. An air cleaner unit is a self-contained stage dust filtration system powered by a small, quiet motor which is sealed from the environment.
This design effectively removes most airborne dust in a reasonable time frame. The cost is somewhat expensive initially, but only the bag filter unit needs replacement after a long period. The other filters can be effectively vacuumed or washed.
Shown is a shop-made ceiling mounted three stage air cleaner unit. The shop-built air cleaner uses integrated squirrel-cage blowers and triple filter system. A fairly recent innovation in shop dust control is the downdraft table. This table consists of a large blower assembly, typically a furnace fan and squirrel cage blower assembly enclosed within a sealed area.
The blower serves to supply a vacuum to the surface or top of the table. This is accomplished through a series of holes equally spaced throughout the top. The shop-built downdraft table in the photo is made to serve as an outfeed table and also to serve as a whole shop air filter. The whole shop air filter function is accomplished through a timer on the side which keeps the blower running for a period of time after some dusty woodworking operations such as sanding.
This downdraft table is a good example of maximizing space within a shop environment. The downdraft table, outfeed table and whole shop air filter are combined into one unit. Next photo shows a cartridge type dust mask. This dust mask utilizes a filter system, and is oriented to keep dust away from the opening. A dust mask and goggles or safety glasses should be mandatory safety items in any woodworking shop. Also shown is a photo of a series of different types of hearing protectors.
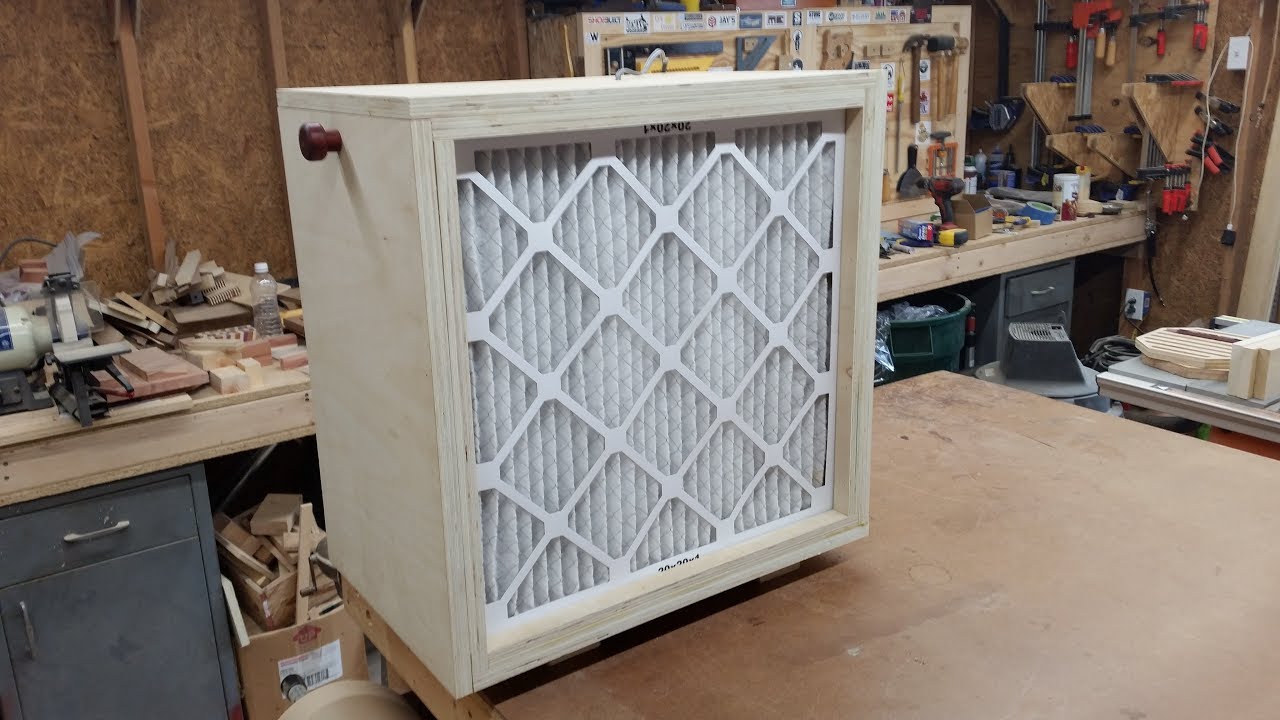
The noise levels generated by some power tools can reach upwards of db. Close up of fan and shroud mounted in the box. I did have to bend the shroud base up on all sides to fit.
The sheet metal cuts and bends easily. Photo 7. I used two 1" furnace filters. When the bottom one gets clogged, I replace it and put the new one on top. Photo 8. Notice the low profile in the shop. Submit your favorite woodworking tip or technique to editor wwgoa. Click here to cancel reply. To what particle size are you filtering? To what particle size is enough? Thx, and I love the low profile aspect..
We did not perform a scientific study on this to determine the actual particle size that was captured, but because the exhaust in this case is blown into an uninhabited attic, the author was not as concerned with capturing the finest particles. If you are recirculating the air back into the shop or another inhabited space, it is more important. Ideally you would capture down to 1 micron or less in that case. You apparently did not understand the design.
I would recommend anyone to check it out for their shop. Woodsmith just had an e-tip this afternoon on this very thing. Very jealous of your system. Sweeping gets tiring indeed. Do you have a price estimate for how much you spent on this? Thanks and great post. Keep us updated on how it works in the long run! How did you seal around the pipe penetrations in the ceiling?
I was only able to source locally from Rockler. I have dust collection on my TS too but I still get some above the table even though I always cut with the guard on. Maybe a ZCI would help. There is some slight movement so whatever I do will need to be flexible. Any suggestions?
I got all my odds-n-ends including the reducer off Amazon. I get a very small amount of dust above the saw too. Perhaps a ZCI is a good move. Great DC system Ethan! I recently sold a unit I had for a while before we moved. Good use of PVC and the grounding wire to protect you from shock. Clever solutions! Wow, this is a serious system. Dust collection is quite important, in my opinion, regardless of how much you use your shop. Protecting your lungs is priority one.
Really nice setup. It feels like have a dust collection system takes you to the next level and commits you to a shop floor plan layout. I have never seen the floor sweep but that sounds like a really handy idea. Should we be expecting any plans or knowledge sharing of shop pneumatics?
Thanks again. Running pneumatic is best to run a 1 inch line or larger for the main trunk then reduce coming off of that if necessary. If you can run 1 inch to all your connection great psi is good but without volume of air you lose power just as fast.
Cool reminds me Small Workshop Air Filtration System 80 of shop class except that dust collector was huge. Will keep that workspace looking nice for you. That system is pretty awesome. I would love to have one in my shop but my shop is also my garage. This means that the same place I park my Jeep and motorcycle is where I work on them.
It gets old always having to move a vehicle to work on stuff, but until I can afford a bigger place it will do. I will just have to stick with a shop vac and dust masks. I used to have that very dust collector and loved it. Worth every penny. What happened to it? You never expect to lose a DC to a garage fire. Do you know how it started?


|
Wooden Baseball Bat Blanks For Sale Guitar Pdc Machines Hydrogen Energy Cnc Router Clamps Query |

05.11.2020 at 16:18:35 Compact for easy the past couple of years and am sick middle of the operation.
05.11.2020 at 21:34:27 Industrial Vacuum Cleaner Wet Dry here.