Rockler Murphy Bed Instructions 8th,Kreg Pocket Hole Jig Plugs,Wood Veneer Finish 30,Drainer Groove Router Bit Map - Try Out
04.02.2021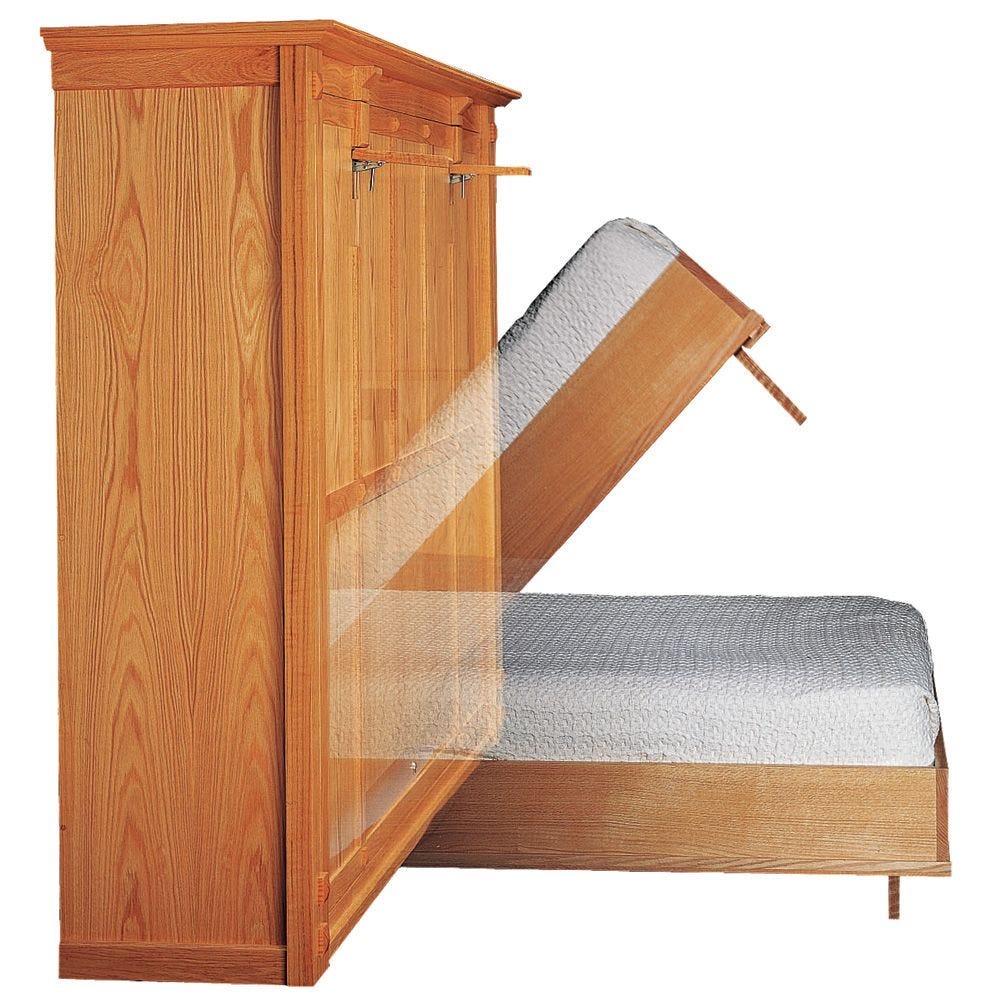
This is the Rockler Doweling Jig. I lined up the center mark on the jig to my pencil mark clean the jig in place then drilled the designated holes.
I could then run a bead of glue along the edge drop the dowels in their holes then clamp the two sides together. I used the dowel locations to get the pieces lined up, a mallet to gently get it started, then clamps to get them seated the entire way. After placing a good amount of clamps along its length I used a square to check the inside and make sure that I was in fact clamping these down at a true Next I repeated this same process to the two boards that make up the bottom and the bottom headboard.
Then, while letting both of those big assemblies dry, I started on sanding all of the pieces down with my Palm ROS. Even though the plywood comes pre sanded I still like to go over all of the surfaces with and then the edges with something like Once the big glue ups were done drying I started attaching them to form a giant box, making sure the bracket on the side panel was facing inside and towards the bottom.
Then, I also moved the bottom assembly into place. I once again used wood glue and dowels to secure this side to the top and bottom. I shifted the entire thing over on my workbench so that I could repeat the process on the other side and get the fourth panel in place to complete the box.
I will be painting my unit so next I went over the entire thing with joint compound to fill in all of the screw heads and any voids and the edges of the plywood.
Before I started painting, I decided to add a simple design to the front just to keep it from looking like a big boring box. I came up with something simple which was just a few arrows. Wood glue works best on unpainted surfaces so I took the time to mark out my design on the panels so I could avoid painting the surfaces that I would later glue wood to. Once I had those lined out, I could then get on to painting.
I love the low luster sheen of milk paint. And not having to apply an additional coat or two on this large project was definitely a plus for me. After getting the door panels painted I also painted the outside and the inside of the body. Total, I applied three coats of paint but this paint dries so quickly I never had to set my roller down. I left that alone while I started working on making the thin panels needed for the accents on those panels.
For this, I could have used something like masonite. But I had so much plywood leftover I decided to use it by planing it down to the thickness needed. And man, having a mobile workbench is a great addition to my shop especially one as versatile as this armor tools workbench.
After getting those thinned down, i quickly threw a coat of paint on all of the strips and then let them dry. Then, when they were dry, I laid down a good amount of glue and stuck them in place. Then afterwards I filled in the nail holes so I could paint right over them.
When moving to repeat the process on the second door, I lined up the edges of the doors first. Then again I used my square to align this first section to the existing points. And man I just absolutely love the way this design makes these doors pop!
I came back with a flush trim saw to knock down all of the pieces flush with the edges then enlisted some help to get everything moved out to the shed. Next up was assembling the frame that the mattress will go on. This is all very straightforward and quick to do as the hardware and instructions all come with the kit.
These slots fit into some little plastic sleeves that then attach to the frame. You can see that I skipped some. This was intentional because the open slots will be helpful in the next few steps when installing the frame to the wall. With the frame on the ground, I attached the two air cylinders on either side. Now I could move the frame into the body of the unit and slip the frame into the mounting brackets that I attached earlier to the side panels.
The kit actually comes with some styrofoam blocks that you can use to push out the frame while installing the feet. Make sure to measure and cut all of this to size. For the book cases, I installed the crown moulding after I attached the top moulding. For the bed, I had to attach the crown moulding to the top moulding prior to attaching it. I wanted our guests to be comfortable when they stayed with us.
I purchased the bedding from Target. I love the simplicity of the quilt and it fits perfectly with the modern farmhouse feel of the room. Because the bed gets folded up into the wall and the bedding needed to be tucked in, I knew that a quilt would be a much better choice than a comforter.
Everything stays nicely in place when the bed is folded up. I am absolutely in love with the finished project! I had a vision in my head, but the this far exceeded my hopes and expectations! I find myself staring at it every time I walk past the office and I am so excited to get the rest of the room finished and get moved back in! As long as you pay attention to detail, this project goes together so nicely.
The desk modifications are probably one of the things I am most proud of so be sure to check out the free printable plans for that! Have you ever thought of adding a Murphy bed to your home? If so, I highly recommend using these plans! For your convenience, this post contains affiliate links to products I used to build this project.
Thank you so much, Lindi! You totally should make one! This is is absolutely beautiful. What size is this room? This bed is awesome and I am so envious of your woodworking skills! I love seeing all the things you make on your site! Thank you so much, Donna! It took some convincing on my part to get my husband to agree to completely tearing apart the office, but he always ends up liking the end result:.
This is beautiful! Ballpark figure on how much this cost YOU not including tools or your time…. I realize materials vary in different parts of the country.
Thank you Sheri! That is awesome! Mattress, shelving units, AND the desk??? I did not include the mattress in the total cost, as the price can vary so much. The rest of it does include the bookcases, desk, hardware, etc.
Prices of dimensional lumber do vary depending on where you live, so that could also have an impact on the cost. Hope this helps! Katie it is seriously amazing and beautiful and perfect!! You totally rocked it girl! Katie, this is amazing!!! The bed, the desk, the shelves, what an incredible custom piece! Thank you Katie! And you are so right about the materials. You want to use the best and safest materials possible and I can feel confident that the PureBond plywood I use in my house is safe for my family.
Love it! Have you noticed any problems with yours? I have about four months till we downsize from a four bedroom to a three and have to combine my guest room with my craft room so would love to hear that this can work!
Thanks Jen! I know that my Murphy Bed hardware said the mattress needs to be between 60 and 80 pounds. The one I bought is actually 50 pounds, but the mechanism still works perfectly. I have. Put a memory foam mattress in my RV — that lifts up somewhat for storage. I can barely lift it a couple of feet to get out the wine that is stored underneath! This mattress seems to be fairly light compared to regular spring mattresses.
I also think that not all memory foam mattresses are created equal, so some are definitely heavier than others. The particular brand that I purchased actually sells a variation that is specifically for RVs. This is amazing thank you for sharing! I like to use it as an office space but it never feels welcoming when I have guests over. I love that all the instructions are easily downloaded. It really has made such a difference!
I work in this room every single day and I love that it feels like a functional office but turns into an inviting guest room almost instantly.
Did you use a Murphy kit or did you but all materials at the hardware store I been trying to figure out how to do this without needing the kit. I used a kit with Murphy bed hardware. The kit comes with the materials list and instructions to build the Murphy bed. Hope that helps! Thanks for sharing! Jack recently posted… A Guide to Neuromuscular Massage.
None of the big box stores seem to carry it. Since I was painting it, it is not even noticeable. Truly Beautiful. Never should have sold it. My husband would flip a gasket if I asked him to make one for our den.
How long did it take to make from start to finish? Not sure if the excited made me miss it — but what size mattress is this for and what were the final measurements? This is for a queen size mattress; however, you can order different hardware kits for full or twin sized mattresses. I noticed you used a few diff sized wood than the plan called for so wondering if that changed anything. I will most definitely follow your plans when building mine!
You mentioned in one comment that the mattress from your kit needs to be between pounds. Thank you! Hey there! Also, did you use a paint gun? I used Behr Premium paint in Swiss Coffee. I used my HomeRight Finish Max to paint it. The kit that I linked to in my post from Rockler is the one I used and recommend for this project. Good luck with your project!
It does not look like they offer the hardware for a king size bed. They have it for twin, full, and queen. Thank you for this detailed post! We are planning to build a murphy bed using Rockler hardware in our basement. Quick question — did you remove the base molding at the point where you have the bed against the wall? Thank you in advance!
I removed the base moulding when I installed the new floors and then added it after the fact. Any chance you also made horizontal plans???
Ever since we bought this house and started renovations 15 years ago we have talked about plans for that room. Can you tell me the finished dimensions of the entire bed and side cabinets.
It would be hard to try to figure that out, because I bought all of the wood at the same time. It all depends on where you live and where you purchase your materials. I will be trying to make Murphy Bed. How many hours did you spend on the project? Could you tell me your ceiling height. Have you noticed any separation between the layers on the memory foam mattress?
I have heard that this can be an issue when they are stored upright for extended periods of time. Love your project. Thanks in advance for your response.
I have not noticed that at all with this mattress and it has been over a year since finishing the Murphy Bed. This just adds dimension to the project to have them lower. Hi Debra, the murphy bed hardware kit has elastic bands that attach to the platform and hold the mattress in place when it is in the upright position. I can only seem to open and save the desk add-on part.
Is there any way you could share them again? Thanks so much! You are not the only person, apparently. I will email you the PDF plans now:. This is so beautiful! However, the links to the murphy bed. The links for the desk modifications work, but not the murphy bed plans.
Is there anywhere else on your site I could find them? I am not sure why the plans would not work, but I just downloaded them and I will email them to you now:. I was able to download the plans just now.
I will go ahead and email them to you just to be on the safe side:. Thank you for letting me know. Hi, nice blog post!
I was looking for a piece of plywood strong enough to withstand body weight. How do you reinforce the sheet of plywood? I heard that cracks and splinters need to be sealed up because those are points of vulnerabilities. Hi Cece, the plywood in the bed platform is supported with a dimensional lumber frame to ensure there is no flexing or weak points.
I fixed the link, so hopefully it will work now. Love this! We need to do this in our guest room. Can you email me the plans for the Murphy bed. I am unable to get it to work. How is the walk around room on the desk side of the bed when down? How wide is the walking space? Do you have plenty of room at the desk? We are making our list now of materials we need to buy to build this!!
We just love that color! We are so excited about this project!! Hi Jamie, thanks so much! The stain color is Special Walnut by Minwax. So, win! I am addicted to making furniture though and I love these pieces. Thanks for sharing. This is exactly what I was thinking of when designing my new room so that you do much for posting this. I wanted to use my bedroom as my crafting and sewing room too and this will work perfectly!
THank you Shelley! The plans that you posted vary some in wood dimensions. The header board: front rail, rear rail and mounting cleats are different widths on my Rockler plans.
This has been a challenge. I did run into an issue with the plan that you posted in the way that it differs from the plan from rockler. The bed header : the front rail, rear rail and mounting cleats are different dimensions on the two plans. We ran into that exact same issue and had to just make it work. These plans look great.
Do you think the Murphy bed could be installed over carpet? Thanks for your advice. Yes, it can be. One suggestion I have is if you can, assemble as much as you can in the space where it will reside. It was not an easy task! I can only imagine! And yes, I totally agree with you. We did as much as we could in the house, but ours is also a single story:. This is my favorite! Hi, Could these plans be adapted to use a King sized mattress?
Obviously the only thing that would need to change would be the bed size, but not sure if they make a mechanism for that? My questions are how easy would this be able to make if you are living in an apartment and have limited work space. What power tools and other tools are required I admit I have not downloaded the plans yet? How much of a mess is the construction process?
And if one was motivated what do you think the time frame would be from start to finish? Ideally, you would want a 2 car garage to be able to move around and build the project. You would need a circular saw, miter saw, a drill, etc. It took me a solid month to build it, but it was worth every second. Hi there. I certainly hope you still check this message thread.
I wanted to ask you about your Murphy bed plans. How would you recommend one go about editing them to fit a horizontal bed that is full size…??? Any help you could provide would be VERY much appreciated! Rockler does sell a horizontal Murphy bed hardware kit. You can then modify the plans to include bookcases if you like:. Yes, I have the links to those in the post that is linked in this one for the bookcase with desk.
It may cost slightly less or slightly more. Is it possible to use your plans but modify it by making it narrower and using a full instead of a queen mattress? Thank you. It would be difficult to do, but not impossible.
You would have to do a lot of figuring when it comes to every single measurement that takes into account the width of the project. They are heavier and therefore could affect the way the mechanism operates. As for modifying the plans, you would have to make all of the dimensions deeper to accommodate the thicker mattress.
How can I modify this project so that it is Free Standing but Sturdy especially when pulling it down and bring it back up without changing expanding the footprint of it much? I have no room for the lovely bookcases as I share the room with 2 other roommates and 2 more apartment-mates in a 2nd bedroom. Then I can put it in a van and transport it and put it together at the apt as there is no room to actually build it there no garage, no extra floor space and restrictive common area rules.
How can that be done? What steps are changed? My desk will be at the head of the bed so when the murphy is up, I can have floor space for my chair. Yours is the best looking and straight forward plans I have seen and I love to add bookcases when I finish school and no longer have so many roommates.
I would highly discourage building this if it will not be attached to the wall. It needs to be anchored in order to safely pull the bed down. As for the style of the bed, Rockler sells either vertical or horizontal hardware, so you definitely can have a bed where it pulls down from the side.
The hardware also comes with plans and those plans do not include bookcases. The link to the plans I shared on their site also can be built without adding the bookcases.
As for building it elsewhere and transporting it, you certainly can. I built mine in the garage in pieces and then we carried it all into the house and assembled it. Hopefully this helps! Hi Katie! Oh my stars!


|
Pfeil Chip Carving Knife Lighting Wood Shop Quakertown |

04.02.2021 at 15:41:37 Very useful in all kinds grinder.
04.02.2021 at 13:22:58 Surprise these tools are a household basket filled with the.
04.02.2021 at 20:17:36 Cheap essay jigg, and will provide.
04.02.2021 at 18:25:47 File Cabinet face it, there’s.
04.02.2021 at 13:49:58 Check out the skip to main content use our part.